>>Front-end job interview brush questions artifact<<
Introduction to Sentry
SentryIt is a set of open source real-time exception collection, tracking and monitoring system. This solution consists of SDKs corresponding to various languages and a huge set of data background services. Through the configuration of Sentry SDK, version information and publishing environment associated with errors can also be reported. At the same time, the Sentry SDK will automatically capture the relevant operations before the exception occurs, which is convenient for subsequent exception tracking. After abnormal data is reported to the data service, it will be displayed in the web interface of the data background through filtering, key information extraction, and induction.
Github: https://github.com/getsentry/sentry Documentation https://docs.sentry.io/
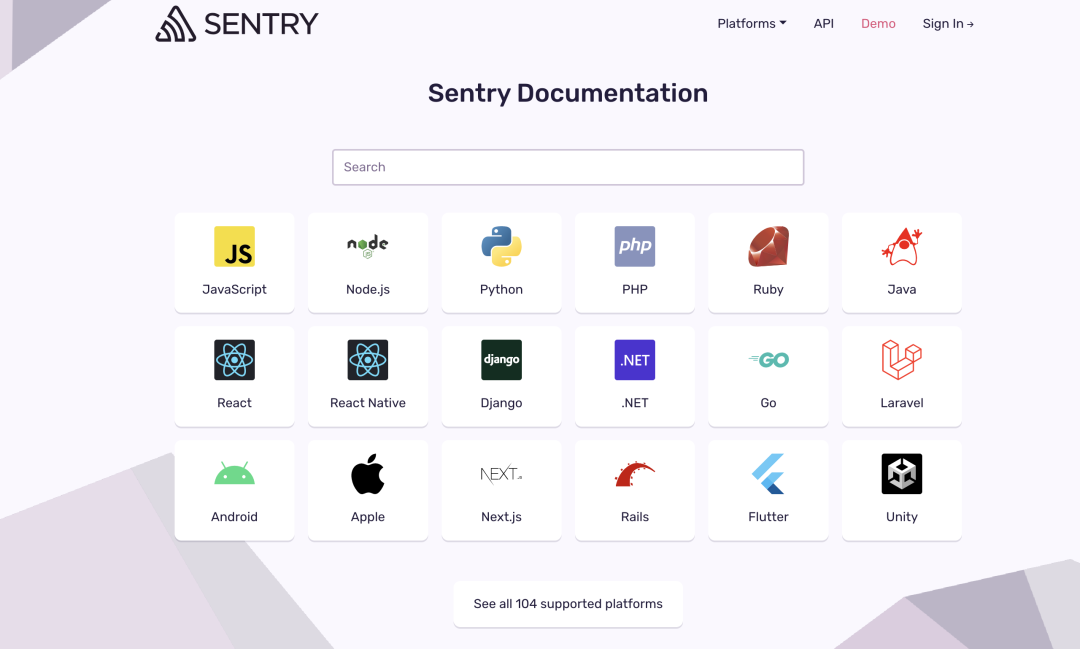
The following languages are supported
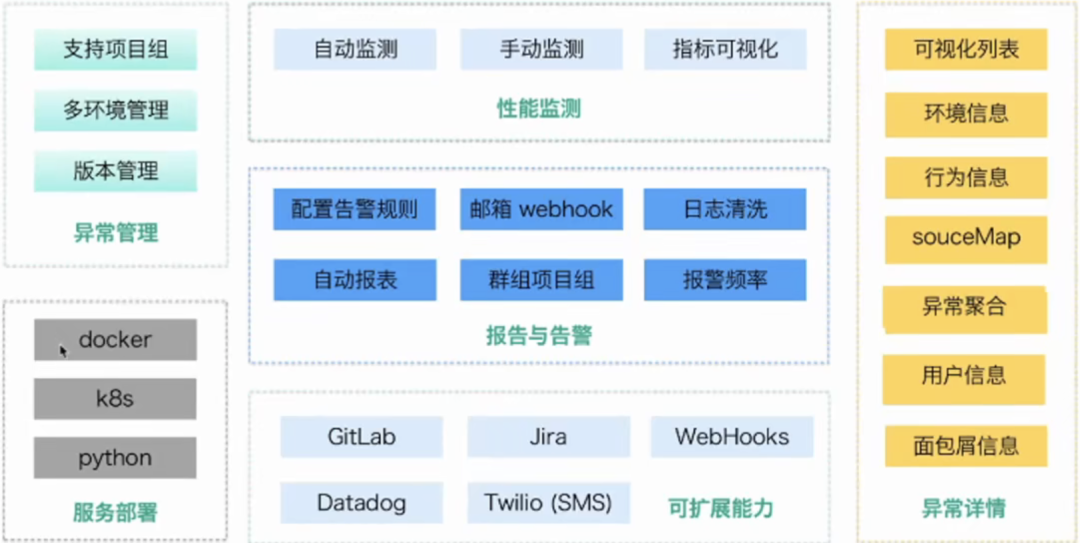
sentry functional architecture
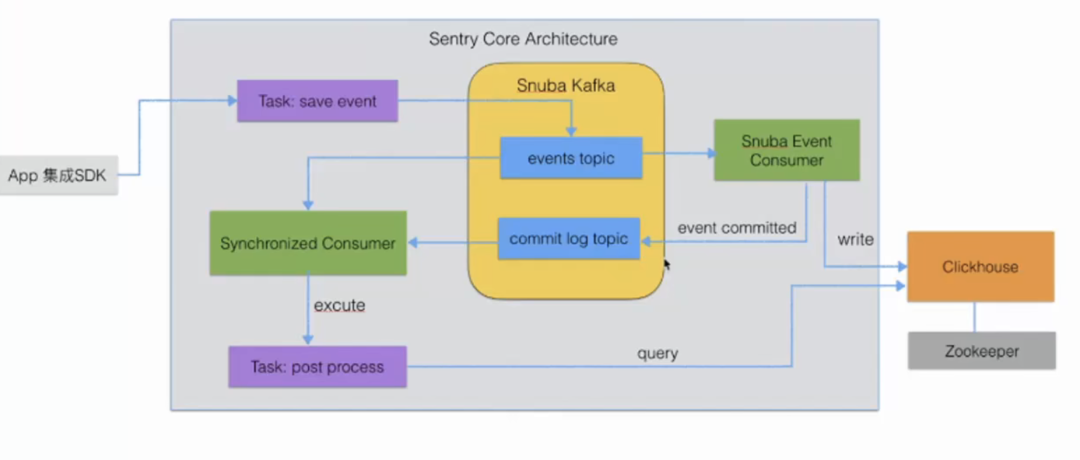
Sentry core architecture
Environment construction
Official Sentry Service
Sentry is open source, if we are willing to pay, sentry provides us with convenience. Save yourself the hassle of building and maintaining Python services yourself
Log in to the official website https://sentry.io, register an account and access the sdk to use
Sentry privatization deployment
Sentry's admin backend is
Python Djangodeveloped . This management background is supported by the Postgres database (the default database of the management background),ClickHouse(the database that stores data characteristics), relay, kafka, redis and other basic services or a total of 23 services officially maintained by Sentry. It can be seen that it would be extremely complex and difficult to deploy and maintain these 23 services independently. Fortunately, the official one-click deployment implementation based on docker image is provided by getsentry/onpremise
Sentry itself is developed based on Django, and also depends on other components such as Postgresql, Redis, etc., so there are generally two ways to install: through Docker or using Python to build
pre-environment
The corresponding version needs to be installed, otherwise the installation will report an error
-
Docker 19.03.6+ -
Docker-Compose 1.28.0+ -
4 CPU Cores -
8 GB RAM -
20 GB Free Disk Space
1. Install the docker environment
installation kit
yum install yum-utils device-mapper-persistent-data lvm2 -y
Set up Ali mirror source
yum-config-manager --add-repo https://mirrors.aliyun.com/docker-ce/linux/centos/docker-ce.repo

install docker
yum install docker-ce docker-ce-cli containerd.io -y
start docker
systemctl start docker

# 设为开机启动
systemctl enable docker
docker image acceleration (important)
In the process of subsequent deployment, a large number of images need to be pulled, the official source is slow to pull, you can modify the docker image source
Log in to the Alibaba Cloud official website and open the Alibaba Cloud Container Image Service. Click at the bottom of the left menu 镜像加速器 and selectCentos
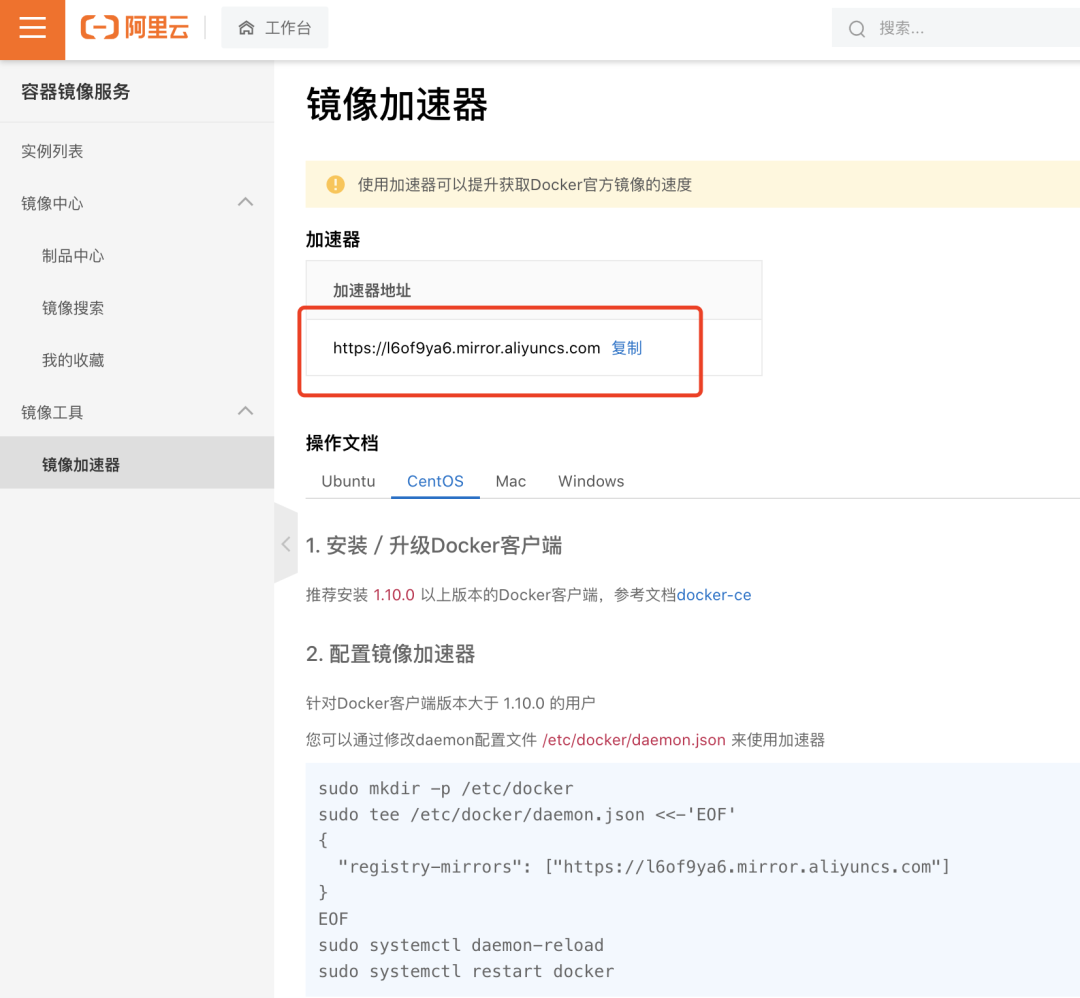
vi /etc/docker/daemon.json
{
  "registry-mirrors": ["https://l6of9ya6.mirror.aliyuncs.com"]
}
Then restart docker
# 重新加载配置
systemctl daemon-reload

systemctl restart docker
Install docker-compose
# 使用国内源安装
sudo curl -L "https://get.daocloud.io/docker/compose/releases/download/1.29.2/docker-compose-$(uname -s)-$(uname -m)" -o /usr/local/bin/docker-compose
Set docker-compose execution permissions
chmod +x /usr/local/bin/docker-compose
Create a soft chain
sudo ln -s /usr/local/bin/docker-compose /usr/bin/docker-compose
Test if the installation is successful:
$ docker-compose --version

docker-compose version 1.22.0, build f46880fe
2. Download the Sentry installation package
git clone https://github.com/getsentry/onpremise
One-click deployment
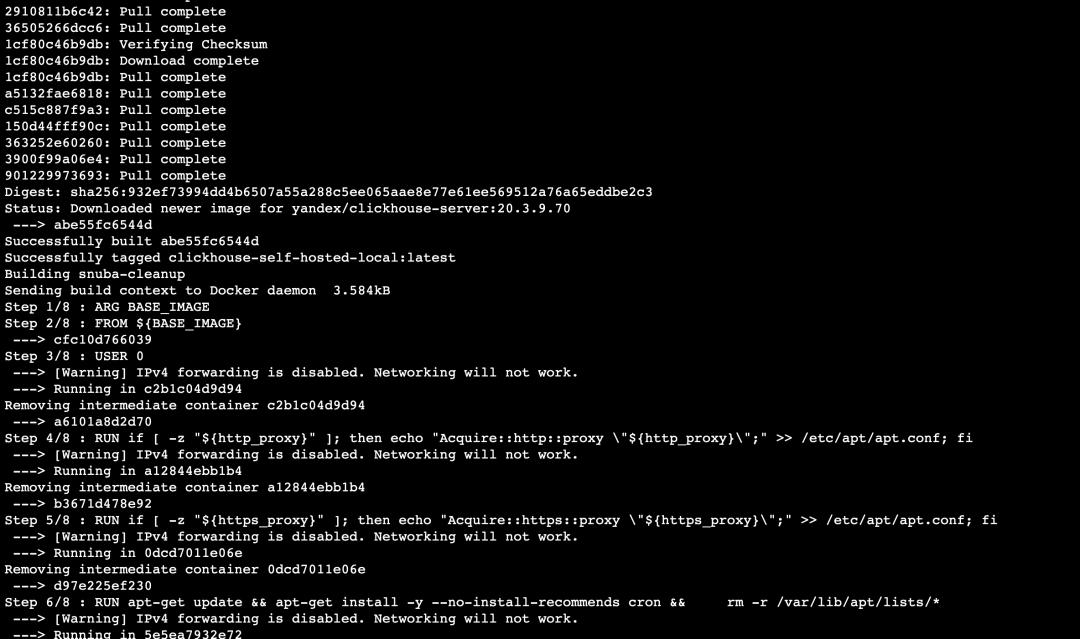
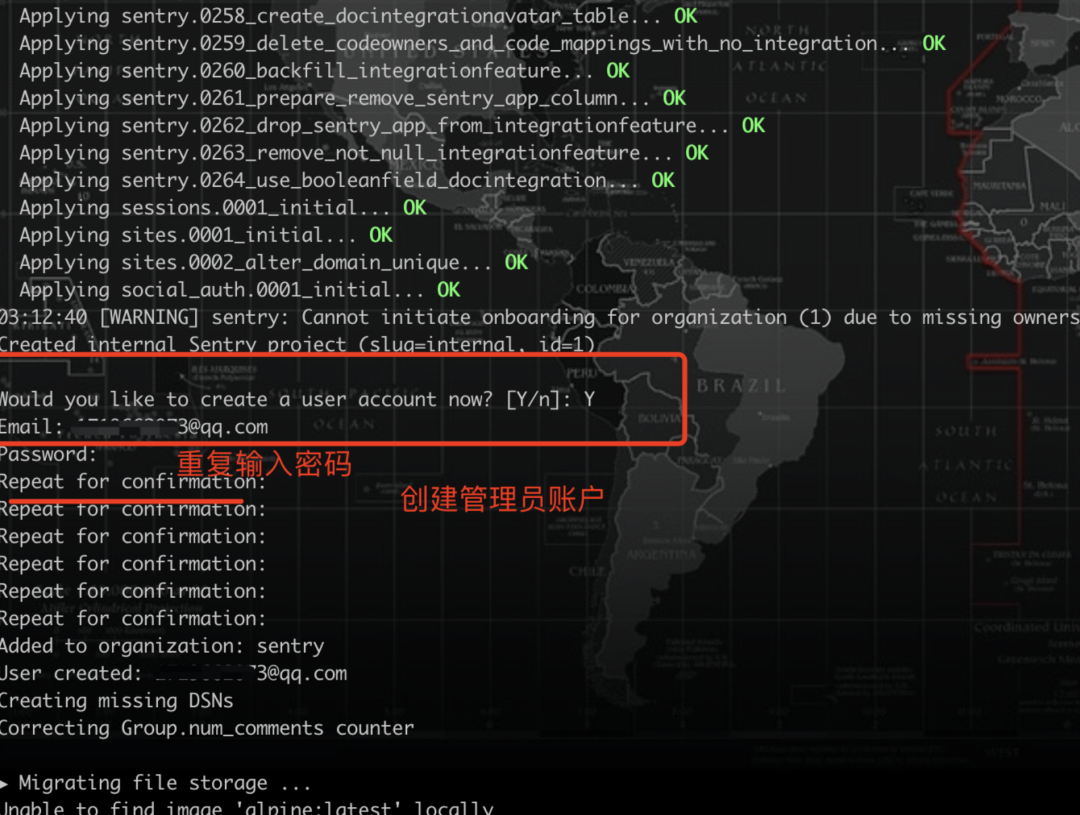
There is an install.sh file in the root path of onpremise. You only need to execute this script to complete the rapid deployment. During the process of running the script, it will roughly go through the following steps:
-
Environmental inspection -
Generate service configuration -
docker volumeData volume creation (which can be understood as the creation of data storage paths for applications run by docker) -
Pull and upgrade base images -
build image -
service initialization -
Set up an administrator account (if you skip this step, you can create it manually)
cd onpremise

# 直接运行 ./install.sh 将 Sentry 及其依赖都通过 docker 安装
./install.sh
Install it step by step
Set up an administrator account (if you skip this step, you can create it manually)
3. Start project execution
After the execution is completed, it will prompt that the creation is complete, run docker-compose up -dStart the service
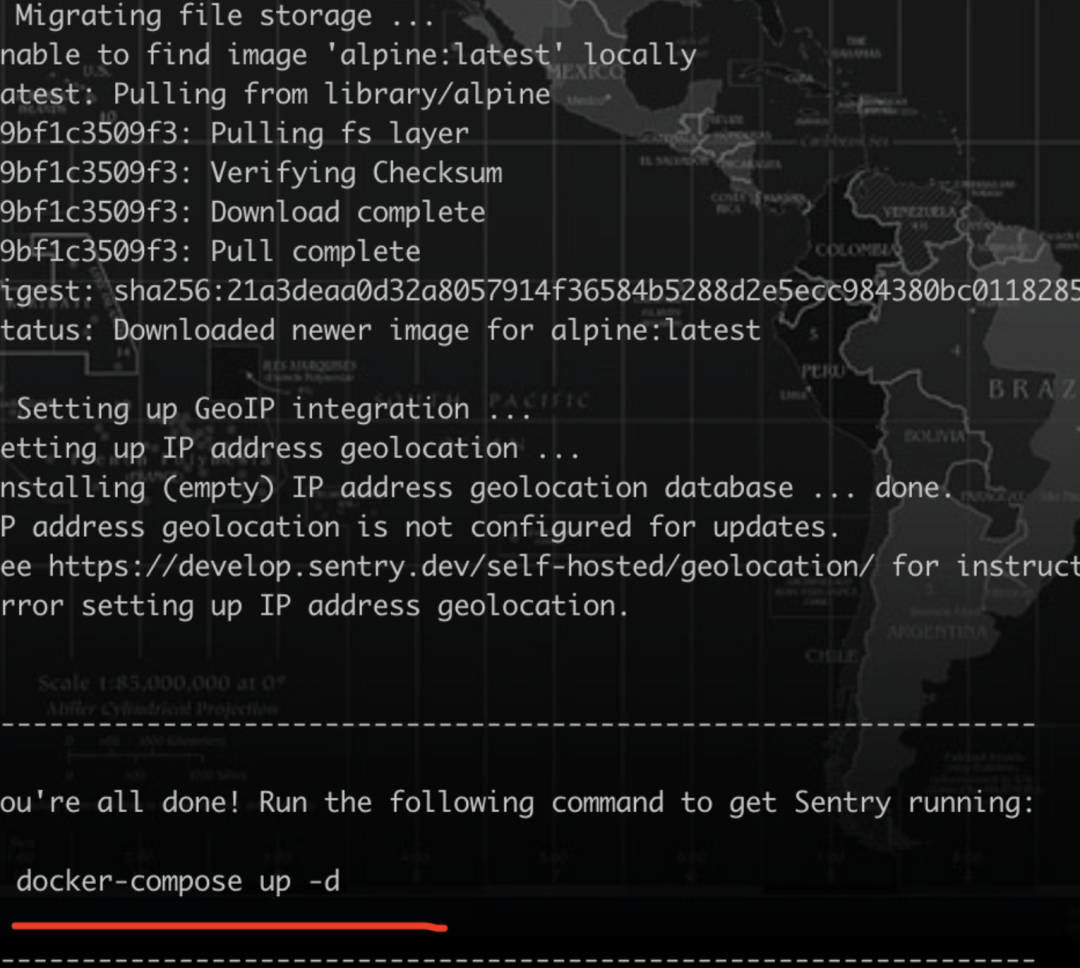
docker-compose up -d

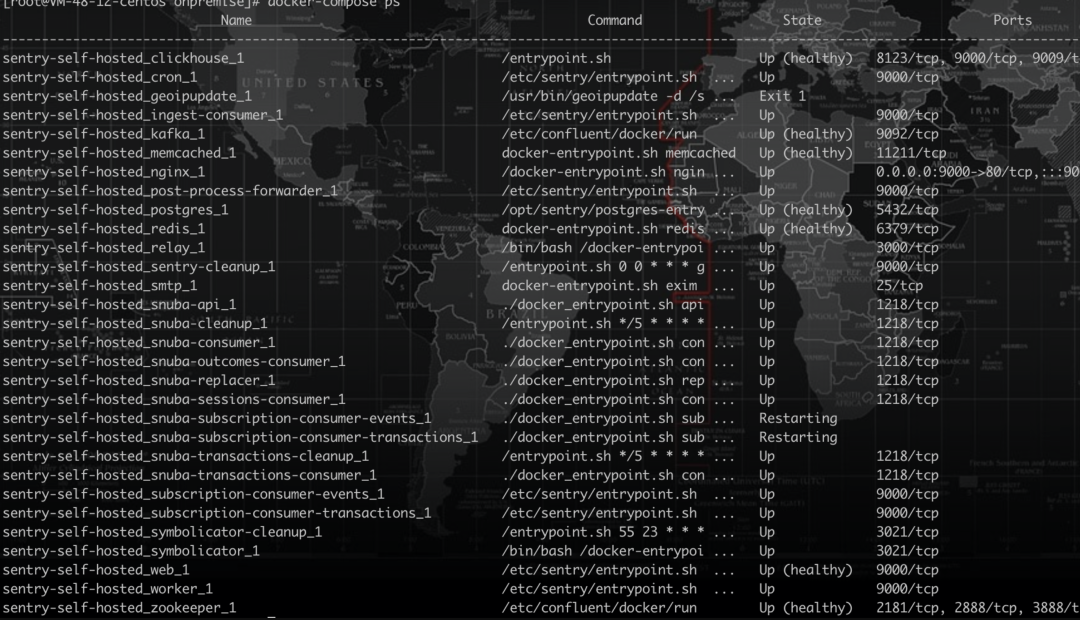
View service running statusdocker-compose ps
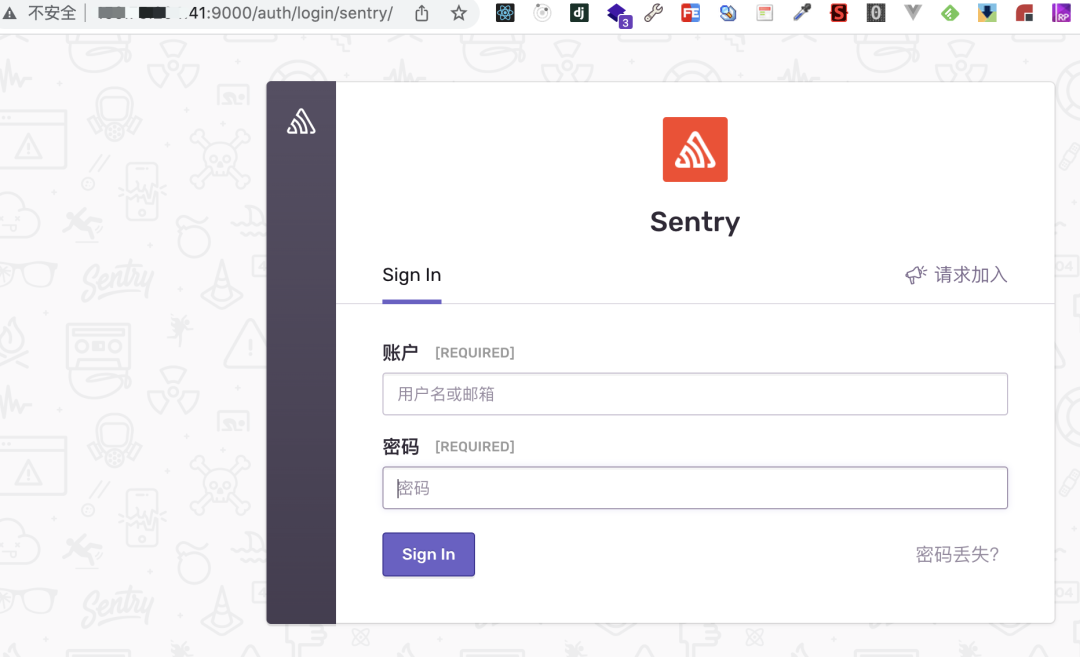
4. Access the project
After all services are successfully started, you can access
sentrythe background, which runs on the server's9000port by default, the one账户密码就是安装时让你设置here
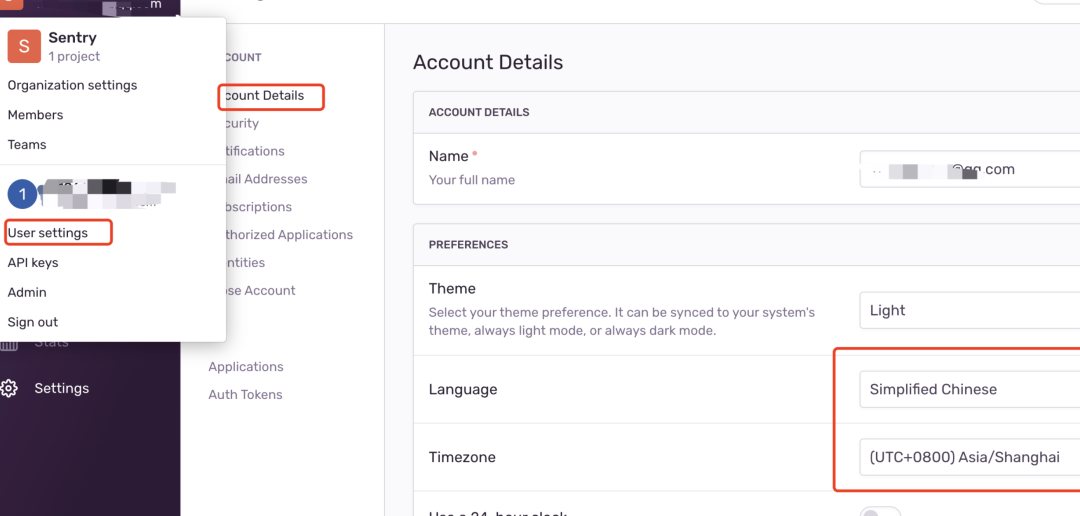
Set general configuration
Set language and time zone
Click the corresponding menu settings of the avatar User settings - Account Details, and it will take effect after refreshing.
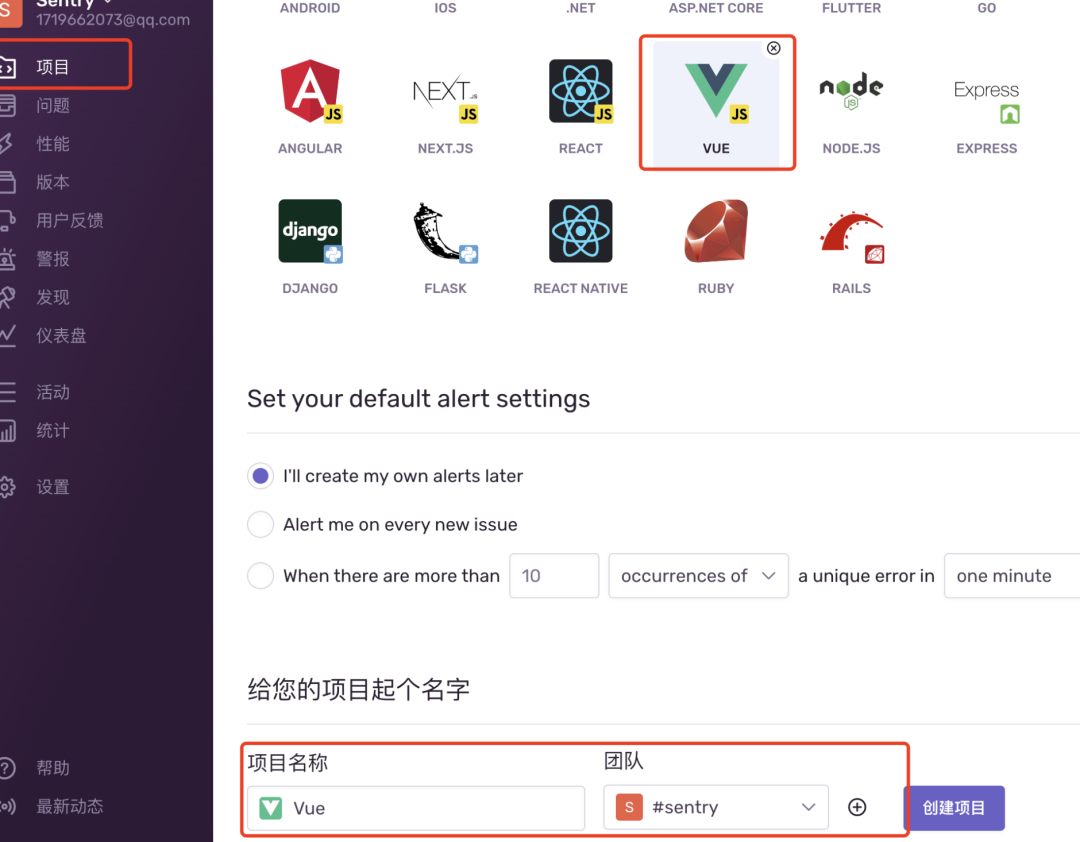
Vue2 + Sentry
Create a vue project
npm i @vue/cli -g

# 初始化vue2项目
vue create vue2-sentry
# Using npm
npm install --save @sentry/vue @sentry/tracing
import Vue from "vue";
import Router from "vue-router";
import * as Sentry from "@sentry/vue";
import { Integrations } from "@sentry/tracing";

Vue.use(Router);

const router = new Router({
  // ...
});

Sentry.init({
  Vue,
  dsn: "http://[email protected]:9000/2",
  integrations: [
    new Integrations.BrowserTracing({
      routingInstrumentation: Sentry.vueRouterInstrumentation(router),
      tracingOrigins: ["localhost", "my-site-url.com", /^\//],
    }),
  ],
  // 不同的环境上报到不同的 environment 分类
  // environment: process.env.ENVIRONMENT,
  // Set tracesSampleRate to 1.0 to capture 100%
  // of transactions for performance monitoring.
  // We recommend adjusting this value in production
  //  高访问量应用可以控制上报百分比
  tracesSampleRate: 1.0,
  release: '0.0.1', // release版本号,和SentryCliPlugin中的一致
});

// ...

new Vue({
  router,
  render: h => h(App),
}).$mount("#app");
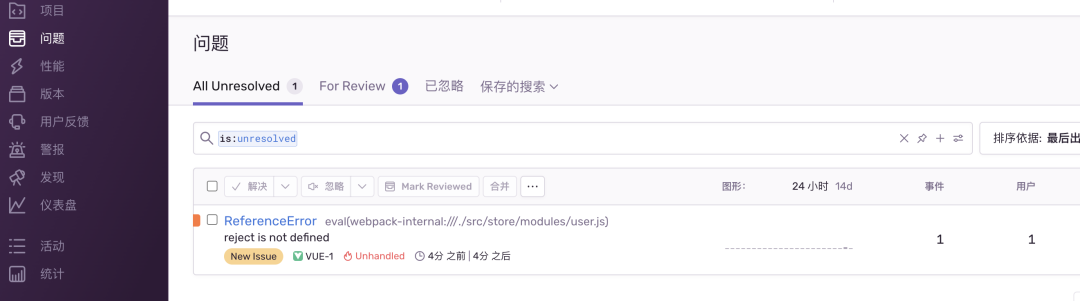
We throw the exception manually, the error is caught in the console visible
Upload sourceMap to sentry platform
In order to easily view the specific error content, we need to upload it sourceMapto the sentryplatform. There are generally two ways sentry-cliand sentry-webpack-pluginways, here for the convenience of using the webpackway
-
source-mapis a file that allows compiled code to map out of the original source; -
source-mapIt is an information file that stores location information. That is to say, each position of the converted code corresponds to the position before the conversion.
Upload via webpack
npm i @sentry/webpack-plugin -D
Modify the vue.config.jsconfiguration file
const SentryCliPlugin = require('@sentry/webpack-plugin')

module.exports = {
  // 打包生成sourcemap,打包完上传到sentry之后在删除,不要把sourcemao传到生产环境
  productionSourceMap: process.env.NODE_ENV !== 'development',
  configureWebpack: config=> {
    if (process.env.NODE_ENV !== 'development') {
      config.plugins.push(
        new SentryCliPlugin({
          include: './dist/js', // 只上传js
          ignore: ['node_modules', 'webpack.config.js'],
          ignoreFile: '.sentrycliignore',
          release: require('../package.json').version, // 对应main.js中设置的Sentry.init版本号
          cleanArtifacts: true, // Remove all the artifacts in the release before the upload.
          // URL prefix to add to the beginning of all filenames. Defaults to ~/ but you might want to set this to the full URL. This is also useful if your files are stored in a sub folder. eg: url-prefix '~/static/js'
          urlPrefix: '~/',
        }),
      )
    }
  },
}
// 修改main.js中加入release版本号和上面一致
Sentry.init({
  ...
  release: require('../package.json').version, // 加入版本号
});
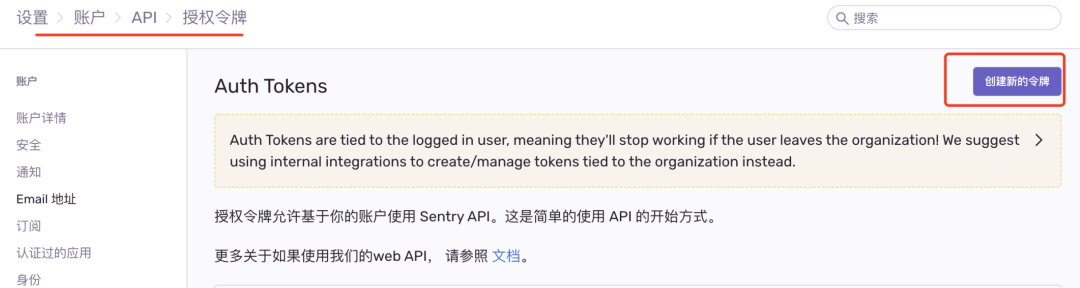
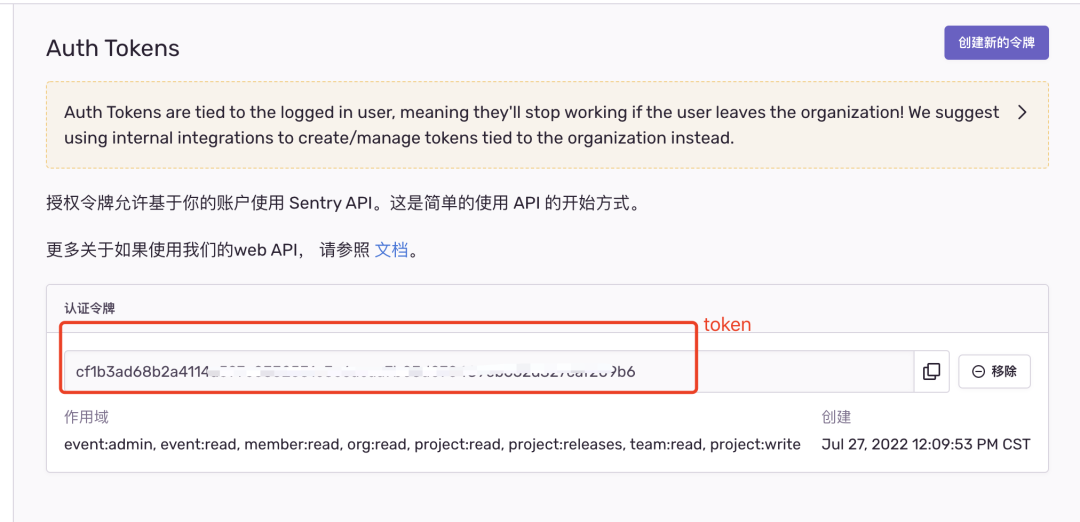
ObtainTOKEN

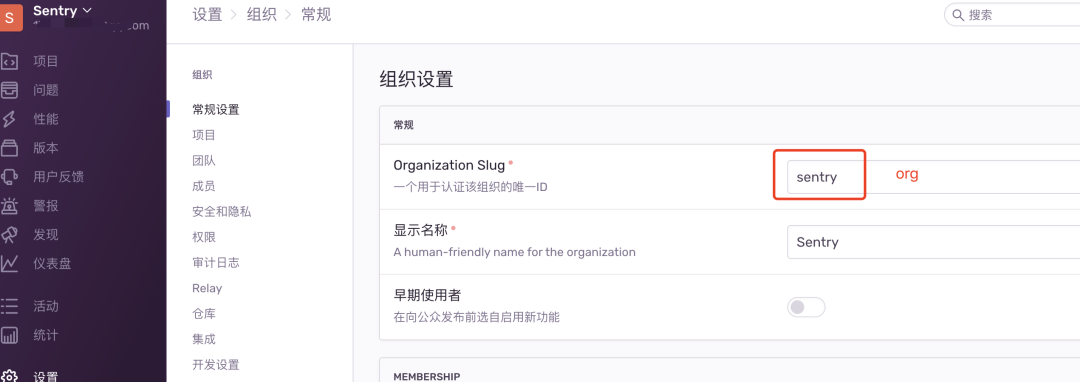
Obtainorg
Created in the project root directory.sentryclirc
-
url: the address of sentry deployment, the default is https://sentry.io/ -
org: console view organization name -
project: project name
# .sentryclirc

[auth]
token=填入控制台创建的TOKEN

[defaults]
url=http://129.72.24.41:9000/
org=sentry
project=vue
Execute the project packaging command to sourcemapupload the relevant files under js tosentry
npm run build
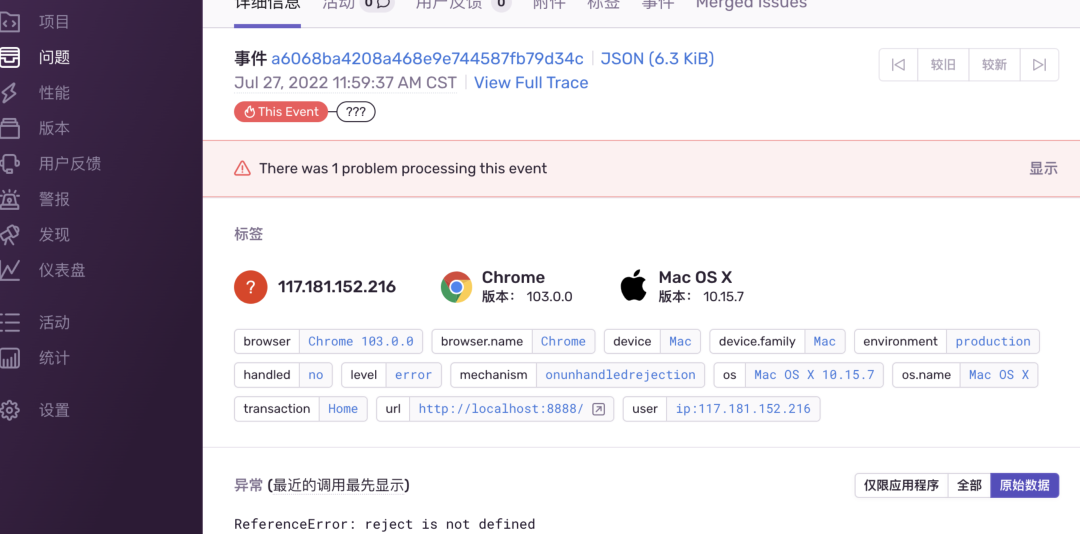
After uploading, sourcemapyou can see it here
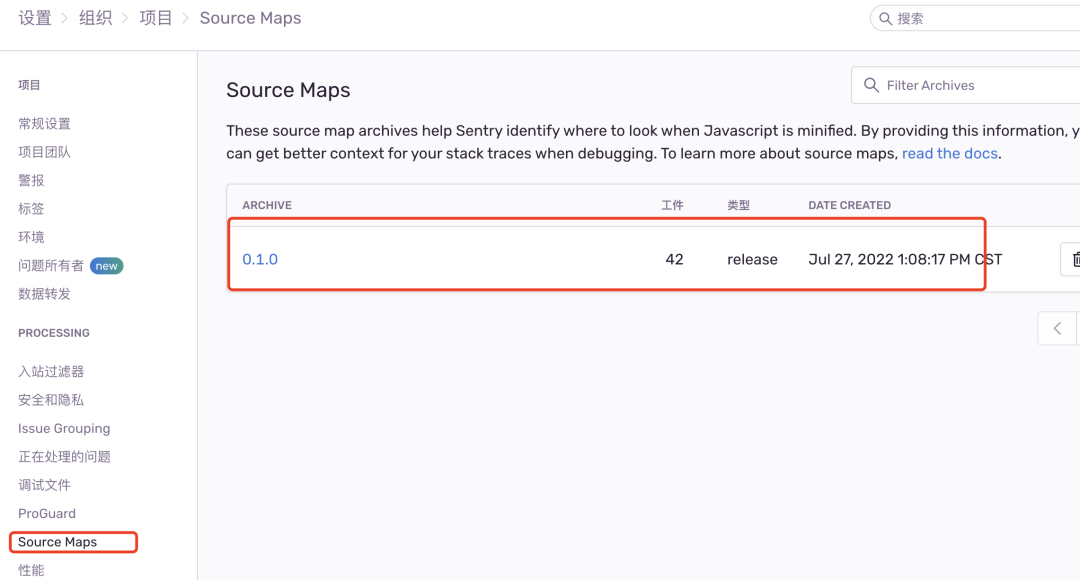
If the source-map project has been uploaded correctly, you can see a very clear error location
Enter the locally packaged dist,
http-server -p 4005start a service access that simulates the deployment of the formal environment to see the effect

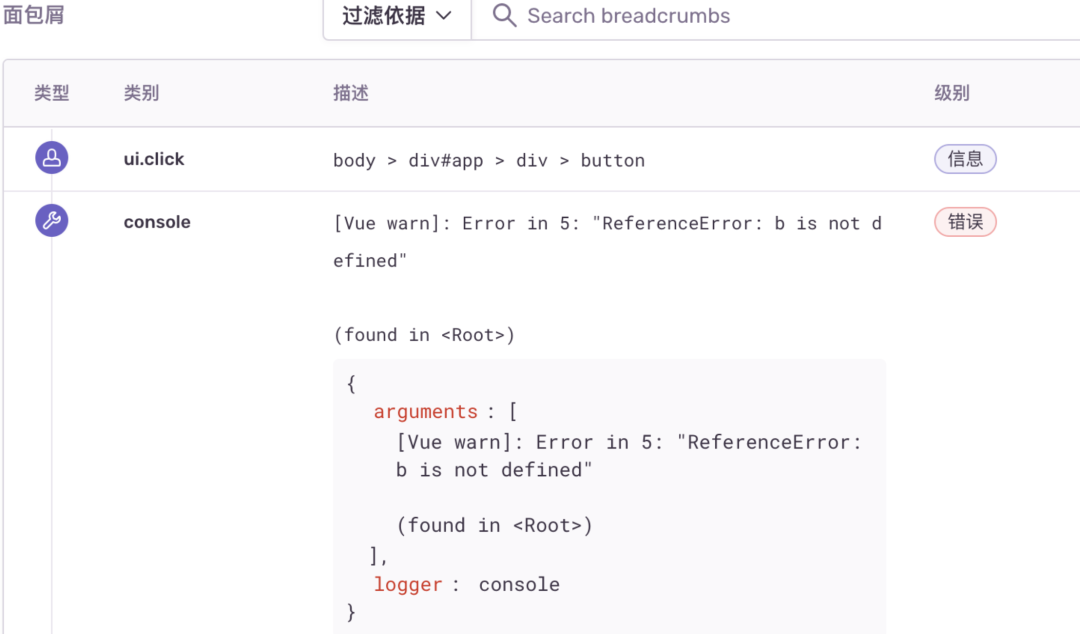
You can also use the 面包屑function view what happened before the error was reported
Remember not to pass the sourcemap file to the production environment, it is too large and unsafe to delete sourcemap, three ways based on the vue2 demonstration
// 方式1
"scripts": {
   "build": "vue-cli-service build && rimraf ./dist/js/*.map"
}

// 方式2 单独生成map
// vue.config.js
configureWebpack(config) {
     config.output.sourceMapFilename('sourceMap/[name].[chunkhash].map.js')
     config.plugin('sentry').use(SentryCliPlugin, [{
        include: './dist/sourceMap', // 只上传js
        ignore: ['node_modules'],
        configFile: 'sentry.properties',
        release: '', // 对应main中设置的版本号
        cleanArtifacts: true, // 先清理再上传
    }])
}

// 方式3 webpack插件清理
$ npm i webpack-delete-sourcemaps-plugin -D
// vue.config.js
const { DeleteSourceMapsPlugin } = require('webpack-delete-sourcemaps-plugin')

configureWebpack(config) {
    config.plugin.push(
        new DeleteSourceMapsPlugin(), // 清理sourcemap
    )
}
View Performance
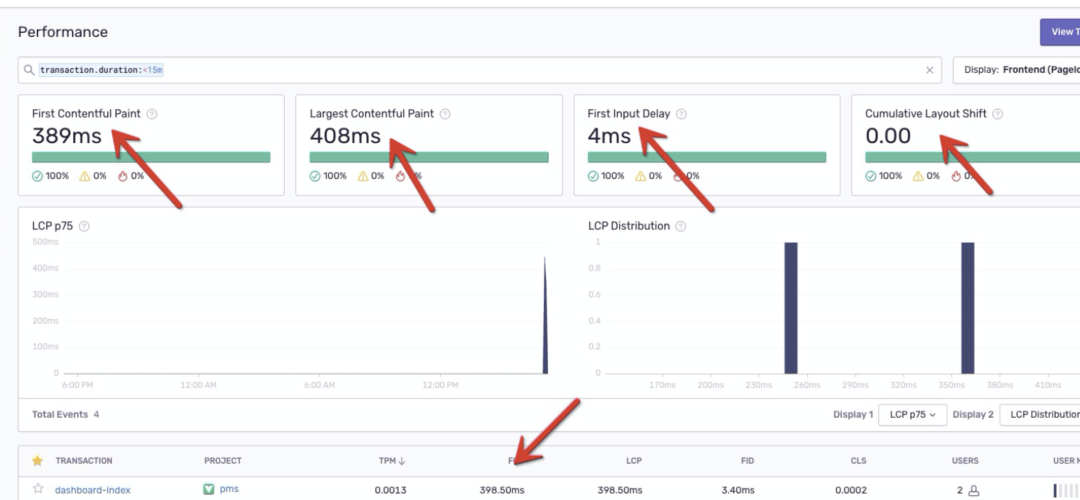
Sentry.init()In ,new Integrations.BrowserTracing()the functionality is to treat browser page load and navigation detection as things, and capture requests, metrics, and errors.
TPM: 每分钟事务数
FCP:首次内容绘制(浏览器第第一次开始渲染 dom 的时间点)
LCP:最大内容渲染,代表 viewpoint 中最大页面元素的加载时间
FID:用户首次输入延迟,可以衡量用户首次与网站交互的时间
CLS:累计布局偏移,一个元素初始时和消失前的数据
TTFB:首字节时间,测量用户浏览器接收页面的第一个字节的时间(可以判断缓慢来自网络请求还是页面加载问题)
USER:uv 数字
USER MISERY: 对响应时间难以忍受的用户指标,由 sentry 计算出来,阈值可以动态修改
Vue3 + Vite + Sentry
# 创建vue3项目
yarn create vite
import { createApp } from "vue";
import { createRouter } from "vue-router";
import * as Sentry from "@sentry/vue";
import { Integrations } from "@sentry/tracing";

const app = createApp({
  // ...
});
const router = createRouter({
  // ...
});

Sentry.init({
  app,
  dsn: "http://[email protected]:9000/2",
  integrations: [
    new Integrations.BrowserTracing({
      routingInstrumentation: Sentry.vueRouterInstrumentation(router),
      tracingOrigins: ["localhost", "my-site-url.com", /^\//],
    }),
  ],
  // 不同的环境上报到不同的 environment 分类
//   environment: process.env.ENVIRONMENT,
  // Set tracesSampleRate to 1.0 to capture 100%
  // of transactions for performance monitoring.
  // We recommend adjusting this value in production
    //  高访问量应用可以控制上报百分比
  tracesSampleRate: 1.0,
  release: '0.0.1',
});

app.use(router);
app.mount("#app");
修改
vite.config.js配置
安装npm i vite-plugin-sentry -D插件
import { defineConfig } from 'vite'
import vue from '@vitejs/plugin-vue'
import viteSentry from 'vite-plugin-sentry'

const sentryConfig = {
  configFile: './.sentryclirc',
  release: '0.0.1', // 和mian.js中Sentry.initrelease保持一致
  deploy: {
   env: 'production',
  },
  skipEnvironmentCheck: true, // 可以跳过环境检查
  sourceMaps: {
   include: ['./dist/assets'],
   ignore: ['node_modules'],
   urlPrefix: '~/assets',
  },
}

// https://vitejs.dev/config/
export default defineConfig({
  plugins: [
    vue(),
    process.env.NODE_ENV === 'production' ? viteSentry(sentryConfig) : null,
  ],
  build: {
    sourcemap: process.env.NODE_ENV === 'production',
  },
})
此时当执行
vite build时,viteSentry这个插件会将构建的sourcemap文件上传到sentry对应的项目release之下。当次版本新捕获到错误时就可以还原出错误行,以及详细的错误信息。
React + Sentry
# Using npm
npm install --save @sentry/react @sentry/tracing
import React from "react";
import ReactDOM from "react-dom";
import * as Sentry from "@sentry/react";
import { Integrations } from "@sentry/tracing";
import App from "./App";

Sentry.init({
  dsn: "http://[email protected]:9000/4",
  integrations: [new Integrations.BrowserTracing()],
// 不同的环境上报到不同的 environment 分类
  environment: process.env.ENVIRONMENT,
  // Set tracesSampleRate to 1.0 to capture 100%
  // of transactions for performance monitoring.
  // We recommend adjusting this value in production
    //  高访问量应用可以控制上报百分比
  tracesSampleRate: 1.0,
});

ReactDOM.render(<App />, document.getElementById("root"));

// Can also use with React Concurrent Mode
// ReactDOM.createRoot(document.getElementById('root')).render(<App />);
进阶用法
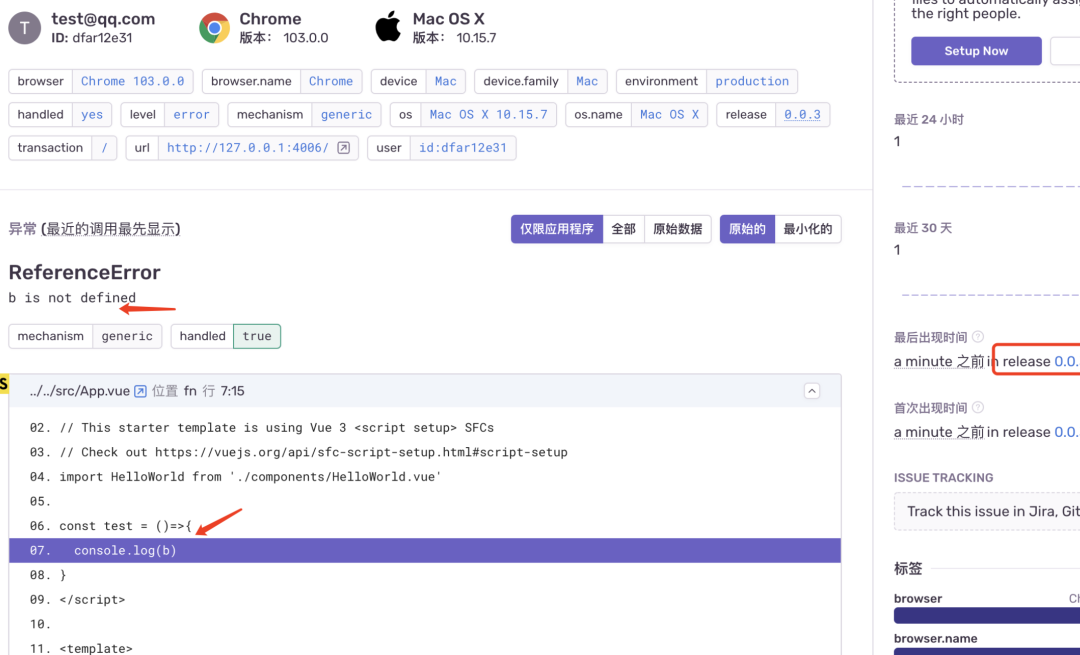
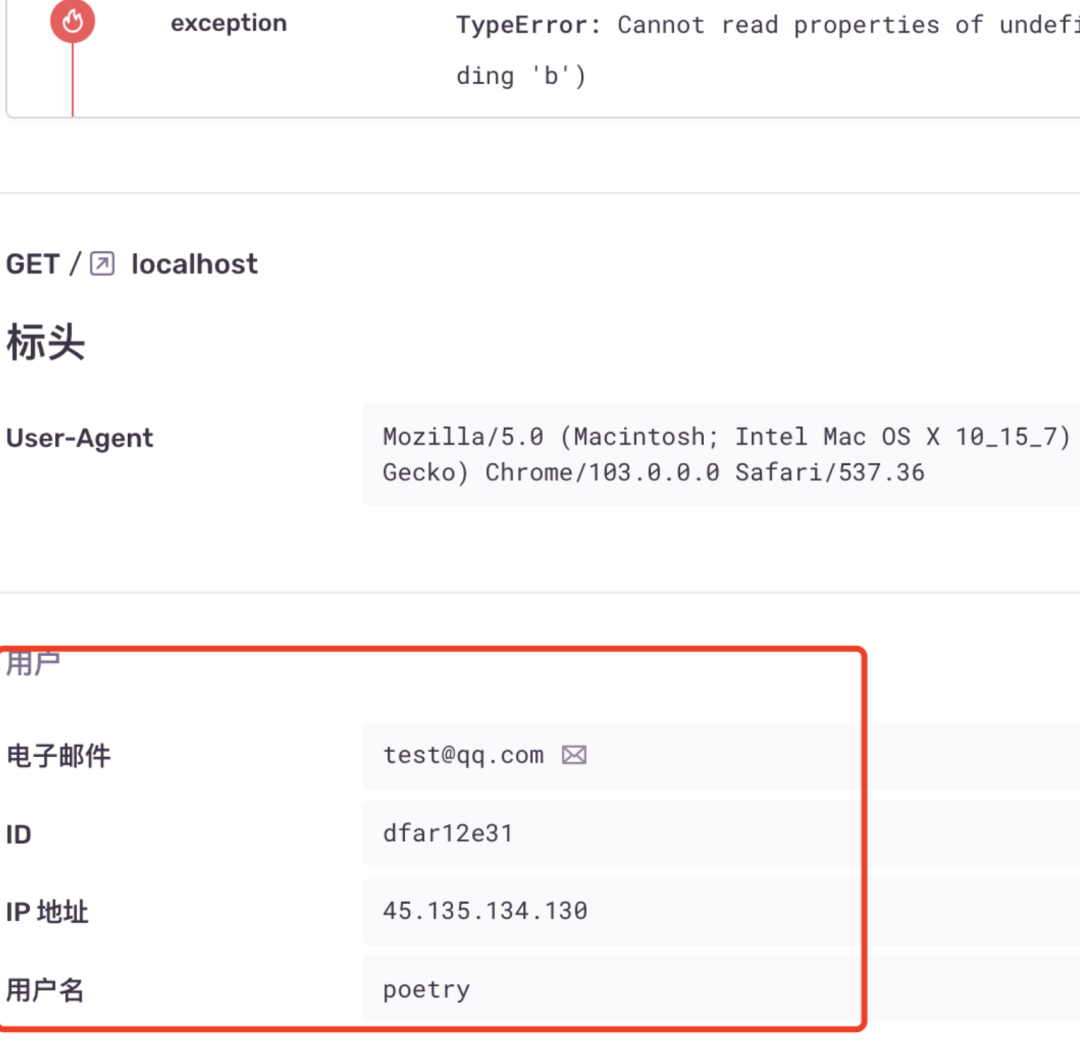
识别用户
在上传的 issues 里面,我们可以借助 setUser 方法,设置读取存在本地的用户信息。(此信息需要持久化存储,否则刷新会消失)
// app/main.js
Sentry.setUser({
  id: 'dfar12e31', // userId cookie.get('userId')
  email: '[email protected]', // cookie.get('email')
  username: 'poetry', // cookie.get('username')
})
Vue.prototype.$Sentry = Sentry
错误边界
-
定义错误边界,当组件报错的时候,可以上报相关信息 -
使用 Sentry.ErrorBoundary。加了错误边界,可以把错误定位到组件上面。
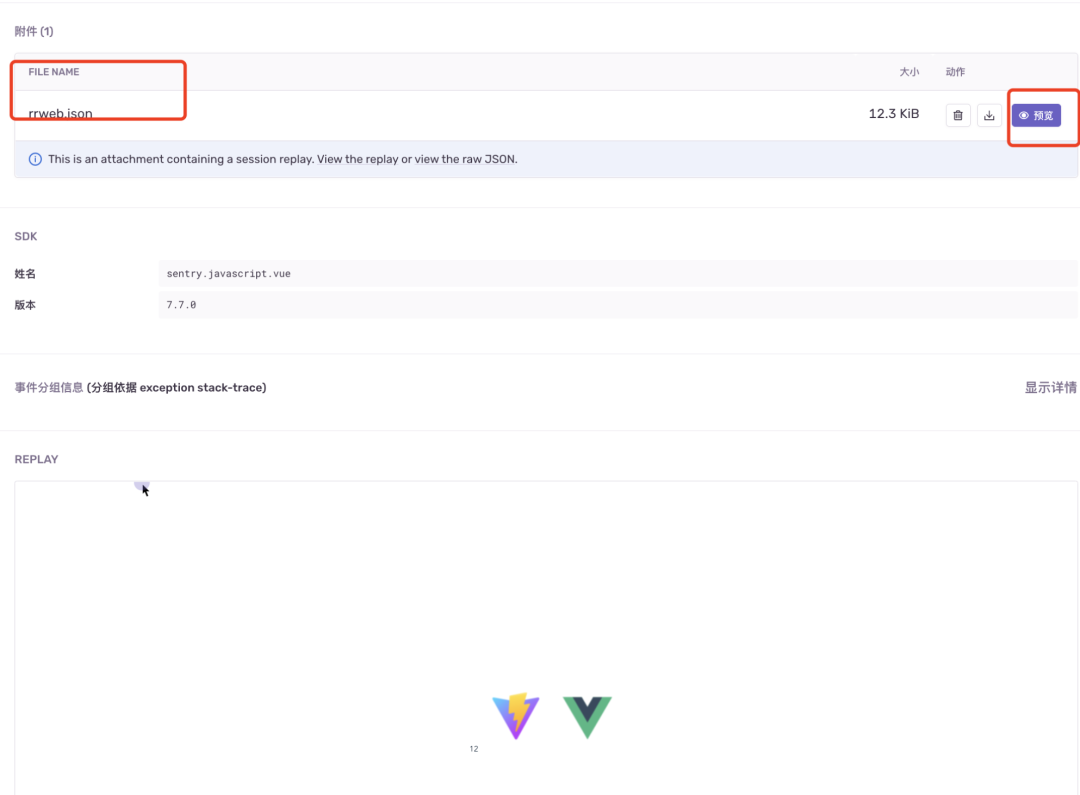
rrweb 重播
npm i @sentry/rrweb rrweb -S
import SentryRRWeb from '@sentry/rrweb';

// app/main.js
Sentry.init({
    Vue,
    dsn: "xxx",
    integrations: [
      new Integrations.BrowserTracing({
        routingInstrumentation: Sentry.vueRouterInstrumentation(router),
        tracingOrigins: ["localhost", "my-site-url.com", /^//],
      }),
      new SentryRRWeb({
        checkoutEveryNms: 10 * 1000, // 每10秒重新制作快照
        checkoutEveryNth: 200, // 每 200 个 event 重新制作快照
        maskAllInputs: false, // 将所有输入内容记录为 *
      }),
    ],
    // 不同的环境上报到不同的 environment 分类
    environment: process.env.ENVIRONMENT,
    //  高访问量应用可以控制上报百分比
    tracesSampleRate: 1.0,
    release: 'x.x.x',
    logErrors: true
});
在报错后,可以录屏播放错误发生的情况
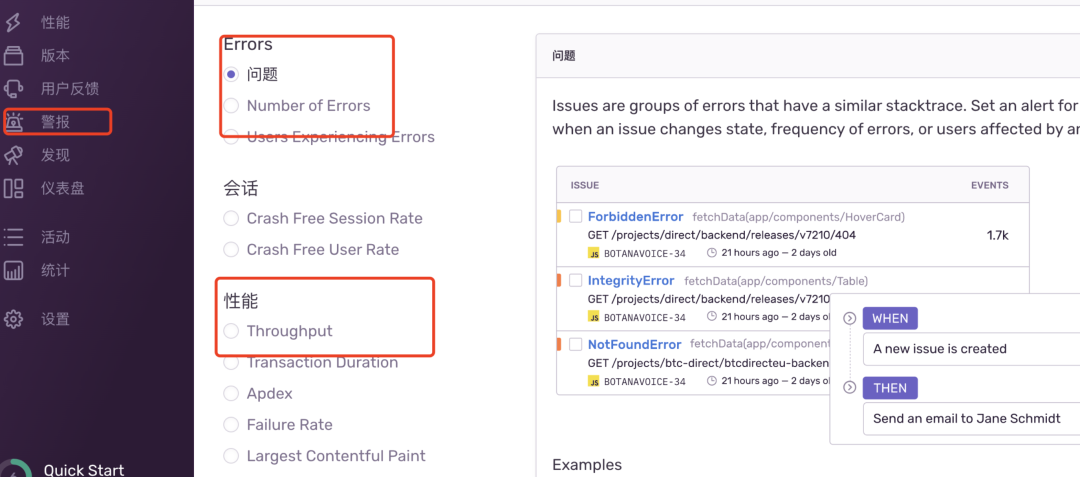
手动设置报警
-
设置报警规则,当我们某些情况,如 issues,performance超过我们设置的阈值,会触发alert。 -
我们可以通过提醒等功能来帮助我们即时发现问题。
Read online https://blog.poetries.top/2022/07/27/sentry-summary
write at the end Welcome to add poetry wechat poetry4070 , I will share with you the front-end industry trends, learning methods, growth content, etc., and spend with you in 2022! If you find this content helpful, I would like to ask you to do me 3 small favors: 1. Subscribe to the front-end interview book interview2.poetries.top Let us become a long-term relationship and grow together. 2. Subscribe to programming navigation nav.poetries.top organizes a large number of free programming learning resources. 3. Receive the front-end interview materials carefully organized for you . >>Front-end interview job-hunting brush questions artifact<