This article introduces
Like + Follow + Favorite = Learned
Svelte [1] is the coolest framework I've ever used. No matter how powerful Vue and React are, and how good the ecosystem is, I still prefer Svelte because it's really cool to develop.
In fact, I noticed Svelte [2] a long time ago , but never took this framework to heart.
Because my previous work mainly used Vue, I occasionally touched some React projects, but I didn't encounter any items using Svelte at all.
It wasn't until Vite came along that I started to value Svelte.
From the Vite documentation [3] it can be seen that it supports these templates:
| JavaScript | TypeScript |
|---|---|
| vanilla [4] | vanilla-ts [5] |
| vue [6] | vue-ts [7] |
| react [8] | react-ts [9] |
| preact [10] | preact-ts [11] |
| lit [12] | lit-ts [13] |
| svelte [14] | svelte-ts [15] |
The framework that can make the grandfather pay attention to it is not simple nor simple~
I like to learn new technologies by way of demo, which is provided by Svelte's official introductory tutorial [16] .
This is a learning method that I think is more comfortable to get started and easy to search in the future.
Although the Svelte official introductory tutorial [17] has given many examples, and the Svelte Chinese website [18] also has corresponding translations, some translations seem to be machine translations, and some cases may not be suitable for novice learning~
The purpose of this article is to sort out the learning process of Svelte, so that workers who are new to Svelte can get started smoothly.
**This article is suitable for people: have HTML , CSS , JS basic, know and have installed Node**.
If you plan to learn front-end from 0, this article is not suitable for you to read for the time being.
Introduction to Svelte
Svelte [19] is a tool for building web applications.
While traditional frameworks like React and Vue require a lot of work in the browser, Svelte takes that work into the compile phase of building the application.
Note that Svelte is a compiler. It can package the code written according to the specified syntax into a project that the browser can run.
Like other front-end frameworks, it is also used and HTML developed .CSSJavaScript
author
Get to know its father (author) before learning about Svelte.
The author of Svelte is Rich Harris [20] , and he is the one who is eating.
Maybe most of the domestic workers are not very familiar with him (and I am not at all familiar with him), but they should have heard of Rollup [21] .
That's right, he's also Rollup [22] 's dad.
He also developed Ractive.js [23] before developing Svelte , and heard that part of the implementation of Vue was also inspired by Ractive.
There are many more introductions about Rich Harris . The information I found is as follows:
-
University major is philosophy -
Graphics editor working on the investigative team of The New York Times as a reporter and developer
For more on him and Svelte, see "Svelte \- The magical disappearing UI framework \- Interview with Rich Harris" [24]
Advantages of Svelte
Translated into Chinese, Svelte means "slim", and the side shows that the package it packs is very small.
The main advantages of Svelte are as follows.
1. Compiler
You can see this introduction when you open the Svelte official website [25] .
Svelte is a completely new way of building user interfaces. While traditional frameworks like React and Vue require a lot of work in the browser, Svelte takes that work into the compile phase of building the application.
Svelte components need to .svelte be written in suffixed files, and Svelte will compile JS and code the written CSScode.
2. Smaller package size
Svelte will package the referenced code during packaging, and the unreferenced code will be filtered out and will not be added when packaging.
In the report "A RealWorld Comparison of Front-End Frameworks with Benchmarks \(2019 update\)" [26] , the mainstream frameworks are compared.
In gzip the package size generated after compression, it can be seen from the report that the volume packaged by Svelte is a few streets away from Vue, React and Angular.
This is because the Svelte-compiled code retains only the referenced parts.
3. Not using Virtual DOM
Virtual DOM It is the virtual DOM , which uses JS objects to describe the data of DOM nodes, which was promoted by the React team.
Virtual DOM is a front-end celebrity, so many developers have begun to study and engage in debate competitions.
There is a picture on the Internet comparing the process of Svelte and React in data-driven views
In fact, it mainly compares the difference between using virtual DOM and directly manipulating real DOM.
The approximate process of implementing a data-driven view in React is as follows:
数据发生变化 -> 通过diff算法判断要更新哪些节点 -> 找到要更新的节点 -> 更新真实DOM
复制代码
The data update principle of Vue is actually similar, but the implementation method and usage syntax will be different.
The diff algorithm compares the virtual DOM generated before and after the data update. Only when there is a difference between the two versions of the virtual DOM, will the corresponding real DOM be updated.
Using the virtual DOM comparison method is more efficient than directly comparing the real DOM.
Moreover, there are many properties and methods mounted on the real DOM, and it will be lighter to describe the DOM node tree by using the virtual DOM.
But it also means creating a virtual DOM every time the data changes, and using the diff algorithm to compare the new virtual DOM with the old virtual DOM, this step consumes a little performance and requires a little execution time.
And Svelte implements responsive design without using virtual DOM.
I understand it in a crude way: Svelte listens to all variables of the top-level component, and once a variable changes, it updates the component that used that variable. This only needs to update the affected part of the DOM element, not the entire component.
To sum up, in my understanding, the idea of virtual DOM is very good, and it is also a product of the times, but virtual DOM is not the fastest, JS directly manipulates DOM is the fastest.
"Virtual DOM is pure overhead" [27] is a blog on Svelte's official website that discusses virtual DOM. Interested workers can take a look~
4. More Natural Responsiveness
That's why I immediately fell in love with Svelte when I first came across it.
Responsive design here is only about data responsiveness, not responsive layout like Bootstrap.
Now the popular front-end frameworks basically use the concept of data-driven views . Frameworks like Vue and React have the concept of responsive data.
But Vue and React are still a bit "not so natural" in terms of data response. I will give a few examples:
-
In React, if you need to update data and respond in the view, you need to use
setStatemethods to update the data. -
In Vue2, reactive data should be placed
datain ,methodsand usedthis.xxxto update data in . -
In the Composition API syntax of Vue3, you need to use
reforreactiveother methods to wrap the data, and use thexxx.valueother methods to modify the data.
In the above cases, I feel that some things have been added to realize the responsive data function (at least when ordinary developers are developing).
In Svelte's philosophy, responsiveness should give developers a senseless experience. For example, in Excel, when I specify that the value of cell C1 is the sum of A1 + B1, after setting the rules, users only need to modify A1 and B1 That's it, C1 will automatically respond, and no other operations are required.
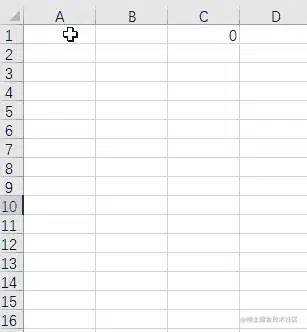
In this regard, Svelte I think is the most natural at this stage.

<h1>{name}</h1>

<script>
  let name = '雷猴'

  setTimeout(() => {
    name = '鲨鱼辣椒'
  }, 1000)
</script>
复制代码
In the above code, the value is modified after 1 second name , and the view is updated.
It can be seen from the code that when using Svelte to develop projects, developers generally do not need to use additional methods to achieve responsive effects with Vue and React.
If you are interested in Svelte's responsive principle, it is recommended to read "Analysis of Svelte's responsive principle - Rethinking Reactivity" by FESKY [28] [29]
You can also see "Rethinking reactivity" [30] to see the official thinking on reactivity.
5. Strong performance
Stefan Krause gave a performance test report (click to view) [31] to compare the performance of several popular frameworks. As can be seen from the performance test results of Svelte, Svelte is quite excellent.
6. Memory optimization
The performance test report (click to view) [32] also lists the memory usage of different frameworks. Svelte manages memory extremely well, and the memory occupied is also very small, which is a good thing for devices with low configuration .
For points 5 and 6, because the test report is relatively long, I did not include screenshots in the text. If you are interested, you can click on the link to view the test report [33] .
7. Focus more on accessibility
When developing with Svelte, the accessibility experience will be automatically detected . For example, if the img element does not have an alt attribute added, Svelte will issue a warning to you. The accessibility experience is very helpful for special personnel, such as when you img set the attribute value in the tag, the content will be read out by the alt audio browser .alt
Here I would also recommend 2 books on design experience.
-
A Touch of Stone Turns Gold into Gold: Tips for Designing for Web and Mobile Usability with Visitors First -
Inclusive Web Design
Their cover lengths look like this
There are definitely many advantages of Svelte, but due to my lack of development experience, I can only summarize the above. If you have more understanding of Svelte, please add it in the comment area~
Shortcomings of Svelte
-
Svelte is very unfriendly to IE, but I don't take that seriously. If you want to be compatible with IE I still recommend using jQuery. -
Svelte's ecology is not rich enough. Because it is a "new favorite", it is definitely not as good as Vue and React in terms of ecology.
Libraries related to Svelte
Sapper
Sapper official website address [34]
Sapper is a framework built on Svelte. Sapper provides functions such as page routing, layout templates, and SSR.
Svelte Native
Svelte Native official website address [35]
Svelte Native is a product built on NativeScript [36] , which can develop Android and iOS applications, and is a cross-end technology.
Kind of like something like React Native and Weex.
svelte-gl
svelte-gl repository [37]
svelte-gl is not officially released yet, but it is an interesting tool, similar to three.js [38] , for 3D applications.
Although there are not many Stars on github now, you can also write some demos to play with.
Create project
Before getting started, you need to have the Node [39] environment installed on your computer.
I used the editing tool VS Code and installed the Svelte for VS Code extension [40] .
Before using Svelte, you must have a development environment.
There are several ways to create or use a development environment:
-
REPL -
RollupVersion -
WebpackVersion -
ParcelVersion -
ViteVersion
This article uses Vite creating a project, but I'll go through all the ways listed above.
REPL
REPL It is an online environment provided by Svelte. Open the Svelte official website [41] and you can see that there is a REPL [42] option on the top navigation bar . Click this option to jump to the Svelte online development environment.
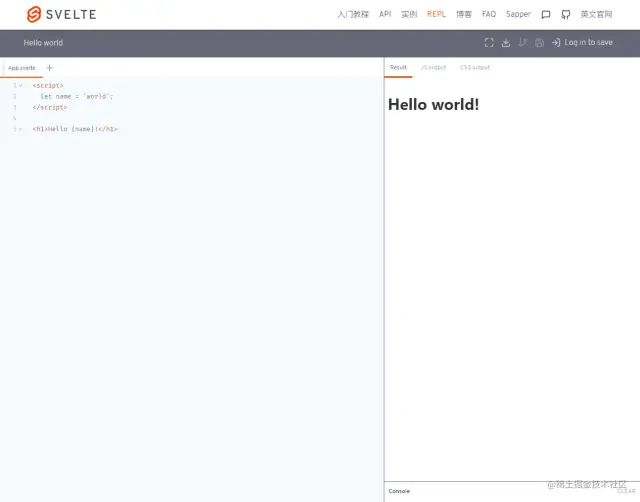
REPL is read(读取), evaluate(执行), print(打印) and loop(循环) the abbreviation of these words.
If you just want to try out some features of Svelte or test small code, you can use this online tool.
REPL Multi-component development is also provided, and +号 new components can be created by pressing the upper left corner. The content of the component will be discussed later.
On the right side of the interface, there are 3 options at the top:
-
Result: operation result. -
JS output: Svelte compiledJScode. -
CSS output: Svelte compiledCSScode.
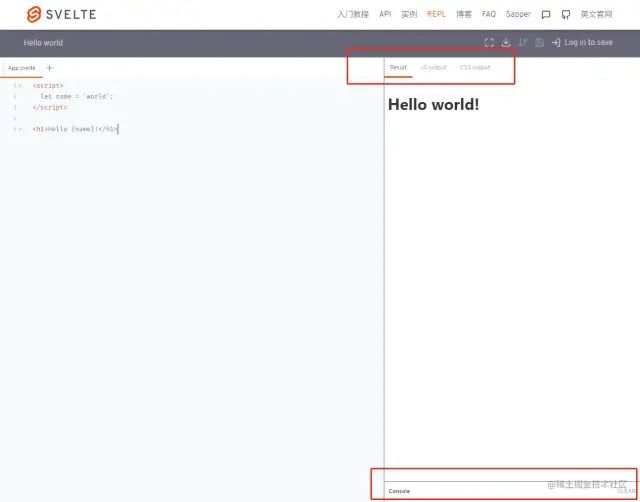
REPL There is also a download button in the upper right corner of the interface.
When you have written the code in the online environment, you can click the download button to save the project locally. The downloaded file is one zip, and you need to manually decompress it yourself.
Then use the following command to initialize the project and run it.
# 1、初始化项目
npm install

# 2、运行项目
npm run dev

# 3、在浏览器访问 http://localhost:5000
复制代码
operation result:
Rollup Edition
Svelte official also provides a command to download the Svelte project to the local.
The command requires your project name at the end.
# 1、下载模板
npx degit sveltejs/template 项目名称

# 2、安装依赖
npm install

# 3、运行项目
npm run dev

# 4、在浏览器访问 http://localhost:8080
复制代码
operation result:
This is the official way to create a project, which is packaged using Rollup.
Both Rollup and Svelte are developed by the same author ( Rich Harris [43] ), and it is normal to use their own stuff.
Webpack version
If you don't want to use Rollup to package your project, you can try using Webpack.
# 1、下载模板
npx degit sveltejs/template-webpack 项目名称

# 2、安装依赖
npm install

# 3、运行项目
npm run dev

# 4、在浏览器访问 http://localhost:8080/
复制代码
operation result:
Parcel version
I don't recommend using this method to create a project, as Svelte doesn't provide a template for using the Parcel packaging tool. But there are third-party solutions on GitHub (click to visit the repository) [44] .
Download the code of DeMoorJasper/parcel-plugin-svelte [45] .
# 1、进入 `packages/svelte-3-example` 目录

# 2、安装依赖
npm install

# 3、运行项目
npm run start

# 4、在浏览器访问 http://localhost:1234/
复制代码
operation result:
Vite Edition
All the following examples in this article are developed using Vite to create a Svelte project.
The reason for creating projects with Vite is: fast!
# 1、下载模板的命令
npm init vite@latest

# 2、输入项目名

# 3、选择 Svelte 模板(我没选ts)

# 4、进入项目并安装依赖
npm install

# 5、运行项目
npm run dev

# 6、在浏览器访问 http://127.0.0.1:5173/
复制代码
operation result:
This article uses Vite to create a project. The directory structure is slightly different from the project structure created by the Rollup version, but the development logic is the same.
start
index.html 、src/main.js 和 src/App.svelte 这三个是最主要的文件。
index.html 是项目运行的入口文件,它里面引用了 src/main.js 文件。
src/main.js 里引入了 src/App.svelte 组件,并使用以下代码将 src/App.svelte 的内容渲染到 #app 元素里。
const app = new App({
  target: document.getElementById('app')
})
复制代码
target 指明目标元素。
我们大部分代码都是写在 .svelte 后缀的文件里。
.svelte 文件主要保安 多个 HTML 元素、1个 script 元素 和 1个 style 元素 。这3类元素都是可选的。
我们主要的工作目录是 src 目录。
为了减轻学习难度,我们先做这几步操作。
1、清空全局样式
如果你使用 Rollup版 创建项目,不需要做这一步。
在使用 Vite 创建的 Svelte 项目中,找到 src/app.css 文件,并把里面的内容清空掉。
2、改造 src/App.svelte
将 src/App.svelte 文件改成以下内容
<script>
  let name = '雷猴'

  function handleClick() {
    name = '鲨鱼辣椒'
  }
</script>

<div>Hello {name}</div>
<button on:click={handleClick}>改名</button>
复制代码
此时点击按钮,页面上的 “雷猴” 就会变成 “鲨鱼辣椒”
上面的代码其实和 Vue 有点像。
-
变量和方法都写在
<script>标签里。 -
在
HTML中使用{}可以绑定变量和方法。 -
通过
on:click可以绑定点击事件。
只需写以上代码,Svelte 就会自动帮我们做数据响应的操作。一旦数据发生改变,视图也会自动改变。
是不是非常简单!
基础模板语法
Svelte 的模板语法其实和 Vue 是有点像的。如果你之前已经使用过 Vue,那本节学起来就非常简单。
插值
在 “起步章节” 已经使用过 插值 了。在 Svelte 中,使用 {} 大括号将 script 里的数据绑定到 HTML 中。
<script>
  let name = '雷猴'
</script>

<div>{name}</div>
复制代码
此时页面上就会出现 name 的值。
这种语法和 Vue 是有点像的,Vue 使用双大括号的方式 {{}} 绑定数据。Svelte 就少一对括号。
表达式
在 HTML 中除了可以绑定变量外,还可以绑定表达式。
<script>
  let name = '雷猴'

  function sayHi() {
    return `${name} 世界!`
  }

  let a = 1
  let b = 2

  let state = false
</script>

<div>{sayHi()}</div>

<div>{a} + {b} = {a + b}</div>

<div>{state ? '雷猴' : '鲨鱼辣椒'}</div>
复制代码
属性绑定
HTML 的属性需要动态绑定数据时,也是使用 {} 语法。
<script>
  let name = '雷猴'
</script>

<div title={name}>Hello</div>
复制代码
当鼠标放到 div 标签上时,会出现 title 里的提示信息。
渲染 HTML 标签 @html
如果只是使用插值的方法渲染带有 HTML 标签的内容,Svelte 会自动转义 < 、> 之类的标签。
<script>
  let h1El = '<h1 style="color: pink;">雷猴</h1>'
</script>

<div>{h1El}</div>
复制代码
这种情况多数出现在渲染富文本。
在 Vue 中有 v-html 方法,它可以将 HTML 标签渲染出来。在 Svelte 中也有这个方法,在插值前面使用 @html 标记一下即可。

<script>
  let h1El = '<h1 style="color: pink;">雷猴</h1>'
</script>

<div>{@html h1El}</div>
复制代码
但此方法有可能遭受 XSS 攻击。
我在 《NodeJS 防止xss攻击》[46] 中简单演示过 XSS 攻击,有兴趣的可以看看。
样式绑定
在日常开发中,给 HTML 标签设置样式主要通过 行内 style 和 class 属性。
基础的 HTML 写法和原生的一样,这里不过多讲解。
下面主要讲动态设置样式,也就是将 JS 里的变量或者表达式绑定到 style 或者 class 里。
行内样式 style

<script>
  let color = 'red'

  setTimeout(() => {
    color = 'blue'
  }, 1000)
</script>

<div style="color: {color}">雷猴</div>
复制代码
1秒后,文字从红色变成蓝色。
绑定 class

<script>
  let foo = true

  setTimeout(() => {
    foo = false
  }, 1000)
</script>

<div class:active={foo}>雷猴</div>

<style>
  .active {
    color: red;
  }
</style>
复制代码
在 HTML 里可以使用 class:xxx 动态设置要激活的类。这里的 xxx 是对应的类名。
语法是 class:xxx={state} ,当 state 为 true 时,这个样式就会被激活使用。
条件渲染 #if
使用 {#if} 开头,{/if} 结尾。
基础条件判断
{#if 条件判断}
...
{/if}
复制代码
举个例子

<script>
  let state = true

  setTimeout(() => {
    state = false
  }, 1000)
</script>

{#if state}
  <div>雷猴</div>
{/if}
复制代码
1秒后改变状态
两种条件
{#if 条件判断}
...
{:else}
...
{/if}
复制代码
举个例子
<script>
  let state = true

  setTimeout(() => {
    state = false
  }, 1000)
</script>

{#if state}
  <div>雷猴</div>
{:else}
  <div>鲨鱼辣椒</div>
{/if}
复制代码
多种条件
{#if 条件判断}
...
{:else if 条件判断}
...
{/if}
复制代码
举个例子
<script>
  let count = 1

  setInterval(() => {
    count++
  }, 1000)
</script>

{#if count === 1}
  <div>雷猴</div>
{:else if count === 2}
  <div>鲨鱼辣椒</div>
{:else}
  <div>蟑螂恶霸</div>
{/if}
复制代码
条件渲染的用法比较简单,只要 JS 基础就能看得懂。
列表渲染 #each
如果你有一堆数据需要展示出来,可以使用 #each 方法。
使用 {#each} 开头,{/each} 结尾。
遍历数组
{#each expression as name}
...
{/each}
复制代码
举个例子
<script>
  let list = ['a', 'b', 'c', 'd', 'e', 'f']
</script>

<ul>
  {#each list as item}
   <li>{item}</li>
  {/each}
</ul>
复制代码
要注意,Svelte 和 Vue 的遍历在写法上有点不同。
Vue的方式是:
<div v-for="元素 in 源数据">
  <span>{{元素}}</span>
</div>
复制代码
Svelte的方式是:
<div>
  {#each 源数据 as 元素}
    <span>{元素}</span>
  {/each}
</div>
复制代码
遍历数组(带下标)
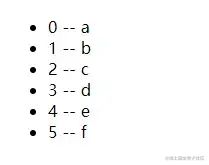
<script>
  let list = ['a', 'b', 'c', 'd', 'e', 'f']
</script>

<ul>
  {#each list as item, index}
   <li>{index} -- {item}</li>
  {/each}
</ul>
复制代码
注意:as 后面首先跟着元素,然后才是下标。而且元素和下标不需要用括号括起来。
如果元素是对象,可以解构

<script>
  let list = [
    {name: '雷猴'},
    {name: '鲨鱼辣椒'}
  ]
</script>

<ul>
  {#each list as {name}}
   <li>{name}</li>
  {/each}
</ul>
复制代码
默认内容
如果源数据没有内容,是空数组的情况下,还可以组合 {:else} 一起使用。

<script>
  let list = []
</script>

<div>
  {#each list as {name}}
   <div>{name}</div>
  {:else}
   <div>暂无数据</div>
  {/each}
</div>
复制代码
事件绑定 on:event
使用 on: 指令监听 DOM 事件,on: 后面跟随事件类型
语法:
on:事件类型={事件名}
复制代码
举个例子,点击按钮时在控制台输出 “雷猴”。

<script>
  function sayHi() {
    console.log('雷猴')
  }
</script>

<button on:click={sayHi}>打招呼</button>
复制代码
绑定其他事件(比如change等)也是同样的道理。
事件修饰符
如果你只希望某些事件只执行一次,或者取消默认行为,或者阻止冒泡等,可以使用事件修饰符。
语法:
on:事件类型|修饰符={事件名}
复制代码
举个例子,我希望点击事件只能执行一次,之后再点击都无效,可以使用官方提供的 once 修饰符。
<script>
  function sayHi() {
    console.log('雷猴')
  }
</script>

<button on:click|once={sayHi}>打招呼</button>
复制代码
从上图可以看出,多次点击都只是输出1次“雷猴”。
除了 once 之外,还有以下这些修饰符可以用:
-
preventDefault:禁止默认事件。在程序运行之前调用event.preventDefault() -
stopPropagation:调用event.stopPropagation(), 防止事件到达下一个标签 -
passive:改善了 touch/wheel 事件的滚动表现(Svelte会在合适的地方自动加上它) -
capture:表示在 _capture_阶段而不是_bubbling_触发其程序 -
once:程序运行一次后删除自身
串联修饰符
修饰符还可以串联起来使用,比如 on:click|once|capture={...}
但需要注意,有些特殊的标签使用修饰符会出现“意想不到”的结果,比如 <a> 标签。
<script>
  function toLearn() {
    console.log('还在思考要不要学Canvas')
  }
</script>

<a
  href="https://juejin.cn/post/7116784455561248775"
  on:click|once|preventDefault={toLearn}
>去学习Canvas ?</a>
复制代码
本来是想给 <a> 标签绑定一个点击事件,第一次点击时在控制台输出一句话,并且禁止 <a> 标签的默认事件。
所以使用了 once 和 preventDefault 修饰符。
但实际上并非如此。上面的代码意思是 once 设定了只执行一次 toLearn 事件,并且只有一次 preventDefault 是有效的。
只有点击时就不触发 toLearn 了,而且 preventDefault 也会失效。所以再次点击时,<a>元素就会触发自身的跳转功能。
数据绑定 bind
数据绑定通常会和表单元素结合使用。
bind 可以做到双向数据绑定的效果。我觉得 Svelte 里的 bind 有点像 Vue 的 v-model。
语法:
bind:property={variable}
复制代码
input 单行输入框
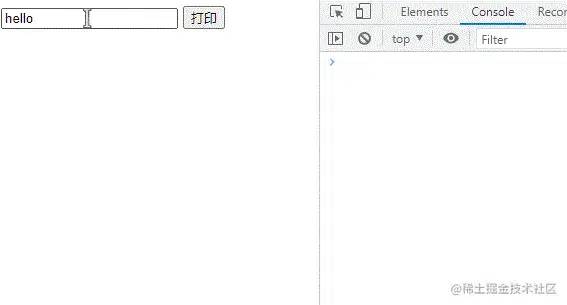
<script>
  let msg = 'hello'

  function print() {
    console.log(msg)
  }
</script>

<input type="text" value={msg} />
<button on:click={print}>打印</button>
复制代码
如果只是使用 value={msg} 的写法,input 默认值是 hello ,当输入框的值发生改变时,并没有把内容反应回 msg 变量里。
此时就需要使用 bind 了。
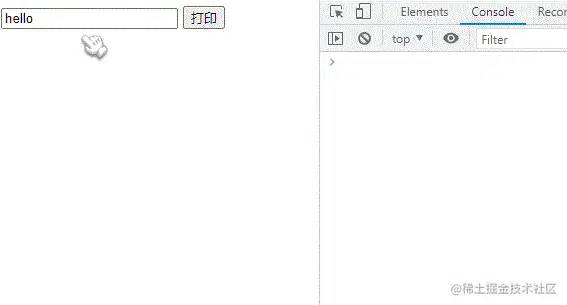
<!-- 省略部分代码 -->
<input type="text" bind:value={msg} />
复制代码
textarea 多行文本框
多行文本框同样绑定在 value 属性上。
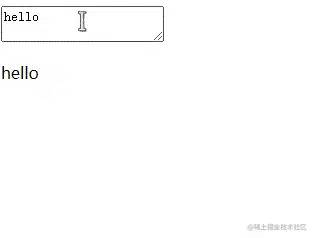
<script>
  let msg = 'hello'
</script>

<textarea type="text" bind:value={msg} />
<p>{msg}</p>
复制代码
input range 范围选择
因为都是 input 元素,只是 type 不同而已。所以范围选择元素同样需要绑定 value 。

<script>
  let val = 3
</script>

<input type="range" bind:value={val} min=0 max=10 />
<p>{val}</p>
复制代码
radio 单选
单选框通常是成组出现的,所以要绑定一个特殊的值 bind:grout={variable}

<script>
  let selected = '2'
</script>

<input type="radio" bind:group={selected} value="1" />
<input type="radio" bind:group={selected} value="2" />
<input type="radio" bind:group={selected} value="3" />
<p>{selected}</p>
复制代码
checkbox 复选框
<script>
  let roles = []
</script>

<input type="checkbox" bind:group={roles} value="雷猴" />
<input type="checkbox" bind:group={roles} value="鲨鱼辣椒" />
<input type="checkbox" bind:group={roles} value="蟑螂恶霸" />
<input type="checkbox" bind:group={roles} value="蝎子莱莱" />

<p>{roles}</p>
复制代码
select 选择器
<script>
  let selected = 'a'
</script>

<select bind:value={selected}>
 <option value='a'>a</option>
 <option value='b'>b</option>
 <option value='c'>c</option>
</select>

<span>{selected}</span>
复制代码
select multiple 选择器
multiple 和 checkbox 有点像。
<script>
  let selected = []
</script>

<select multiple bind:value={selected}>
 <option value="雷猴">雷猴</option>
 <option value="鲨鱼辣椒">鲨鱼辣椒</option>
 <option value="蟑螂恶霸">蟑螂恶霸</option>
 <option value="蝎子莱莱">蝎子莱莱</option>
</select>

<span>{selected}</span>
复制代码
简写形式
如果 bind 绑定的属性和在 JS 里声明的变量名相同,那可以直接绑定
<script>
  let value = 'hello'
</script>

<input type="text" bind:value />

<p>{value}</p>
复制代码
这个例子中,bind:value 绑定的属性是 value ,而在 JS 中声明的变量名也叫 value ,此时就可以使用简写的方式。
$: 声明反应性
通过使用
$:JS label 语法[47]作为前缀。可以让任何位于 top-level 的语句(即不在块或函数内部)具有反应性。每当它们依赖的值发生更改时,它们都会在 component 更新之前立即运行。
上面这段解释是官方文档的解释。
$: 在文档中称为 Reactivity ,中文文档成它为 反应性能力。
但我使用 $: 时,觉得这个功能有点像 Vue 的 computed。
$: 可以监听表达式内部的变化从而做出响应。

<script>
  let count = 0;
  $: doubled = count * 2;

  function handleClick() {
    count += 1;
  }
</script>

<button on:click={handleClick}>
  点击加1
</button>

<p>{count} 翻倍后 {doubled}</p>
复制代码
使用 $: 声明的 double 会自动根据 count 的值改变而改变。
如果将以上代码中 $: 改成 let 或者 var 声明 count ,那么 count 将失去响应性。
这样看来,真的和 Vue 的 computed 的作用有那么一点像。
异步渲染 #await
Svelte 提供异步渲染标签,可以提升用户体验。
语法:
{#await expression}
...
{:then name}
...
{:catch name}
...
{/await}
复制代码
以 #await 开始,以 /await 结束。
:then 代表成功结果,:catch 代表失败结果。
expression 是判断体,要求返回一个 Promise。
其实用法和 #if ... :else if ... /if 有那么一丢丢像。
举个例子

<script>
  const api = new Promise((resolve, reject) => {
    setTimeout(() => {
      resolve('请求成功,数据是xxxxx')
    }, 1000)
  })
</script>

{#await api}
  <span>Loading...</span>
{:then response}
  <span>{response}</span>
{:catch error}
  <span>{error}</span>
{/await}
复制代码
如果将上面的 resolve 改成 reject 就会走 :catch 分支。
基础组件
在 Svelte 中,创建组件只需要创建一个 .svelte 为后缀的文件即可。
通过 import 引入子组件。
比如,在 src 目录下有 App.svelte 和 Phone.svelte 两个组件。
App.svelte 是父级,想要引入 Phone.svelte 并在 HTML 中使用。
App.svelte
<script>
  import Phone from './Phone.svelte'
</script>

<div>子组件 Phone 的内容:</div>
<Phone />
复制代码
Phone.svelte
<div>电话:13266668888</div>
复制代码
组件通讯
组件通讯主要是 父子组件 之间的数据来往。
父传子
比如上面的例子,手机号希望从 App.svelte 组件往 Phone.svelte 里传。
可以在 Phone.svelte 中声明一个变量,并公开该变量。
App.svelte 就可以使用对应的属性把值传入。
App.svelte
<script>
  import Phone from './Phone.svelte'
</script>

<div>子组件 Phone 的内容:</div>
<Phone number="88888888" />
复制代码
Phone.svelte
<script>
  export let number = '13266668888'
</script>

<div>电话:{number}</div>
复制代码
如果此时 App.svelte 组件没有传值进来,Phone.svelte 就会使用默认值。
子传父
如果想在子组件中修改父组件的内容,需要把修改的方法定义在父组件中,并把该方法传给子组件调用。
同时需要在子组件中引入 createEventDispatcher 方法。
App.svelte
<script>
  import Phone from './Phone.svelte'
  function print(data) {
    console.log(`手机号: ${data.detail}`)
  }
</script>

<div>子组件 Phone 的内容:</div>
<Phone on:printPhone={print} />
复制代码
Phone.svelte
<script>
  import { createEventDispatcher } from 'svelte'
  const dispatch = createEventDispatcher()

  function printPhone() {
    dispatch('printPhone', '13288888888')
  }
</script>

<button on:click={printPhone}>输出手机号</button>
复制代码
父组件接受参数是一个对象,子组件传过来的值都会放在 detail 属性里。
插槽 slot
和 Vue 一样,Svelte 也有组件插槽。
在子组件中使用 <slot> 标签,可以接收父组件传进来的 HTML 内容。
App.svelte
<script>
  import Phone from './Phone.svelte'
</script>

<div>子组件 Phone 的内容:</div>
<Phone>
  <div>电话:</div>
  <div>13288889999</div>
</Phone>
复制代码
Phone.svelte
<style>
 .box {
  width: 100px;
  border: 1px solid #aaa;
  border-radius: 8px;
  box-shadow: 2px 2px 8px rgba(0,0,0,0.1);
  padding: 1em;
  margin: 1em 0;
 }
</style>

<div class="box">
 <slot>默认值</slot>
</div>
复制代码
生命周期
生命周期是指项目运行时,指定时期会自动执行的方法。
Svelte 中主要有以下几个生命周期:
-
onMount: 组件挂载时调用。 -
onDestroy: 组件销毁时执行。 -
beforeUpdate: 在数据更新前执行。 -
afterUpdate: 在数据更新完成后执行。 -
tick: DOM元素更新完成后执行。
以上生命周期都是需要从 svelte 里引入的。
用 onMount 举个例子
<script>
  import { onMount } from 'svelte'
  let title = 'Hello world'

  onMount(() => {
    console.log('onMount')
    setTimeout(() => title = '雷猴', 1000)
  })
</script>

<h1>{title}</h1>
复制代码
在组件加载完1秒后,改变 title 的值。
onDestroy、beforeUpdate 和 afterUpdate 都和 onMount 的用法差不多,只是执行的时间条件不同。你可以自己创建个项目试试看。
tick 是比较特殊的,tick 和 Vue 的 nextTick 差不多。
在 Svelte 中,tick 的使用语法如下:
import { tick } from 'svelte'

await tick()
// 其他操作
复制代码
总结
本文主要讲解了 Svelte 的基础用法,但 Svelte 的内容和 API 远不止此。它还有很多高级的用法以及提供了过渡动画功能等,这些都会放在高级篇讲解。
Svelte 是一个 Web 应用的构建工具,它打包出来的项目体积比较小,性能强,不使用虚拟DOM。
但 Svelte 的兼容性和周边生态相比起 Vue 和 React 会差一点。
所以日常项目中需要根据 Svelte 的优缺点进行取舍。
推荐阅读
推荐书籍
-
《点石成金:访客至上的Web和移动可用性设计秘笈》 -
《包容性Web设计》
推荐文章
-
👍《Canvas 从入门到劝朋友放弃(图解版)》[48] -
👍《SVG 从入门到后悔,怎么不早点学起来(图解版)》[49] -
👍《Fabric.js 从入门到膨胀》[50] -
👍《Vue3 过10种组件通讯方式》[51] -
👍《CSS也能用数字命名?》[52]
点赞 + 关注 + 收藏 = 学会了
关于本文
作者:德育处主任
https://juejin.cn/post/7121759118070644772
写在最后
I am a penman , if my article is helpful to you, please like it👍🏻 Support me
If you have any questions, you can also add me on WeChat: yllg_xbyj, to share your experience
❤️ After reading three things
If you find this content inspiring, I would like to invite you to do me three small favors:
-
Click " Watching " to let more people see this content
-
Pay attention to the public account " Hangbi e Jue ", continue to push selected good articles for you, and reply to "Jiaqun " to join the exchange group
-