This article is about 8,000 words, and it is estimated that it will take 27 minutes to read.
Hi, my name is Quixn.
As front-end projects grow larger and code complexity increases, the need for modularity increases. Modularization is the basis of engineering. Only by modularizing the code and splitting it into reasonable units can we have the ability to schedule and integrate. Let's take a look at the concept of modularity, and how different modular solutions are used and the advantages and disadvantages.
1. Module overview
(1) Concept
Since there is a lot of interaction between code, if it is not well structured, the code becomes difficult to maintain, difficult to test, and difficult to debug. The use of modularity solves these problems. The characteristics of modularization are as follows:
-
Reusability: When an application is organized into modules, it is convenient to reuse these modules in other places, avoiding writing repetitive code, thereby speeding up the development process; -
Readability: As applications become more complex, the code can become difficult to read if all functionality is written in one file. If the application is designed using modules, each function is distributed in its own module, the code will be clearer and easier to read; -
Maintainability: The beauty of software is evolution, in the long run we need to keep adding new features to the application. When an app is structured into modules, functionality can be easily added or removed. In addition to that, fixing bugs is also part of software maintenance, and using modules makes it possible to locate problems more quickly.
Modularization is a method of separating the system into independent functional parts. The system can be divided into independent functional parts, the module interface is strictly defined, and the modules are transparent. By dividing the code into modules, each file is independent of each other, it is easier for developers to develop and maintain the code, and modules can call and communicate with each other. This is the basic mode of modern development.
(2) Mode
A JavaScript module consists of three parts:
-
Import: When using a module, you need to import the required module as a dependency. For example, if you want to create a React component, you need to import the react module. To use a tool library like Lodash, you need to install and import it as a dependency; -
Code: the specific code of the module; -
Export: The module interface, the content exported from the module can be used wherever the module is imported.
(3) Type
The implementation of modularization is inseparable from the corresponding agreement, that is, the specification. This is a top priority for being able to do modular work. There are many specifications for implementing modularity, such as: AMD, RequireJS, CMD, SeaJS, UMD, CommonJS, ES6 Module. In addition, IIFE (immediately executed function) is also a solution to achieve modularity.
This article will cover six of them:
-
IIFE: Immediately call function expression -
AMD: Asynchronous module loading mechanism -
CMD: Common Module Definition -
UMD: Unified Module Definition -
CommonJS: Node.js adopts this specification -
ES modules: JavaScript built-in module system
2. IIFE
Before ECMAScript 6, modules were not built into JavaScript because JavaScript was originally designed for small browser scripts. This lack of modularity leads to the use of shared global variables in different parts of the code.
For example, for the following code:
var name = 'JavaScript';
var age = 20;
When the above code runs, the nameand agevariables are added to the global object. Therefore, all JavaScript scripts in the application have access to the global variables nameand age, which can easily lead to code errors because these global variables can also be accessed and modified in other unrelated units. Among other things, adding variables to the global object clutters the global namespace and increases the chance of naming conflicts.
Therefore, we need a way to encapsulate variables and functions, and only expose the defined interfaces to the outside world. So, to achieve modularity and avoid using global variables, you can create modules as follows:
(function () {
    // 声明私有变量和函数

    return {
        // 声明公共变量和函数
    }
})();
The above code is a closure that returns an object, which is what we often call IIFE (Immediately Invoked Function Expression), that is, the function expression is called immediately. In this function, a local scope is created. This avoids the use of global variables (IIFEs are anonymous functions), and the unit of code is encapsulated and isolated.
You can use the IIFE as a module like this:
var module = (function(){
  var age = 20;
  var name = 'JavaScript'

  var fn1 = function(){
    console.log(name, age)
  };

  var fn2 = function(a, b){
    console.log(a + b)
  };

  return {
    age,
    fn1,
    fn2,
  };
})();

module.age;           // 20
module.fn1();         // JavaScript 20
module.fn2(128, 64);  // 192
In this code, moduleit is a module we define, which defines two private variables ageand name, and defines two methods fn1and fn2, in fn1which modulethe private variables defined in are used to fn2receive external incoming parameters. Finally, the module exposes age, fn1, , to the outside world fn2. This forms a module.
When trying to call it directly from moduleoutside fn1, it will report an error:
fn1(); // Uncaught ReferenceError: fn1 is not defined
When trying to print the private variable inside it moduleoutside name, the result I get is undefined:
module.name; // undefined
The above example of IIFE follows the module pattern and has three parts, among which age, name, fn1, and fn2 are the code implementations inside the module, and the returned age, fn1, and fn2 are the exported content, that is, the interface. Calling modulemethods and variables is import use.
3. CommonJS
(1) Concept
① Definition
CommonJS is a JavaScript modular specification proposed by the community. It is a module specification provided for the JavaScript runtime environment outside the browser. Node.js adopts this specification.
Notice:
The browser does not support the use of the CommonJS specification; Node.js not only supports the use of CommonJS to implement modules, but also supports the latest ES modules.
The CommonJS specification loads the module synchronously, and the subsequent operations can only be performed after the loading is completed. However, since Node.js mainly runs on the server side, and the module files to be loaded are generally saved on the local hard disk, the loading is relatively fast, and there is no need to consider the asynchronous method.
② Grammar
The CommonJS specification stipulates that each file is a module, has an independent scope, and is invisible to other modules, so that it will not pollute the global scope. In CommonJS export, requiremodules can be exported and imported using and , respectively. Inside each module, there is an moduleobject that represents the current module. Through it to export the API, it has the following properties:
-
exports: The module exports the value. -
filename: Module file name, use absolute path; -
id: Module identifier, usually the module filename using an absolute path; -
loaded: Boolean value, indicating whether the module has been loaded; -
parent: object, representing the module that calls the module; -
children: Array, indicating other modules used by this module;
③ Features
The CommonJS specification has the following characteristics:
-
A file is a module, and all the code in the file runs in an independent scope, so it will not pollute the global space; -
Modules can be referenced and loaded multiple times. When it is loaded for the first time, it will be cached , and then the result will be read directly from the cache. -
Loading a module is to introduce the module.exportsattribute . The output of this attribute is a copy of the value . Once the value is output, changes in the module will not affect the output value. -
Modules are loaded in the order in which the code was imported.
④ Advantages and disadvantages
Advantages of CommonJS:
-
Simple to use -
Many tooling systems and packages are built using CommonJS; -
Used in Node.js, the popular JavaScript runtime environment.
Disadvantages of CommonJS
-
A module can be included in a JavaScript file; -
If you want to use it in a web browser, you need additional tools; -
Synchronous in nature and in some cases not suitable for use in a web browser.
(2) use
In CommonJS, a module can be imported through the require function, which will read and execute the JavaScript file and return the module's exports object, which will only be generated after the module script is run.
① Module export
Module content can be exported in two ways:
module.exports.TestModule = function() {
    console.log('exports');
}

exports.TestModule = function() {
    console.log('exports');
}
Then the export result of the two methods is the same, module.exportsand exportsthe difference between and can be understood as: exportsyes module.exportsreference, if it is exportscalled before the call exports=..., then the exportsmodule content cannot be exported through it, unless it is pointed to by exports=module.exportsthe reset exportsreference.
Of course, you can define the function first, and then export it:
function testModule() {
    console.log('exports');
}

module.exports = testModule;
This is the case when only one function is exported, when used like this:
testModule = require('./MyModule');

testModule();
If you export multiple functions, you can do this:
function testModule1() {
    console.log('exports1');
}

function testModule2() {
    console.log('exports2');
}
Import multiple functions and use:
({testModule1, testModule2} = require('./MyModule'));

testModule1();
testModule2();
② Module import
Modules can be imported in the following ways:
const module = require('./MyModule');
Note that if requirethe path does not have a suffix, it will automatically search in the order of .js, .jsonand ..node
③ Loading process
In CommonJS, requirethe loading process is as follows:
-
Load from cache first; -
If there is no cache, check whether it is a core module, if it is loaded directly; -
If it is not a core module, check whether it is a file module, parse the path, locate the file according to the parsed path, and then execute and load it; -
If none of the above, recursively follow the current path up one level, until the directory of the root node_modulesdirectory.
(3) Example
Let's look at an example of a shopping cart. The main function is to add items to the shopping cart and calculate the total price of the items in the shopping cart:
// cart.js

var items = [];

function addItem (name, price)
    item.push({
    name: name,
    price: price
  });
}

exports.total = function () {
    return items.reduce(function (a, b) {
      return a + b.price;
    }, 0);
};

exports.addItem = addItem;
Here, two methods are defined on the exports object in two ways: addItem and total, which are used to add a shopping cart and calculate the total price, respectively.
Let's test the module defined above in the console:
let cart = require('./cart');
Here the relative path is used to import the cart module and print the cart module. The results are as follows:
cart // { total: [Function], addItem: [Function: addItem] }
Add some items to the cart and calculate the total price of the current cart items:
cart.addItem('book', 60);
cart.total()  // 60

cart.addItem('pen', 6);
cart.total()  // 66
This is the basic way to create a module, we can create some methods and only expose the part of the code that we want other files to use. This part becomes the API, the application programming interface.
There is a problem here, there is only one shopping cart, i.e. there is only one instance of the module. Let's execute the following code in the console:
second_cart = require('./cart');
Will a new shopping cart be created then? This is not the case, printing the total amount of items in the current cart, it is still 66:
second_cart.total(); // 66
When we create multiple instances, we need to create a constructor in the module, and rewrite the cart.jsfile :
// cart.js

function Cart () {
    this.items = [];
}

Cart.prototype.addItem = function (name, price) {
    this.items.push({
        name: name,
        price: price
    });
}

Cart.prototype.total = function () {
    return this.items.reduce(function(a, b) {
        return a + b.price;
    }, 0);
};

module.export = Cart;
Now, when you need to use this module, the Cart constructor is returned instead of an object with the cart function as a property. Let's import this module and create two shopping cart instances:
Cart = require('./second_cart');

cart1 = new Cart();
cart2 = new Cart();

cart1.addItem('book', 50);
cart1.total();   // 50
cart2.total();   // 50
4. AMD
(1) Concept
One of the drawbacks of CommonJS is that it is synchronous, and AMD aims to solve this problem by asynchronously loading modules and their dependencies via APIs defined in the specification. AMD's full name is Asynchronous Module Definition, which is an asynchronous module loading mechanism . It specifies how to define modules, how to export them, and how to introduce dependencies.
An important feature of the AMD specification is asynchronous loading. The so-called asynchronous loading refers to concurrent loading of dependent modules at the same time. When all dependent modules are loaded, the callback function of the current module is executed. This loading method is exactly in line with the performance requirements of the browser environment.
① Grammar
The AMD specification defines a global function define through which modules can be defined and referenced. It has 3 parameters:
define(id?, dependencies?, factory);
It contains three parameters:
-
id: Optional, refers to the module path. If this parameter is not provided, the module name defaults to the path to the specified script requested by the module loader. -
dependencies: Optional, refers to an array of modules. It defines the modules it depends on. Dependent modules must be executed according to the module's factory function priority, and the result of execution should be passed to the factory function in the form of parameters in the order of positions in the dependency array. -
factory: Initializes the function or object to be executed for the module. If it is a function, then the function is a singleton mode and will only be executed once; if it is an object, this object should be the output value of the module.
In addition to this, to use this module, you need to use the require function defined in the specification:
require(dependencies?, callback);
It contains two parameters:
-
dependencies: array of dependencies; -
callback: The callback function to execute when the module is loaded.
For a more detailed description of the AMD API, you can view the AMD API specification on GitHub: https://github.com/amdjs/amdjs-api/blob/master/AMD.md.
② Compatibility
Browser compatibility for this specification is as follows:

③ Advantages and disadvantages
Advantages of AMD :
-
Asynchronous loading results in better startup times; -
Ability to split modules into multiple files; -
support constructor; -
Works in the browser without additional tools.
Disadvantages of AMD :
-
The grammar is very complicated and the learning cost is high; -
A loader library like RequireJS is required to use AMD.
(2) use
Of course, the above is just the theory of the AMD specification, to understand how this theory works in code, you need to look at the actual implementation of AMD. RequireJS is an implementation of the AMD specification, which is described as a "JavaScript file and module loader". Let's take a look at how RequireJS is used.
① Introduce RequireJS
RequireJS can be installed via npm:
npm i requirejs
You can also import files in html require.jsfiles :
<script data-main="js/config" src="js/require.js"></script>
This scripttag has two properties:
-
data-main="js/config": This is the entry point of RequireJS and the place to configure it; -
src="js/require.js": The normal way to load a script, will load therequire.jsfile .
scriptAdd the following code under the tag to initialize RequireJS:
<script>
    require(['config'], function() {
        //...
    })
</script>
When the page finishes loading the configuration file, require()the code in will run. This scripttag is an asynchronous call, which means that when RequireJS is src="js/require.jsloaded via , it will asynchronously load the configuration file specified in the data-mainattribute . Therefore, any JavaScript code under this tag can execute the configuration file when RequireJS gets it.
So what's the difference between in AMD require()and CommonJS require()?
-
AMD require() accepts an array of dependencies and a callback function, and CommonJSrequire()accepts a module ID; -
AMD require()is asynchronous while CommonJSrequire()is synchronous.
② Define AMD module
Here is a basic module definition in AMD:
define(['dependency1', 'dependency2'], function() {
  // 模块内容
});
This module definition clearly shows that it contains two dependencies and one function.
Let's define a addition.jsfile called that contains a function that performs the addition operation, but has no dependencies:
// addition.js
define(function() {
    return function(a, b) {
        alert(a + b);
    }
});
Then define calculator.jsa :
define(['addition'], function(addition) {
    addition(7, 9);
});
When RequireJS sees the above code block, it will go look for the dependencies and automatically inject them into the module by passing them as arguments to the function.
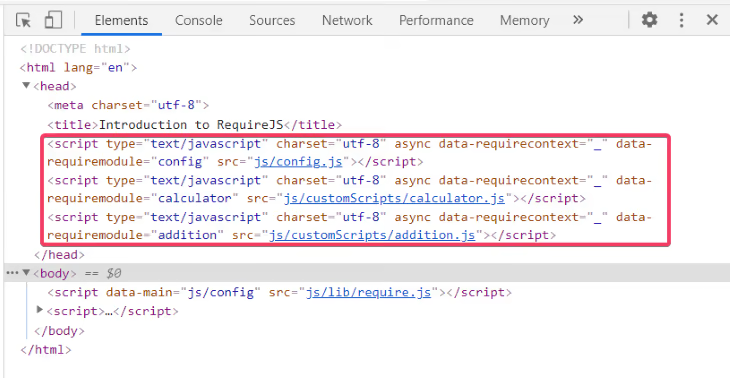
RequireJS will addition.jsautomatically calculator.jscreate a <script>tag , place it in the HTML <head>element, wait for them to load, and then run the function, which is similar to require()the behavior of .

下面来更新一下 index.html 文件:
// index.html
require(['config'], function() {
    require(['calculator']);
});
当浏览器加载 index.html 文件时,RequireJS 会尝试查找 calculator.js 模块,但是没有找到,所以浏览器也不会有任何反应。那该如何解决这个问题呢?我们必须提供配置文件来告诉 RequireJS 在哪里可以找到 calculator.js(和其他模块),因为它是引用的入口。
下面是配置文件的基本结构:
requirejs.config({
    baseURL: "string",
    paths: {},
    shim: {},
});
这里有三个属性值:
-
baseURL:告诉 RequireJS 在哪里可以找到模块; -
path:这些是与 define() 一起使用的模块的名称。在路径中,可以使用文件的 CDN,这时 RequireJS 将尝试在本地可用的模块之前加载模块的 CDN 版本; -
shim:允许加载未编写为 AMD 模块的库,并允许以正确的顺序加载它们
我们的配置文件如下:
requirejs.config({
    baseURL: "js",
    paths: {
        // 这种情况下,模块位于 customScripts 文件中
        addition: "customScripts/addition",
        calculator: "customScripts/calculator",
    },
});
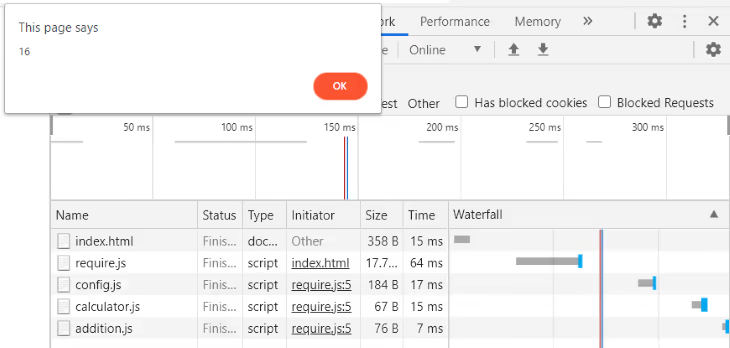
配置完成之后,重新加载浏览器,就会收到浏览器的弹窗:

这就是在 AMD 中使用 RequireJS 定义模块的方法之一。我们还可以通过指定其路径名来定义模块,该路径名是模块文件在项目目录中的位置。下面给出一个例子:
define("path/to/module", function() {
    // 模块内容
})
当然,RequireJS 并不鼓励这种方法,因为当我们将模块移动到项目中的另一个位置时,就需要手动更改模块中的路径名。
在使用 AMD 定义模块时需要注意:
-
在依赖项数组中列出的任何内容都必须与工厂函数中的分配相匹配; -
尽量不要将异步代码与同步代码混用。当在 index.html 上编写其他 JavaScript 代码时就是这种情况。
5. CMD
CMD 全称为 Common Module Definition,即通用模块定义。CMD 规范整合了 CommonJS 和 AMD 规范的特点。sea.js 是 CMD 规范的一个实现 。
CMD 定义模块也是通过一个全局函数 define 来实现的,但只有一个参数,该参数既可以是函数也可以是对象:
define(factory);
如果这个参数是对象,那么模块导出的就是对象;如果这个参数为函数,那么这个函数会被传入 3 个参数:
define(function(require, exports, module) {
  //...
});
这三个参数分别如下:(1)require:一个函数,通过调用它可以引用其他模块,也可以调用 require.async 函数来异步调用模块;(2)exports:一个对象,当定义模块的时候,需要通过向参数 exports 添加属性来导出模块 API;(3)module 是一个对象,它包含 3 个属性:
-
uri:模块完整的 URI 路径; -
dependencies:模块依赖; -
exports:模块需要被导出的 API,作用同第二个参数exports。
下面来看一个例子,定义一个 increment 模块,引用 math 模块的 add 函数,经过封装后导出成 increment 函数:
define(function(require, exports, module) {
  var add = require('math').add;
  exports.increment = function(val) {
    return add(val, 1);
  };
  module.id = "increment";
});
CMD 最大的特点就是懒加载,不需要在定义模块的时候声明依赖,可以在模块执行时动态加载依赖。除此之外,CMD 同时支持同步加载模块和异步加载模块。
AMD 和 CMD 的两个主要区别如下:
-
AMD 需要异步加载模块,而 CMD 在加载模块时,可以同步加载( require),也可以异步加载(require.async)。 -
CMD 遵循依赖就近原则,AMD 遵循依赖前置原则。也就是说,在 AMD 中,需要把模块所需要的依赖都提前在依赖数组中声明。而在 CMD 中,只需要在具体代码逻辑内,使用依赖前,把依赖的模块 require进来。
6. UMD
UMD 全程为 Universal Module Definition,即统一模块定义。其实 UMD 并不是一个模块管理规范,而是带有前后端同构思想的模块封装工具。
UMD 是一组同时支持 AMD 和 CommonJS 的模式,它旨在使代码无论执行代码的环境如何都能正常工作,通过 UMD 可以在合适的环境选择对应的模块规范。比如在 Node.js 环境中采用 CommonJS 模块管理,在浏览器环境且支持 AMD 的情况下采用 AMD 模块,否则导出为全局函数。
一个UMD模块由两部分组成:
-
**立即调用函数表达式 (IIFE)**:它会检查使用模块的环境。其有两个参数: root和factory。root是对全局范围的 this 引用,而factory是定义模块的函数。 -
匿名函数: 创建模块,此匿名函数被传递任意数量的参数以指定模块的依赖关系。
UMD 的代码实现如下:
(function (root, factory) {
  if (typeof define === 'function' && define.amd) {
    define([], factory);
  } else if (typeof exports === 'object') {
    module.exports,
    module.exports = factory();
  } else {
    root.returnExports = factory();
  }
}(this, function () {
  // 模块内容定义
  return {};
}));
它的执行过程如下:
-
先判断是否支持 Node.js 模块格式(exports 是否存在),存在则使用 Node.js 模块格式; -
再判断是否支持 AMD(define 是否存在),存在则使用 AMD 方式加载模块; -
若两个都不存在,则将模块公开到全局(Window 或 Global)。
UMD的特点如下:① UMD 的优点:
-
小而简洁; -
适用于服务器端和客户端。
② UMD 的缺点:
-
不容易正确配置。
7. ES 模块
(1)概念
通过上面的例子,你可能会发现,使用 UMD、AMD、CMD 的代码会变得难以编写和理解。于是在 2015 年,负责 ECMAScript 规范的 TC39 委员会将模块添加为 JavaScript 的内置功能,这些模块称为 ECMAScript模块,简称 ES 模块。
模块和经典 JavaScript 脚本略有不同:
-
模块默认启用严格模式,比如分配给未声明的变量会报错:
<script type="module">
  a = 5;
</script>
-
模块有一个词法顶级作用域。这意味着,例如,运行 var foo = 42; 在模块内不会创建名为 foo 的全局变量,可通过浏览器中的 window.foo 访问,尽管在经典JavaScript脚本中会出现这种情况;
<script type="module">
  let person = "Alok";
</script>

<script type="module">
   alert(person);{/* Error: person is not defined */}
</script>
-
模块中的 this 并不引用全局 this,而是 undefined。(如果需要访问全局 this,可以使用 globalThis);
<script>
  alert(this); {/* 全局对象 */}
</script>

<script type="module">
  alert(this); {/* undefined */}
</script>
-
新的静态导入和导出语法仅在模块中可用,并不适用于经典脚本。 -
顶层 await 在模块中可用,但在经典 JavaScript 脚本中不可用; -
await 不能在模块中的任何地方用作变量名,经典脚本中的变量可以在异步函数之外命名为 await; -
JavaScript 会提升 import 语句。因此,可以在模块中的任何位置定义它们。
CommonJS 和 AMD 都是在运行时确定依赖关系,即运行时加载,CommonJS 加载的是拷贝。而 ES 模块是在编译时就确定依赖关系,所有加载的其实都是引用,这样做的好处是可以执行静态分析和类型检查。
(2)语法
① 导出
当导出模块代码时,需要在其前面添加 export 关键词。导出内容可以是变量、函数或类。任何未导出的代码都是模块私有的,无法在该模块之被外访问。ES 模块支持两种类型的导出:
-
命名导出:
export const first = 'JavaScript';
export function func() {
    return true;
}
当然,我们也可以先定义需要导出的变量/函数,最后统一导出这些变量/函数:
const first = 'JavaScript';
const second = 'TypeScript';
function func() {
    return true;
}
export {first, second, func};
-
默认导出:
function func() {
    return true;
}

export default func;
当然,也可以直接默认导出:
export default function func() {
    return true;
}
默认导出可以省略变量/函数/类名,在导入时可以为其指定任意名称:
// 导出
export default function () {
  console.log('foo');
}
// 导入
import customName from './module';
注意: 导入默认模块时不需要大括号,导出默认的变量或方法可以有名字,但是对外是无效的。export default 在一个模块文件中只能使用一次。
可以使用 as 关键字来重命名需要暴露出的变量或方法,经过重命名后同一变量可以多次暴露出去:
const first = 'test';
export {first as second};
② 导入
使用命名导出的模块,可以通过以下方式来导入:
import {first, second, func} from './module';
使用默认导出的模块,可以通过以下方式来引入,导入名称可以自定义,无论导出的名称是什么:
import customName from './module.js';
导入模块位置可以是相对路径也可以是绝对路径,.js扩展名是可以省略的,如果不带路径而只是模块名,则需要通过配置文件告诉引擎查找的位置:
import {firstName, lastName} from './module';
可以使用 as 关键字来将导入的变量/函数重命名:
import { fn as fn1 } from './profile';
在 ES 模块中,默认导入和命名导入是可以同时使用的,比如在 React 组件中:
import React, {usestate, useEffect} from 'react';

const Comp = () => {
 return <React.Fragment>...</React.Fragment>
}

export default Comp;
可以使用 as 关键字来加载整个模块,用于从另一个模块中导入所有命名导出,会忽略默认导出:
import * as circle from './circle';
console.log('圆面积:' + circle.area(4));
console.log('圆周长:' + circle.circumference(14));
③ 动态导入
上面我们介绍的都是静态导入,使用静态 import 时,整个模块需要先下载并执行,然后主代码才能执行。有时我们不想预先加载模块,而是按需加载,仅在需要时才加载。这可以提高初始加载时的性能,动态 import 使这成为可能:
<script type="module">
  (async () => {
    const moduleSpecifier = './lib.mjs';
    const {repeat, shout} = await import(moduleSpecifier);
    repeat('hello');
    // → 'hello hello'
    shout('Dynamic import in action');
    // → 'DYNAMIC IMPORT IN ACTION!'
  })();
</script>
与静态导入不同,动态导入可以在常规脚本中使用。
④ 其他用法
可以使用以下方式来先导入后导出模块内容:
export { foo, bar } from './module';
上面的代码就等同于:
import { foo, bar } from './module';
export { foo, boo};
另一个与模块相关的新功能是import.meta,它是一个给 JavaScript 模块暴露特定上下文的元数据属性的对象。它包含了这个模块的信息,比如说这个模块的 URL。
默认情况下,图像是相对于 HTML 文档中的当前 URL 加载的。import.meta.url可以改为加载相对于当前模块的图像:
function loadThumbnail(relativePath) {
  const url = new URL(relativePath, import.meta.url);
  const image = new Image();
  image.src = url;
  return image;
}

const thumbnail = loadThumbnail('../img/thumbnail.png');
container.append(thumbnail);
(3)在浏览器使用
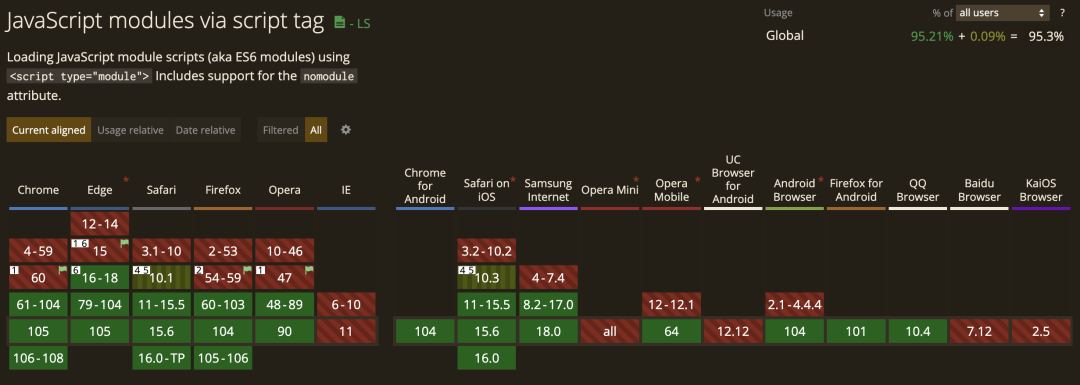
目前主流浏览器都支持 ES 模块:

如果想在浏览器中使用原生 ES 模块方案,只需要在 script 标签上添加 type="module" 属性。通过该属性,浏览器知道这个文件是以模块化的方式运行的。而对于不支持的浏览器,需要通过 nomodule 属性来指定某脚本为 fallback 方案:
<script type="module">
  import module1 from './module1'
</script>
<script nomodule src="fallback.js"></script>
支持 type="module" 的浏览器会忽略带有 nomodule 属性的脚本。使用 type="module" 的另一个作用就是进行 ES Next 兼容性的嗅探。因为支持 ES 模块化的浏览器,都支持 ES Promise 等特性。
由于默认情况下模块是延迟的,因此可能还希望以延迟方式加载 nomodule 脚本:
<script nomodule defer src="fallback.js"></script>
(4)在 Node.js 使用
上面提到,Node.js 使用的是 CommonJS 模块规范,它也是支持 ES 模块的。在 Node.js 13 之前,ES 模块是一项实验性技术,因此,可以通过使用 .mjs 扩展名保存模块并通过标志访问它来使用模块。
从 Node.js 13 开始,可以通过以下两种方式使用模块:
-
使用 .mjs扩展名保存模块; -
在最近的文件夹中创建一个 type="module"的package.json文件。
那如何在小于等于 12 版本的 Node.js 中使用 ES 模块呢?可以在执行脚本启动时加上 --experimental-modules,不过这一用法要求相应的文件后缀名必须为 .mjs:
node --experimental-modules module1.mjs
import module1 from './module1.mjs'
module1
参考:
https://v8.dev/features/modules https://blog.logrocket.com/javascript-reference-guide-js-modules/

小Q全栈指南
加‘Quixn’微信
回复‘加群’
一起学习成长

