In this article, we learn Linux system commands - help commands, file permission commands.
In the Linux system, everything is a file, and these files have different permissions. Before learning file permissions, let's learn the help commands of the Linux system.
help command
man
Use man to get help information, the basic syntax is as follows:
man [命令或配置文件]
The sample code is as follows:
man ls # 查看ls命令的帮助信息
As shown below:
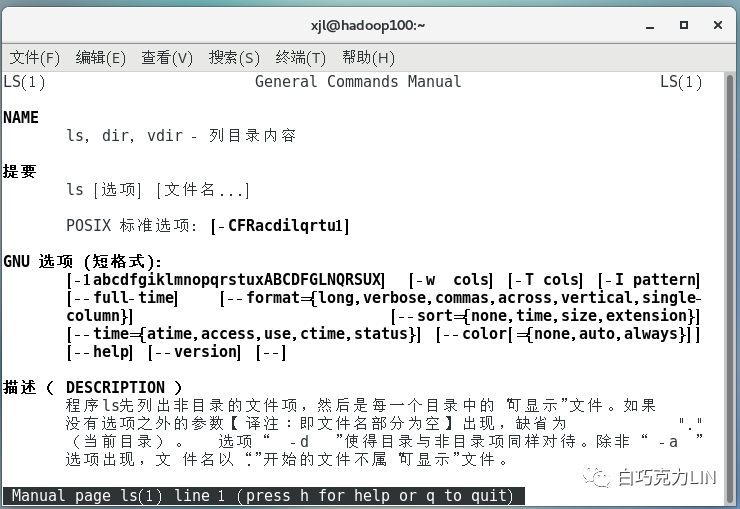
When we want to quit, write q directly.
help
help Get help information about the built-in commands of the shell. Some system commands of basic functions are directly embedded in the shell. After the system is loaded, it will be loaded with the shell and reside in the system memory. This part of the commands is called "built-in ( built-in) commands", and the corresponding other commands are called "external commands".
Its basic syntax is as follows:
help 命令
The sample code is as follows:
help cd # 查看cd命令的帮助信息
As shown below:
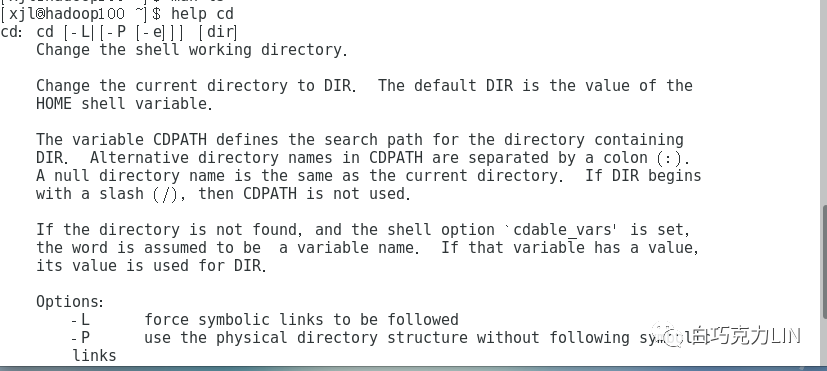
When we use the help command to view non-built-in commands, the following error will be reported:

At this time, we can use the help command to view non-built-in commands through the following code,
ls --help # 查看ls命令的帮助信息
As shown below:
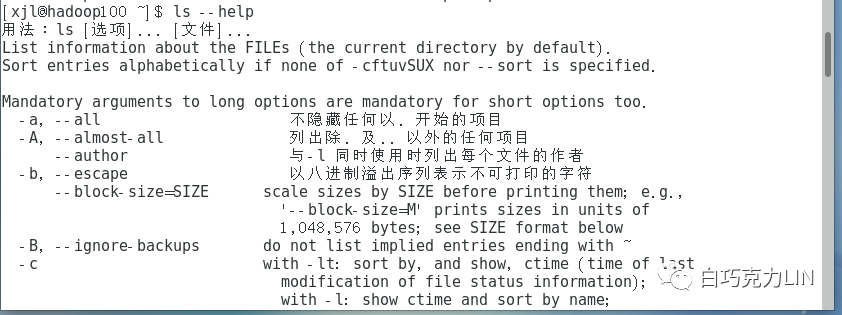
type
Use the type command to get whether the command is a built-in command. Its syntax is as follows:
type 命令
The sample code is as follows:
type cd # 查看cd命令的命令类型
As shown below:

File Permissions
file properties
The Linux system is a multi-user system. In order to protect the security of the system, the Linux system has different regulations on the permissions of different users to access the same file or directory. In Linux, the following commands can be used to display the attributes of a file and files Belonging to users and groups:
ll
ls -l
As shown below:
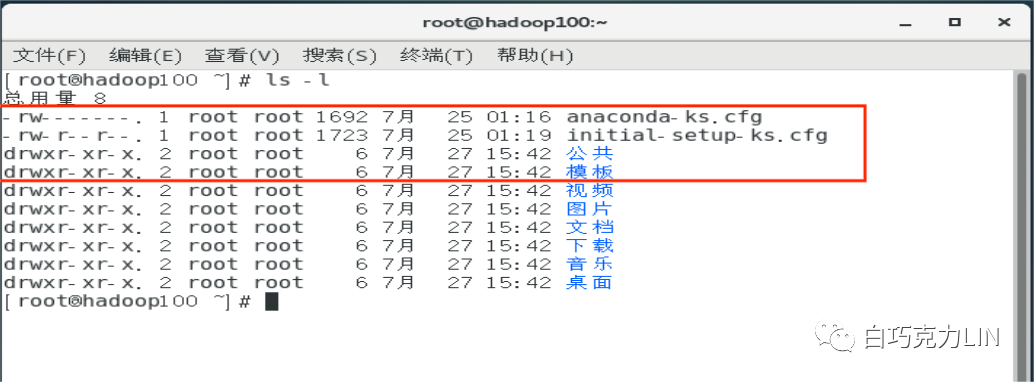
Let's take the third piece of information to illustrate what it means:
drwxr-xr-x. 2 root root 6 7月 27 15:42 公共
in:
-
drwxr-xr-x.: Indicates the file and file permission description; -
2: Indicates that there are two links; -
The first root: indicates that the file is owned by root; -
The second root: indicates that the file is owned by the group to which root belongs; -
6: Indicates that the file size is 6m; -
July 27 15:42: Indicates the creation date of the file; -
Public: Indicates that the file name is public;
In the previous string drwxr-xr-x has a total of ten characters, of which:
-
The 0th character: Represents that the file is a directory, file or linked file, etc., where - represents a file, d represents a directory, and l represents a linked file; -
Characters 1-3: It means that the owner of the file has the permission of the file; -
Characters 4-6: The owner's users in the same group have permissions to the file; -
Characters 7-9: other users have permissions to the file;
As shown below:
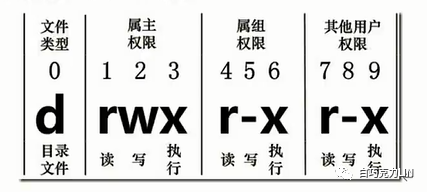
A minus sign - is used instead when there is no permission.
in:
-
r: stands for readable read, which can be read and viewed; -
w: represents writable (write) and can be modified, but it does not mean that the file can be deleted. The prerequisite for deleting a file is that the directory where the file is located has write permission before the file can be deleted; -
x: represents executable (execute), which can be executed by the system;
Modify file group
Use the chgrp command to modify the group to which a file or directory belongs. Its syntax is as follows:
chgrp [-R] 属组名 文件或目录
Note: When the -R parameter is added, when the group of a directory is changed, the group of all files in the directory will be changed.
In my case, there is a folder in the home directory, which contains a.txt file, as shown in the following figure:

Next, we modify the group of the folder, the sample code is as follows:
chgrp -R xjl /home/a # 修改a文件夹及文件夹里面文件的属组为xjl
As shown below:

Through the above code, we have modified the group of the a folder and the a.txt file. When we only want to modify the group of the a folder, just do not add the -R parameter, as shown in the following figure:

In this way, only the group to which the a folder belongs is modified.
Modify file owner
To modify the owner of a file, use the chown command, which can also modify the group of a file. Its syntax is as follows:
chown [-R] 属主名 文件名
chown [-R] 属主名:属组名 文件名
Note: When the -R parameter is added, when the group of a directory is changed, the group of all files in the directory will be changed.
Next, we modify the owner of the above a folder and a.txt file. The sample code is as follows:
chown xjl /home/a/a.txt # 将a.txt文件文件属主该为xjl
As shown below:

When we want to modify the file owner and file group at the same time, we can execute the following code:
chown root:root /home/a/a.txt # 修改a.txt文件的属主及属组为root

Modify file permissions
There are two ways to set file permissions in Linux: one is numeric and the other is symbolic.
Number type modification permission
The characters of file permissions are: rwxrwxrwx, every three characters is a group, there are three groups in total, corresponding to the permissions of the owner, group, and other users.
The numbers corresponding to rwx are r=4, w=2, and x=1, respectively.
The three character scores of each identity need to be accumulated, for example: the permission is: rwxrw-r--score is: 764, where:
rwx=4+2+1=7
rw-=4+2+0=6;
r--=4+0+0=4.
Use chmod to modify file permissions, the syntax format is as follows:
chmod [-R] 数字 文件或目录
Note: When the -R parameter is added, when the group of a directory is changed, the group of all files in the directory will be changed.
The sample code is as follows:
chmod 764 a.txt # 修改a.txt文件权限为764
As shown below:

Symbol type modification permission
In rwxrwxrwx, every three characters corresponds to a set of file permissions, a total of three groups, corresponding to the permissions of the owner (user), group (group), and other users (others), respectively, replaced by letters:
-
u: represents the owner (user); -
g: represents the owning group (group); -
o: represents other users (others); -
a: represents all users (all);
Use the chmod command to modify file permissions, the syntax format is as follows:
chmod [{ugoa}{+-=}{rwx}] 文件或目录
in:
-
+: Represents adding permissions based on the original permissions; -
-: Represents the removal of the authority based on the original authority; -
=: represents setting permissions;
The sample code is as follows:
chmod u-x,g+x,o=rwx a.txt # 在原来的基础上拥有者权限去掉x执行权限,拥有组增加w写权限,其他用户的权限设置为rwx可读可写可执行
As shown below:

Well, Linux system - help commands, file permission commands are learned here.
- END -