As an independent developer, I often have headaches about UI color matching such as icons , hexadecimal color code conversion and other issues.
Just recently, I was thinking about the development of small programs , so I used the uni-app framework to create a color matching applet called Chameleon .
The core functions are roughly as follows:
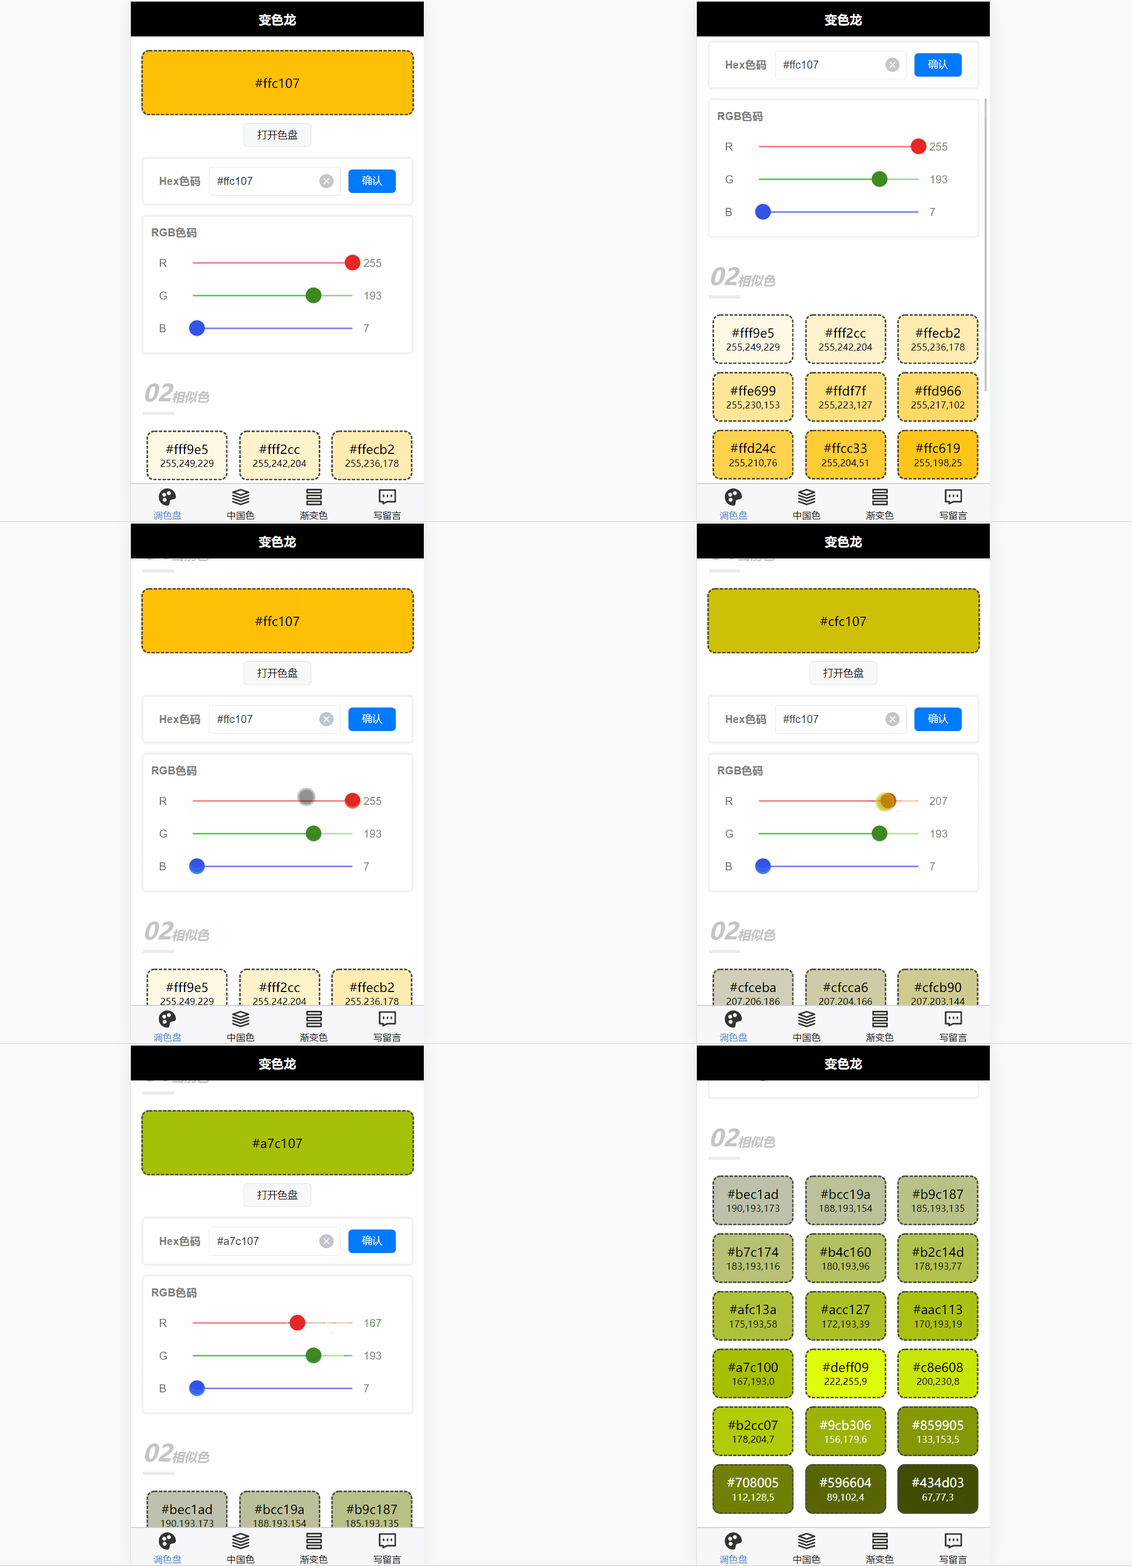
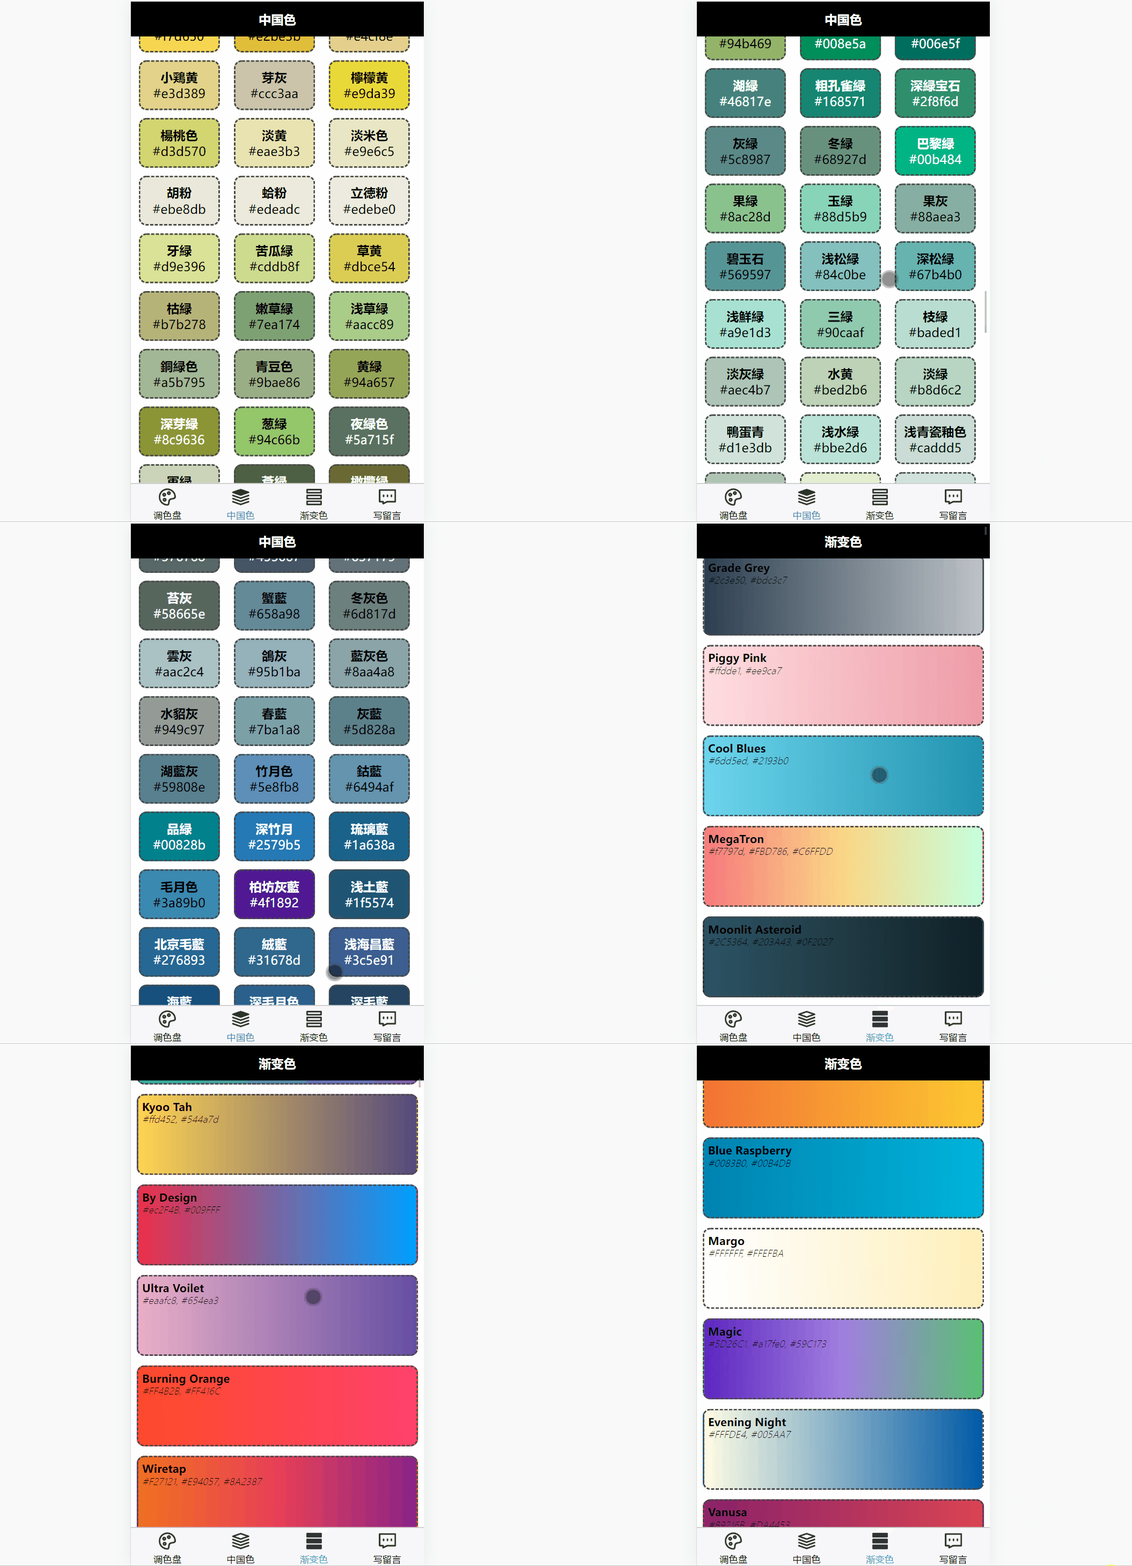
Color data source: Frank Lin., uiGrdients, Dlog_Shuai
The function is simple and practical. (I think)
You can click the link to see the full function:
So I just wanted to pick out the key points and write a short introductory tutorial for students who want to learn uniapp.
Core content :
-
uniapp structure, configuration, specification, plugins -
Basics of Vue template syntax, components, states, computed properties, events, and more -
uniCloud cloud function
It mainly involves the palette, color code conversion, similar colors, Chinese colors and user message function sections.
The writing style is the same as my other tutorials, novice-oriented, entry-level .
It is easy to understand, but Vue development requires a little front-end foundation. If you are a pure novice, it is highly recommended to browse the official Vue documentation first.
what is uniapp
uniapp is a cross-platform development framework, the details can be viewed on the uniapp official website, here are only its most significant advantages:
-
Cross-platform, only write one set of code , small programs, H5, native apps can run, for small teams, greatly improve the efficiency (theoretically) -
It integrates a series of tools such as uniCloud, uni-id, front-end web hosting, etc., which reduces the difficulty of development.
Even better, it's based on Vue. Even if you don't need uniapp in the future, it's not a loss to learn Vue.
The native language of WeChat applet is very similar to Vue, but there are many differences in details, and the conversion costs time.
So you are still hesitating to learn it quickly. I guarantee that this tutorial will be short and concise (only about five chapters), and it will not take you a few days.
Preparation
It's useless to say more, it's better to try it.
It is recommended to use the official HBuilder for novice developers to develop uniapp. Since it is its own, many functions are integrated into it.
After downloading HBuilder, create a new uniapp project:
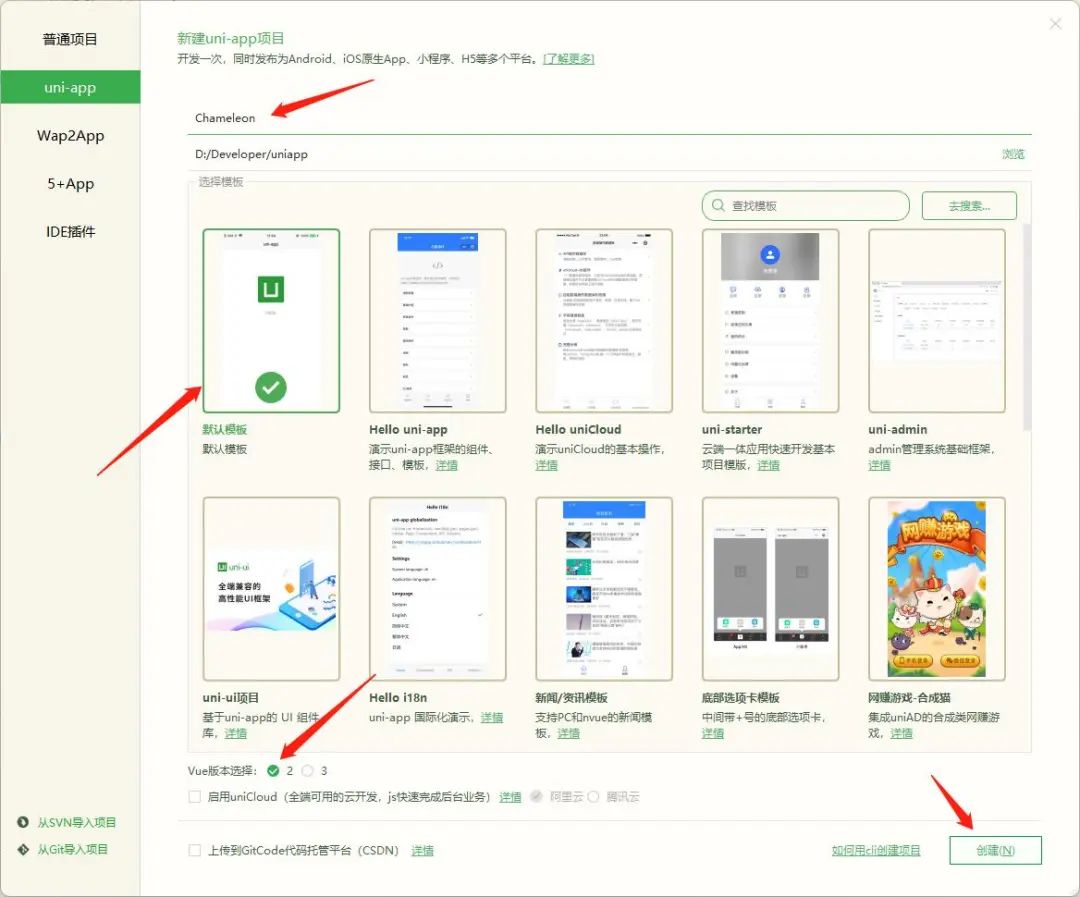 Because it is a small program in terms of color, the project name is "Chameleon".
The Vue version is 2. One is that Vue 2 is easier to use, and the other is the plug-in requirements used in the project.
Then install the required plugins:
-
uni-ui: Official cross-platform universal UI plugin. -
t-color-picker: Color palette plugin.
There is a small bug in the plugin t-color-picker, which may cause all acquired colors to be black. If you encounter it, open
components/t-color-picker/to-color-picker.vueit and replace allpageX,pageYwithclientX,clientY.
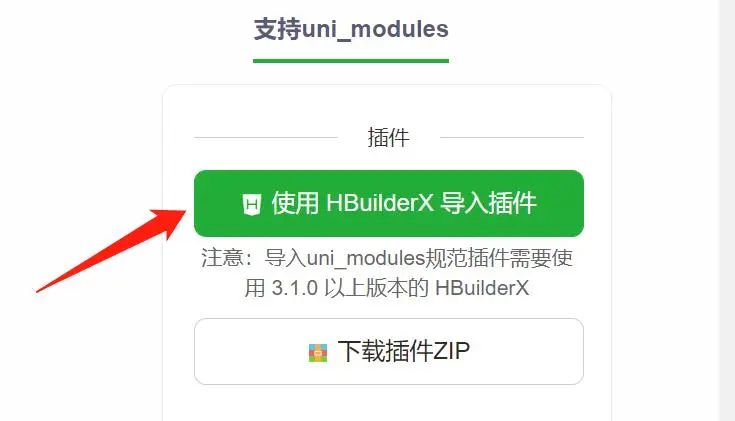
The installation method is very simple. After entering the plugin download page, click on the right to import the plugin using HBuilder and it will be ok:
Next let's look at the project directory.
The core directories and files of the uniapp project are as follows (note not all):
┌─uniCloud              云空间目录
│─components            组件目录
│  └─comp-a.vue         可复用的a组件
├─pages                 业务页面文件目录
│  ├─index
│  │  └─index.vue       index页面
│  └─list
│     └─xxx.vue         xxx页面
├─static                静态资源目录,注意:静态资源只能存放于此
├─uni_modules           存放[uni_module](/uni_modules)
├─unpackage             非工程代码,一般存放运行或发行的编译结果
├─main.js               Vue初始化入口文件
├─App.vue               应用配置,用来配置App全局样式以及监听生命周期
├─manifest.json         配置应用名称、appid、logo、版本等打包信息
├─pages.json            配置页面路由、导航条、选项卡等页面类信息
└─uni.scss              内置的常用样式变量
So many things are blinding.
Don't panic, you don't need to worry about anything else, just know pages/index/index.vuethat it is the entry file on the homepage of the applet and it's ok.
So write the code in it and modify it as follows:
<!-- pages/index/index.vue  -->

<template>
  <view class="container">
    <button @click="openPicker">颜色选择器</button>
    <t-color-picker ref="colorPicker" :color="canvasColor" @confirm="confirmPicker"></t-color-picker>
  </view>
</template>

<script>
  export default {
    data() {
      return {
        canvasColor: {
          r: 255,
          g: 0,
          b: 0,
          a: 1
        }
      };
    },
    methods: {
      openPicker(item) {
        // 打开颜色选择器
        this.$refs.colorPicker.open();
      },
      confirmPicker(e) {
        console.log('颜色选择器返回值:' + e.hex)
      }
    }
  };
</script>

<style scoped>
  .container {
    display: flex;
    flex-direction: column;
    align-items: center;
    justify-content: center;
    padding: 10px;
  }
</style>
As you can see, a standard .vuefile contains three pieces:
-
<template>The packaged template, which describes the structure of the page, corresponds to traditional web developmenthtml. -
<script>The wrapped script, describing the page logic, correspondsjavascript. -
<style>The style of the package, which describes the appearance of the page, corresponds tocss.
Let's break it down by these three pieces.
code disassembly
First template:
<!-- pages/index/index.vue  -->

<template>
  <view class="container">
    <button @click="openPicker">颜色选择器</button>
    <t-color-picker ref="colorPicker" :color="canvasColor" @confirm="confirmPicker"></t-color-picker>
  </view>
</template>

...
-
Traditional web development is often used divas a container for wrapping elements, unfortunately not in uniapp, you need todivchange toview,spantotext,atonavigator. -
<button>is a built-in control whose property@click="openPicker"indicates that button click event will executeopenPicker()this method. (Defined in the script later) -
<t-color-picker>It is the palette plug-in that I just downloaded . The propertyrefdefines its name, which is convenient for subsequent calls; binds the selected color of:colorthe palette to the state ; binds the confirmation button of the palette to the method .canvasColor@confirmconfirmPicker()
Here you need to pay attention to the meaning of the special symbols of Vue properties. The colon :usually means that this property is bound to the state managed by Vue , such dataas variables in , computed properties, etc. @The symbol usually means that the property is bound to some kind of event , such as a mouse click event, an event thrown by a child component, and so on.
Then the script:
// pages/index/index.vue

...

<script>
  export default {
    data() {
      return {
        canvasColor: {
          r: 255,
          g: 0,
          b: 0,
          a: 1
        }
      };
    },
    methods: {
      openPicker(item) {
        // 打开颜色选择器
        this.$refs.colorPicker.open();
      },
      confirmPicker(e) {
        console.log('颜色选择器返回值:' + e.hex)
      }
    }
  };
</script>

...
-
Status canvasColorrepresents the RGB value of the currently selected color, that is, the intensity of the three channels of red, green and blue , ranging from 0 to 255.a: 1is the transparency channel, note that it is not used in this project . -
methodsThe two methods defined in it are used to open the palette and the palette confirmation event, which are all functions provided by the plug-in.
And finally the styles:
/* pages/index/index.vue */

...

<style scoped>
  .container {
    display: flex;
    flex-direction: column;
    align-items: center;
    justify-content: center;
    padding: 10px;
  }
</style>
This mainly defines how the elements should be laid out, such as centering, edge padding, etc.
Since the code in the style part is usually simple and does not involve logic, it is simply carried over later. If you don't understand, please understand by yourself.
That's it for the core code.
Next, do a little finishing touches. pages.jsonThis file stores the global configuration of the applet, such as the background color and text color of the navigation bar.
Modify it as follows:
// pages.json

{
  "pages": [{
    "path": "pages/index/index",
    "style": {
      "navigationBarTitleText": "变色龙"
    }
  }],
  "globalStyle": {
    "navigationBarTextStyle": "white",
    "navigationBarTitleText": "变色龙",
    "navigationBarBackgroundColor": "#000",
    "backgroundColor": "#fff"
  },
  "uniIdRouter": {}
}
Make the homepage navigation bar display "Chameleon" in large characters.
test
The code is written, and the next test.
Select Toolbar - Run to Browser - Chrome :
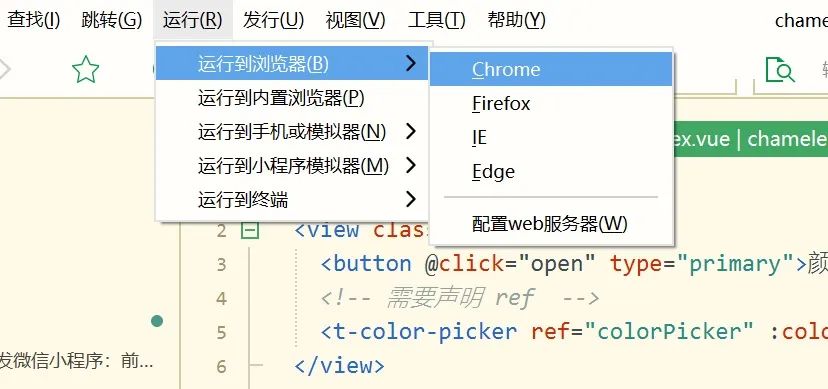
Follow the prompts to confirm all the way. If successful, the Chrome browser will automatically pop up, and the content of the applet homepage will be:
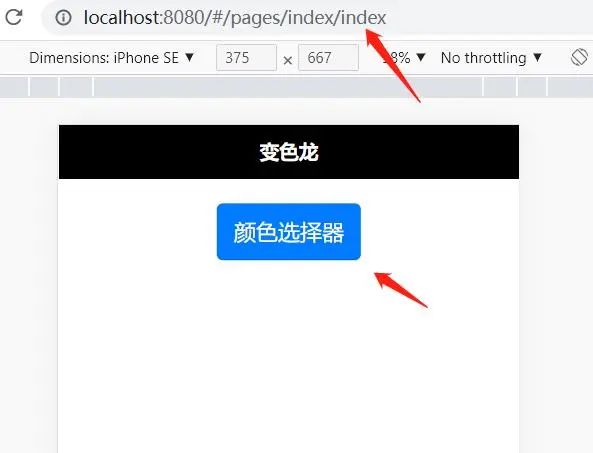
Click the button, the palette pops up:
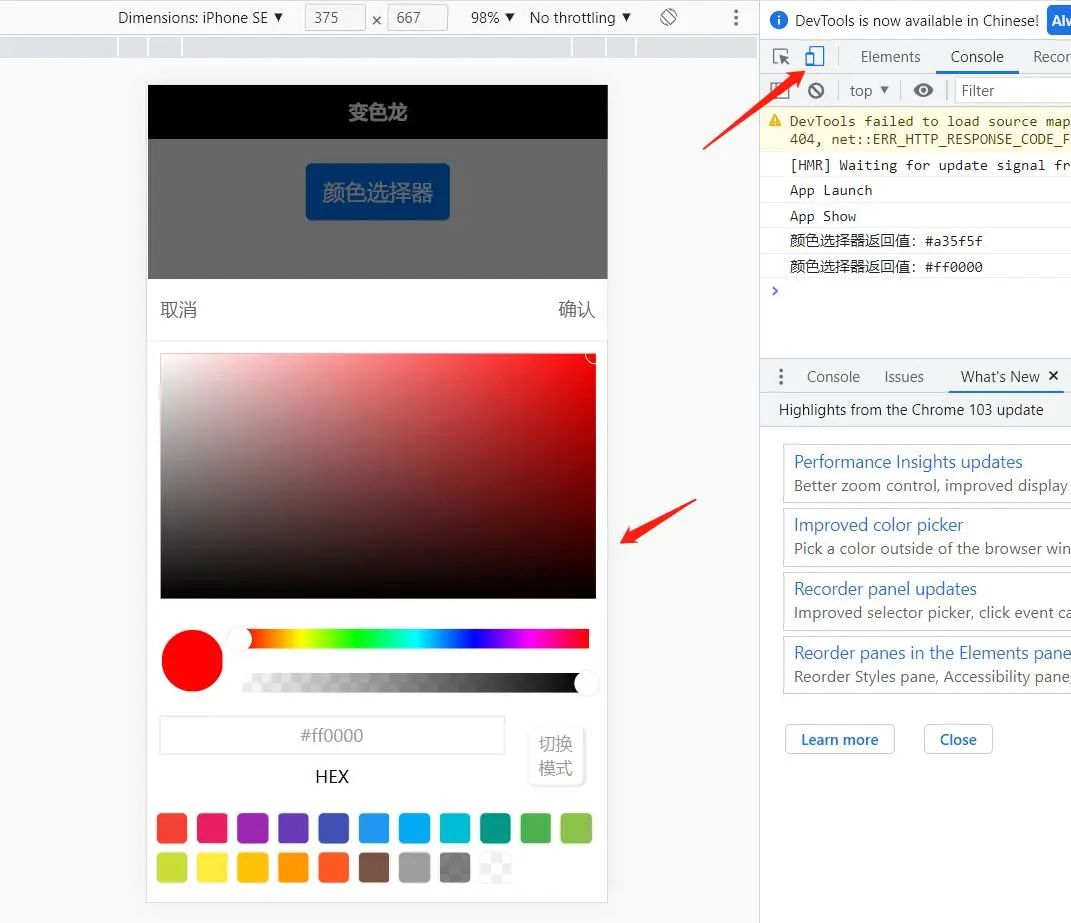
How about, simple and fun.
As you can see, it's fairly easy to write pages and use plugins in uniapp.
Epilogue
This is the end of the introduction.
If you're interested in uniapp, let's move on to the next chapter.
