
foreword
To use Vue to read data in Excel, you need to use npm to install xlsx, extract the results and dynamically render them to the Table of ElementUI to display the results, and then click OK to pass the data to the SpringBoot backend and add it to the database
1. Demonstration
1. Select the file
After clicking the Import button, select the excel file to import

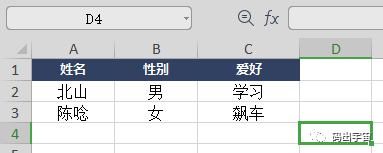

2. View content
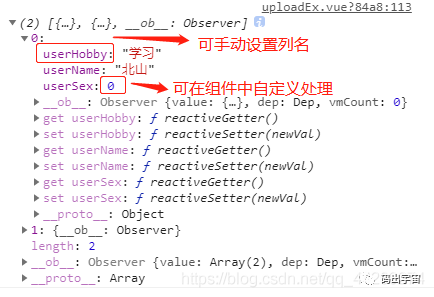
Here, the read Excel data is displayed directly for demonstration, and how to convert some specific fields will be introduced later, for example: male and female are changed to 0,1

Click OK to import and output the data to be sent to the backend
2. Interface
1. Main page
A button, a component, UploadEx is a custom upload popup component, the file selection interface and the content list interface are both in this component, if you want to read other Excel files, you only need to modify the following two component properties and one method
excelTitle: column name to map
urlStr: backend url
<el-button type="primary" @click="importShow = true">导入</el-button><UploadEx :isShow.sync="importShow" :excelTitle="excelTitle" urlStr="/api/excel/import/userinfo"></UploadEx>
content in data
data(){return{importShow: false,excelTitle: [],}},
Set excelTitle content in page created function
// Set the columns of the exported template
setTitle(){this.excelTitle = []let et1 = {'label':'姓名', 'prop':'userName'}let et2 = {'label':'性别', 'prop':'userSex'}let et3 = {'label':'爱好', 'prop':'userHobby'}this.excelTitle.push(et1)this.excelTitle.push(et2)this.excelTitle.push(et3)},
2. Component registration
File registration You can use import or the following method to register globally
An index.js file can be declared where this component is located
// 公用组件import uploadEx from './uploadEx.vue' // 文件上传框const components = {install: function (Vue) {// 公用组件Vue.component('UploadEx', uploadEx)}}export default components
Then modify it in main.js, remember to find the right index.js file
import components from './xxx/index'Vue.use(components)
3. Component content
The HTML content of the uploadEx component is as follows, an upload box is used to select files, and a Table list is used to display Excel content
<template><div><el-dialog title="导入" :visible="isShow" :show-close='false' width="40%" @before-close="importClose"><el-upload style="margin: 10px auto;"dragaction="":on-change="handleChange":show-file-list="false":on-remove="handleRemove":file-list="fileListUpload":limit="1"accept=".csv, application/vnd.openxmlformats-officedocument.spreadsheetml.sheet, application/vnd.ms-excel":auto-upload="false"><i class="el-icon-upload"></i><div class="el-upload__text">点击上传</div><div class="el-upload__tip" slot="tip">只能上传xlsx和xls格式的且大小必须小于2M</div></el-upload><span slot="footer" class="dialog-footer"><el-button @click="importClose()">取消</el-button></span></el-dialog><el-dialogtitle="Excel内容" :visible.sync="excelShow" width="60%" center><el-table:data="excelData"ref="excelDataRef"borderstyle="width: 100%;height:300px;overflow-y:scroll;"><template v-for='(col,index) in excelTitle'><el-table-column:prop="col.prop":label="col.label":key="index"></el-table-column></template></el-table><span slot="footer" class="dialog-footer"><el-button @click="excelShow = false;fileTemp = null;fileListUpload = []">重新选择</el-button><el-button type="primary" @click="importExcel()">确定导入</el-button></span></el-dialog></div></template>
Just add any style
<style lang="scss">.el-upload{.el-upload-dragger{background-color: rgb(13, 57, 128);.el-upload__text{color: white;}}.el-upload-dragger:hover{box-shadow: 5px 5px 15px #0f64c5ad;border: 1px solid #0f64c5ad;}}</style>
Next is the js content, in which we want to introduce an ImportExcel tool file, the file is below this section
<script>import { importEx } from '@/libs/ImportExcel'export default {name: "uploadEx",props: ["isShow","excelTitle","urlStr"],data() {return {fileTemp: undefined,excelShow: false,excelData: [],fileListUpload: [],};},mounted() {},methods: {// 判断文件格式handleChange(file, fileList) {this.fileTemp = file.rawlet fileName = file.raw.namelet fileType = fileName.substring(fileName.lastIndexOf('.') + 1);if (this.fileTemp) {if ((fileType == 'xlsx') || (fileType == 'xls')) {this.importf(this.fileTemp)} else {this.handleRemove()this.$message({type: 'warning',message: '文件格式错误'})}}},// 移除Excel表handleRemove() {this.fileTemp = nullthis.fileListUpload = []},// 关闭导入框importClose(){this.handleRemove()this.$emit('update:isShow', false)},// 导入数据并传递给表格显示importf(obj){var self = thislet arr = []importEx(this.excelTitle, obj).then(arr => {if (arr.length==0){self.$message({message: '没有数据哦',type: 'error',duration: 1500})self.handleRemove()return}// 可以对空字符数据进行处理,例如某个接口要导入的信息有男女字段,将男女改为0,1// 这个只是针对/api/excel/import/userinf这个逻辑中的文件进行字段转换,可以加else if来替换其他文件的特殊字段,当然也可以注释掉,那么久需要在后端进行转换了if (this.urlStr==='/api/excel/import/userinfo'){for (var ar in arr){if (arr[ar]['userSex']=='男'){arr[ar]['userSex'] = 0} else if (arr[ar]['userSex']=='女'){arr[ar]['userSex'] = 1}}}self.excelData = [...arr]self.excelShow = true})},// 将数据传给后台添加importExcel(){console.log(this.excelData)let self = thisthis.$http.request({url: this.urlStr,method: 'POST',data: this.excelData}).then(resp => {// 数据添加成功或失败后清空内容if (resp && resp.status === 100) {self.$message({message: '成功',type: 'success',duration: 1500})self.importClose()self.$parent.queryMainData()}else{self.handleRemove()self.$message({message: resp.message, type: 'error',duration: 1500})}})this.excelShow = false},},};</script>
4. Excel read
This file uses xlsx to read the content and convert it to json. Of course, there are many ways to write this js file online. In short, the result can be converted to json normally. The most important thing is to get the key and value part of the code
export function importEx(excelTitle, fileobj) {return new Promise((resolve, reject) => {var rABS = false; //是否将文件读取为二进制字符串var f = fileobjvar reader = new FileReader();FileReader.prototype.readAsBinaryString = function (f) {var binary = "";var rABS = false; //是否将文件读取为二进制字符串var wb; //读取完成的数据var outdata;var reader = new FileReader();reader.onload = function (e) {var bytes = new Uint8Array(reader.result);var length = bytes.byteLength;for (var i = 0; i < length; i++) {binary += String.fromCharCode(bytes[i]);}var XLSX = require('xlsx');if (rABS) {wb = XLSX.read(btoa(fixdata(binary)), { //手动转化type: 'base64'});} else {wb = XLSX.read(binary, {type: 'binary'});}// outdata => excel导入的数据outdata = XLSX.utils.sheet_to_json(wb.Sheets[wb.SheetNames[0]]);let arr = []outdata.map(v => {// let jsonString = JSON.stringify(v).replace(/\*/g, '').replace(/\s/ig,'');let jsonString = JSON.stringify(v).replace(/\//g, '');v = JSON.parse(jsonString);let obj = {}// 自动获取键与值for (var k1 in v){for (var et in excelTitle){if (excelTitle[et].label==k1){var col_key = excelTitle[et].propvar col_val = v[k1]obj[col_key] = col_val}}}arr.push(obj)})resolve(arr);}reader.readAsArrayBuffer(f);}if (rABS) {reader.readAsArrayBuffer(f);} else {reader.readAsBinaryString(f);}reader.onerror = reject;})}
Then, the back-end code does not need to be displayed, you can just accept the corresponding entity class.
Summarize
Then use the UploadEx component on the page where the import operation needs to be performed, and set two properties and one method, and the operation can basically be completed.
Of course, there are advantages and disadvantages. Different xlsx file processing requires different settings, but it is very user-friendly to display, and it is convenient to define data column names, but for dozens of columns in a file, then I don't say it. . You can expand it yourself!