
The Internet is like the air around us right now. It has changed our lives in countless ways, but the core technology of the Internet has changed very little.
With the vigorous development of open source culture, many excellent open source web frameworks have been born, making our development easier. But at the same time, it also makes us dare not stop learning the new framework. In fact, everything changes. As long as we understand the core technology part of the Web framework, when a new framework comes out, the basic parts are basically the same and only need to focus on understanding: What are its characteristics, and which technologies are used to solve what pain points? In this way, it will be more convenient to accept and understand new technologies, and will not be exhausted.
And those students who only use the web framework, have they opened the source code of the framework countless times, but they have no idea how to learn and improve?
Today, we will strip the cocoon, remove the complexity and save the simplicity, and implement a mini Web framework with one file, so as to clearly explain its core technology, and the supporting source code has been open sourced.
GitHub address: https://github.com/521xueweihan/OneFile
View online: https://hellogithub.com/onefile/
If you think what I have done is helpful to you, please give me a ✨Star, and repost it to benefit more people.
Without further ado, let's start our journey of improvement today.
1. Introduction Principle
When it comes to the Web, we have to mention the network protocol. If we start from the OSI seven-layer network model, I dare to say that there will be no more than 30% of it!
So today we will directly talk about the top layer, which is the HTTP application layer that the Web framework has the most contact with. As for the TCP/IP part, it will be briefly mentioned when talking about sockets. During this period, I will deliberately code the non-essential details of the technology, cut off the technical topics that are far from the theme of this issue, and only talk about one technical point in one document! Please read with confidence.
First of all, let us recall the process of browsing a website in ordinary times.
If we compare surfing the Internet to listening to a class in a classroom, then the teacher is the server and the student is the client. When students have questions, they will raise their hands first (request to establish TCP), the teacher will find the students’ request for questions, and after agreeing to the students to answer the questions, the students will stand up to ask questions (send a request), and if the teacher promises to add class performance points to the students who asked the questions , then when asking questions, you need an efficient questioning method (request format), namely:
-
First application number -
Ask the question again
After receiving the student's question, the teacher can immediately answer the question (return the response) without asking for the student number. The answer format (response format) is as follows:
-
Answer question -
Bonus points according to student number!
With the agreed questioning format (agreement), you can save the teacher asking the student's student number every time, which is efficient and rigorous. Finally, after the teacher answers the question, the student sits down (closes the connection).
In fact, our communication process on the network is roughly the same:

It's just that the machine is more strictly executed. Everyone follows a certain protocol to develop software, so that communication can be realized under a certain protocol, and this network communication protocol is called HTTP (Hypertext Transfer Protocol).
The Web framework we want to do is to deal with the above process: establish a connection, receive a request, parse the request, process the request, and return the request.
So much for the principle part, for now you just need to remember that communication on the network is divided into two steps: establishing a connection (for communication) and processing a request.
The so-called framework is to deal with the things to be dealt with in most cases, so the Web framework we want to write is to deal with two things, namely:
-
Handling connections (sockets) -
Process the request (request)
It must be remembered that a connection and a request are two things, and a request can be sent only after a connection is established.
If you want to establish a connection to initiate communication, you need to implement it through a socket (establish a connection). A socket can be understood as two virtual books (file handles), one for both parties of the communication, which can both read and write, as long as the transmission The content is written to the book (processing request), and the other party can see it.

Next, I will divide the Web framework into two parts to explain, and all the codes will be implemented in simple and easy-to-understand Python3.
2. Writing a Web Framework
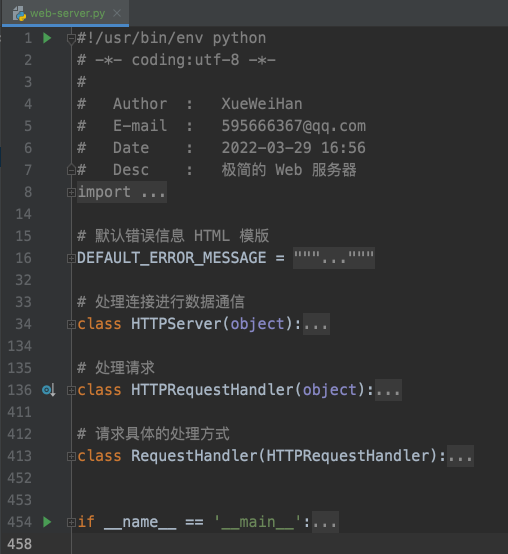
A total of 457 lines of code + comments, please rest assured that it is absolutely simple and easy to understand.
2.1 Handling connections (HTTPServer)
Here we need to briefly talk about socket. At the programming language level, it is a class library responsible for establishing connections and establishing network communication. But it is essentially a process that provides communication at the system level, and a computer can establish multiple communication lines, so each port number is followed by a socket process, which is independent of each other and does not interfere with each other, which is why we are starting the service. The reason for specifying the port number.
Finally, the server mentioned above is actually a computer with better performance that is always on, and the client is a browser, mobile phone, and computer, all of which have a socket (a process at the operating system level).
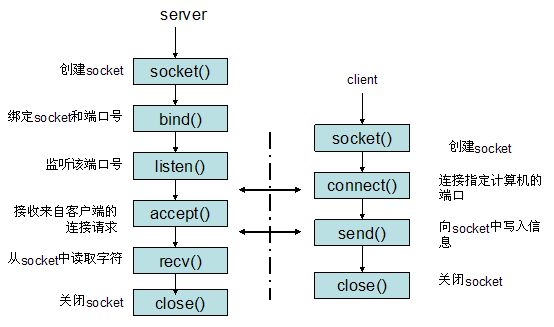
If you don't understand the above paragraph, it's not in the way. You can understand the figure below. You have to understand the steps and processes of socket processing connections before you can write the part of the web framework that handles connections.
The following shows the server.py and client.py codes written based on socket.
# coding: utf-8
# 服务器端代码(server.py)
import socket

print('我是服务端!')
HOST = ''
PORT = 50007
s = socket.socket(socket.AF_INET, socket.SOCK_STREAM)  # 创建 TCP socket 对象
s.setsockopt(socket.SOL_SOCKET, socket.SO_REUSEADDR, 1)  # 重启时释放端口
s.bind((HOST, PORT))  # 绑定地址
s.listen(1)  # 监听TCP,1代表:操作系统可以挂起(未处理请求时等待状态)的最大连接数量。该值至少为1
print('监听端口:', PORT)
while 1:
    conn, _ = s.accept()  # 开始被动接受TCP客户端的连接。
    data = conn.recv(1024)  # 接收TCP数据,1024表示缓冲区的大小
    print('接收到:', repr(data))
    conn.sendall(b'Hi, '+data)  # 给客户端发送数据
    conn.close()
Because HTTP is based on the relatively reliable TCP protocol, the TCP socket object is created here.
# coding: utf-8
# 客户端代码(client.py)
import socket

print('我是客户端!')
HOST = 'localhost'    # 服务器的IP
PORT = 50007              # 需要连接的服务器的端口
s = socket.socket(socket.AF_INET, socket.SOCK_STREAM)
s.connect((HOST, PORT))
print("发送'HelloGitHub'")
s.sendall(b'HelloGitHub')  # 发送‘HelloGitHub’给服务器
data = s.recv(1024)
s.close()
print('接收到', repr(data))  # 打印从服务器接收回来的数据
The operation effect is as follows:
Combined with the above code, it is easier to understand the process of socket establishment communication:
-
socket: create socket -
bind: bind port number -
listen: start listening -
accept: accept the request -
recv: receive data -
close: close the connection
So, the HTTPServer class in the web framework that handles the connection is ready to go. That is: first create the socket in the __init__method , then bind the port ( server_bind) and start listening on the port ( server_activate)
# 处理连接进行数据通信
class HTTPServer(object):
    def __init__(self, server_address, RequestHandlerClass):
        self.server_address = server_address # 服务器地址
        self.RequestHandlerClass = RequestHandlerClass # 处理请求的类

        # 创建 TCP Socket
        self.socket = socket.socket(socket.AF_INET,
                                    socket.SOCK_STREAM)
        # 绑定 socket 和端口
        self.server_bind()
        # 开始监听端口
        self.server_activate()
It can be seen from the incoming RequestHandlerClassparameters that processing the request and establishing the connection are handled separately.
The next step is to start the service to receive the request, that is HTTPServer, the start method serve_foreverof , which includes the whole process of receiving the request, receiving the data, starting to process the request, and ending the request .
def serve_forever(self):
    while True:
        ready = selector.select(poll_interval)
        # 当客户端请求的数据到位,则执行下一步
        if ready:
            # 有准备好的可读文件句柄,则与客户端的链接建立完毕
            request, client_address = self.socket.accept()
            # 可以进行下面的处理请求了,通过 RequestHandlerClass 处理请求和连接独立
            self.RequestHandlerClass(request, client_address, self)
            # 关闭连接
            self.socket.close()
In this cycle, it is all the code for HTTPServer to process the connection and establish the HTTP connection, that's all? right! Is not it simple?
The parameter in the code RequestHandlerClassis the class that handles the request. The following will explain in depth HTTPRequestHandlerhow to handle the HTTP request.
2.2 Handling requests (HTTPRequestHandler)
Remember how the socket described above implements communication between two ends? Through two readable and writable "virtual notebooks".
In addition, to ensure the efficiency and rigor of communication, it is necessary to have a corresponding "communication format".
So, processing the request only takes three steps:
-
setup: initialize two books -
read request file handle (rfile) -
The file handle to write the response to (wfile) -
handle: read and parse the request, process the request, construct the response and write -
finish: return the response, destroy the two books to release resources, and then return to dust, waiting for the next request
Corresponding code:
# 处理请求
class HTTPRequestHandler(object):
    def __init__(self, request, client_address, server):
        self.request = request # 接收来的请求(socket)
        # 1、初始化两个本子
        self.setup()
        try:
            # 2、读取、解析、处理请求,构造响应
            self.handle()
        finally:
            # 3、返回响应,释放资源
            self.finish()

    def setup(self):
        self.rfile = self.request.makefile('rb', -1) # 读请求的本子
        self.wfile = self.request.makefile('wb', 0) # 写响应的本子
    def handle(self):
        # 根据 HTTP 协议,解析请求
        # 具体的处理逻辑,即业务逻辑
        # 构造响应并写入本子
    def finish(self):
        # 返回响应
        self.wfile.flush()
        # 关闭请求和响应的句柄,释放资源
        self.wfile.close()
        self.rfile.close()
The above is the overall process of processing requests. The following will introduce in detail handlehow to parse HTTP requests and construct HTTP responses, as well as how to separate the framework from the specific business code (processing logic).
Before parsing HTTP, we need to look at an actual HTTP request. When I open the home page of the hellogithub.com website, the HTTP request sent by the browser is as follows:
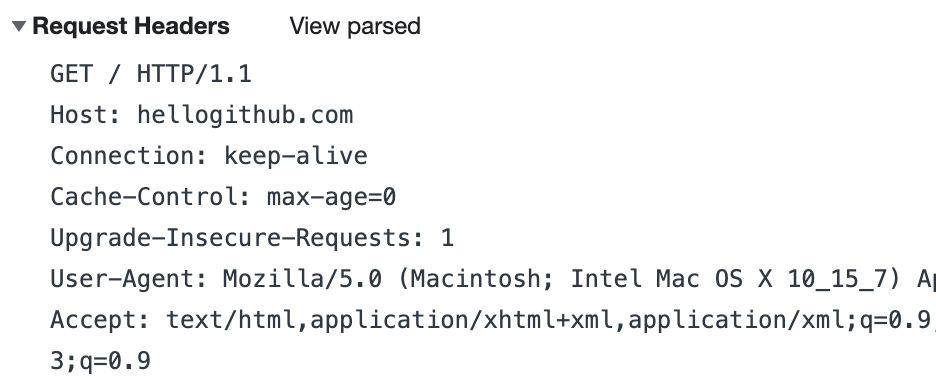
Arrange and summarize the available HTTP request format, as follows:
{HTTP method} {PATH} {HTTP version}\r\n
{header field name}:{field value}\r\n
...
\r\n
{request body}
Once the request format is obtained, there is a method for handleparsing request.
def handle(self):
    # --- 开始解析 --- #
    self.raw_requestline = self.rfile.readline(65537) # 读取请求第一行数据,即请求头
    requestline = str(self.raw_requestline, 'iso-8859-1') # 转码
    requestline = requestline.rstrip('\r\n') # 去换行和空白行
    # 就可以得到 "GET / HTTP/1.1" 请求头了,下面开始解析
    self.command, self.path, self.request_version = requestline.split()
    # 根据空格分割字符串,可得到("GET", "/", "HTTP/1.1")
    # command 对应的是 HTTP method,path 对应的是请求路径
    # request_version 对应 HTTP 版本,不同版本解析规则不一样这里不做展开讲解
    self.headers = self.parse_headers() # 解析请求头也是处理字符串,但更为复杂标准库有工具函数这里略过
    # --- 业务逻辑 --- #
    # do_HTTP_method 对应到具体的处理函数
    mname = ('do_' + self.command).lower()
    method = getattr(self, mname)
    # 调用对应的处理方法
    method()
    # --- 返回响应 --- #
    self.wfile.flush()

def do_GET(self):
    # 根据 path 区别处理
    if self.path == '/':
        self.send_response(200)  # status code
        # 加入响应 header
        self.send_header("Content-Type", "text/html; charset=utf-8")
        self.send_header("Content-Length", str(len(content)))
        self.end_headers() # 结束头部分,即:'\r\n'
        self.wfile.write(content.encode('utf-8')) # 写入响应 body,即:页面内容

def send_response(self, code, message=None):
    # 响应体格式
    """
    {HTTP version} {status code} {status phrase}\r\n
    {header field name}:{field value}\r\n
    ...
    \r\n
    {response body}
    """
    # 写响应头行
    self.wfile.write("%s %d %s\r\n" % ("HTTP/1.1", code, message))
    # 加入响应 header
    self.send_header('Server', "HG/Python ")
    self.send_header('Date', self.date_time_string())
The above is the core code snippet for handleprocessing the request and returning the response. So far, HTTPRequestHandlerall the content has been explained, and the operation effect will be demonstrated below.
2.3 Running
class RequestHandler(HTTPRequestHandler):
    # 处理 GET 请求
    def do_get(self):
        # 根据 path 对应到具体的处理方法
        if self.path == '/':
            self.handle_index()
        elif self.path.startswith('/favicon'):
            self.handle_favicon()
        else:
            self.send_error(404)

if __name__ == '__main__':
    server = HTTPServer(('', 8080), RequestHandler)
    # 启动服务
    server.serve_forever()
Here, the business code and the framework are separated by inheriting the HTTPRequestHandlerimplementation RequestHandleroverriding the do_getmethod . This ensures flexibility and decoupling of the framework.
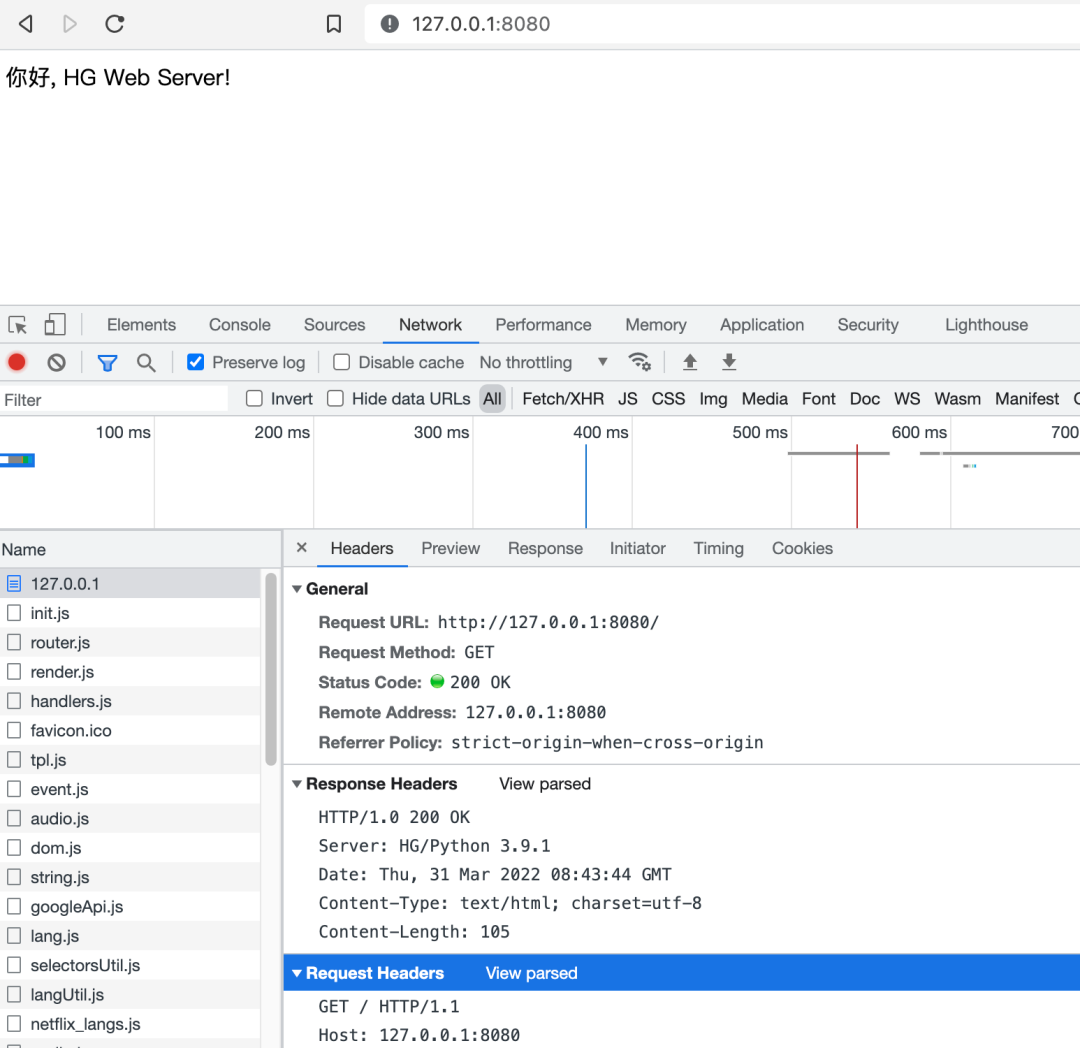
Then the service runs without any accident, and the effect is as follows:
The code involved in the web framework in this article has been simplified for readability. If you want to get the complete working code, you can go to the GitHub address to get it:
https://github.com/521xueweihan/OneFile/blob/main/src/python/web-server.py
The framework does not contain the rich functions that the Web framework should have. It aims to realize a mini Web framework through the simplest code, so that students who do not know the basic Web framework structure can find out.
If the content of this article piqued your interest in Web frameworks, you'd also like to dive deeper into a more comprehensive, production-ready Web framework with the same clean code and structure. My suggested learning path:
-
Python3's HTTPServer, BaseHTTPRequestHandler -
bottle: single file, no third-party dependencies, continuously updated, open source web framework that can be used in production environments: -
Address: https://github.com/bottlepy/bottle -
werkzeug -> flask -
starlette -> uvicorn -> fastapi
Sometimes reading the source code of the framework is not to write a new framework, but to learn from and move closer to the predecessors.
at last
New technologies are always inexhaustible. Mastering the core technical principles can not only be one step ahead in accepting new knowledge, but also sharpen when troubleshooting problems.
I don’t know that this kind of file explains a technical point, and strives to describe the principle through simple text and simplified code, during which the technology that erases the minutiae focuses on one technology, and finally gives an article with a complete and operable open source code, whether it conforms to the your appetite?
This article is my attempt at a new series, accept any pointers and criticisms.
If you like this kind of article, please like it to give me a little encouragement, and you can leave a message to make suggestions or "order food".
Don't think about what you've done for open source, you just need to know what you've done for yourself.
OneFile looks forward to your joining, tap {read the original text} to contribute.
- END -
👆 Follow "HelloGitHub" to receive updates as soon as possible👆