illustrate
The QPainter class performs drawing operations on QWidget (control), which is a drawing tool that provides highly optimized functions for most graphical interfaces. Using the QPainter class, you can draw from simple straight lines to complex pie charts. It can also draw text and images. QPainter can draw on any object that inherits from QPaintDevice.
QpaintDevice subclasses include QPixmap, QBitmap, QImage, QPicture, QOpenGLPaintDevice, QWidget, etc.
The core function of QPainter is drawing, but this class also provides several functions that allow you to customize QPainter's settings and its rendering quality, as well as other functions that enable clipping.
Additionally, you can control how the different shapes are combined by specifying the painter's composition mode.
The painting operation is done in QWidget.paintEvent(). The drawing method must be placed between begin() and end() of the painter of the QtGui.QPainter object. The isActive() function indicates whether the painter is active. The painter is activated by the begin() function and the constructor with a QPaintDevice parameter; it is deactivated by the end() function and destructor.
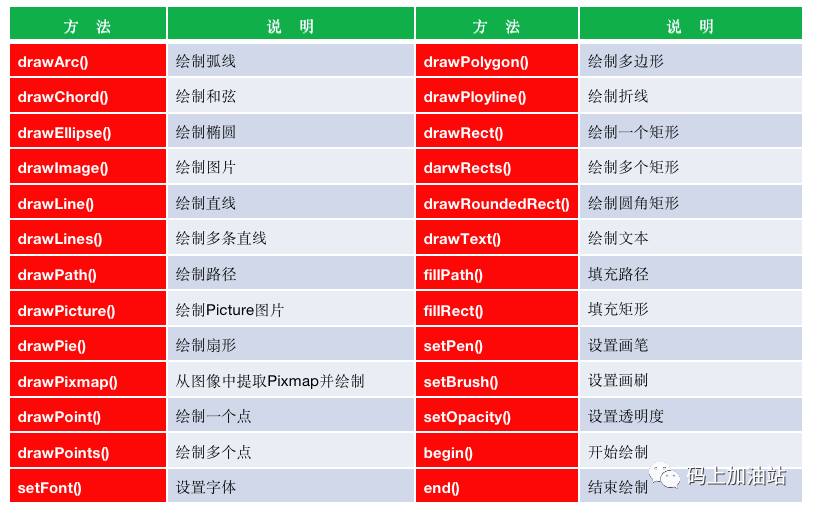
Common method:
Open class
The Open class is mainly to set the brush. The commonly used methods are:
-
setColor() sets the color
-
setWidth() sets the brush width
-
setDshPattern() custom brush style using a list of numbers
-
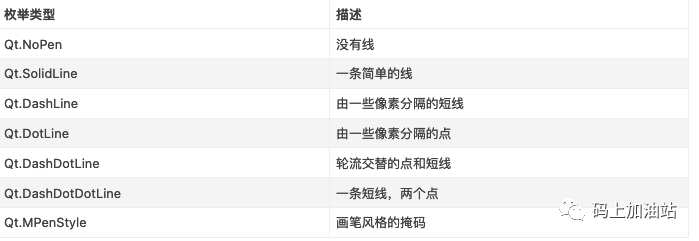
setStyle() Brush style, which is an enumeration class that can be drawn by the QPainter class.
The brush styles are as follows:
Qbrush class
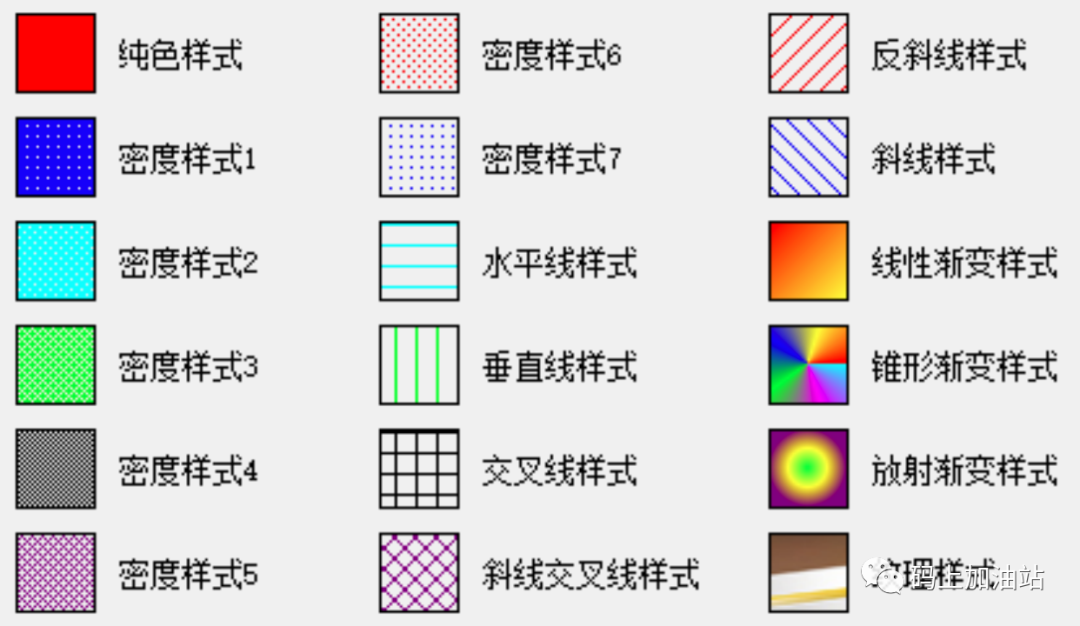
The Qbrush class is mainly used to set the brush, used to fill the geometry
-
setColor() sets the brush color
-
setTexture() sets the pixmap of the brush to QPixmap, and the style needs to be set to Qt.TexturePattern
-
setStyle() sets the brush style
-
Qt.SolidPattern
-
Qt.Dense1Pattern
-
Qt.Dense2Pattern
-
Qt.Dense3Pattern
-
Qt.Dense4Pattern
-
Qt.Dense5Pattern
-
Qt.Dense6Pattern
-
Qt.Dense7Pattern
-
Qt.HorPattern
-
Qt.VerPattern
-
Qt.CrossPattern
-
Qt.DiagCrossPattern
-
Qt.BDiagPatter
-
Qt.FDiagPatter
-
Qt.LinearGradientPattern
-
Qt.ConicalGradientPattern
-
Qt.RadialGradientPattern
-
Qt.TexturePattern
QFont class
The QFont class encapsulates the font size and style properties
Common method :
-
setFamily(): set the font
-
setPointSize(): Set the size of the font text in pixels
-
setBold(): Set whether the font is bold
-
setItalic(): Set whether it is italic
-
setPointSize(): Set the text size
-
setUnderline(): set the underline
-
setCapicalization(): Set the letter display style, QFont.Capitalize the first letter uppercase, QFont.AllUpercase all uppercase, QFont.Allcase all lowercase
-
setWeight(): Set the text thickness, such as QFont.Bold is bold, QFont.Light is normal
-
setLetterSpacing(): Set the file spacing, such as QFont.PercentageSpacing sets the file spacing in percentage, the default is 100, QFont.AboluteSpacing sets the file spacing in pixels, the default is 100,
-
setStrikeOut(): Set whether there is a midline
-
setOverline(): Set whether there is an overline
-
setStyle(): Set the style, commonly used values QFont.StyleItalic italic style and QFont.StyleNormal normal style
QPixmap class
The QPixmap class is mainly used to display graphics on the controls of labels or buttons, and supports many image types, such as the commonly used BMP, JPG, PNG, GIF, JPEG, ICO, etc. When using QPixmap to obtain images, you can directly use it in its constructor. Specify the image in the , use "QPixmap (image path)".
Commonly used methods
-
load(): Load the specified image file as a QPixmap object
-
fromImage(): Convert a QImage object to a QPixmap object
-
toImage(): Convert a QPixmap object to a QImage object
-
copy(): Copy from QRect object to QPixmap object
-
save(): save the QPixmap object as a file
Example 1: Basic drawing of graphics
from PyQt5.QtWidgets import *
from PyQt5.QtGui import QPainter
from PyQt5.QtCore import Qt

class Demo(QWidget):
    def __init__(self,parent=None):
        super(Demo,self).__init__(parent)
        self.setWindowTitle("使用QPainter绘制图形") # 设置窗口标题
        self.resize(300,120) # 设置窗口大小

    def paintEvent(self,event):
        painter=QPainter(self) # 创建绘图对象
        painter.setPen(Qt.red) # 设置画笔
        painter.drawEllipse(80, 10, 50, 30) # 绘制一个椭圆
        painter.drawRect(180, 10, 50, 30) # 绘制一个矩形
        painter.drawLine(80, 70, 200, 70) # 绘制直线
        painter.drawText(90,100,"人生苦短,我用Python") # 绘制文本

if __name__=='__main__':
    import sys
    app=QApplication(sys.argv) # 创建窗口程序
    demo=Demo() # 创建窗口类对象
    demo.show() # 显示窗口
    sys.exit(app.exec_())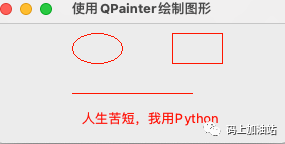
Example 2: Brush settings
from PyQt5.QtWidgets import *
from PyQt5.QtGui import QPainter,QPen,QColor
from PyQt5.QtCore import Qt
class Demo(QWidget):
def __init__(self,parent=None):
super(Demo,self).__init__(parent)
self.setWindowTitle("画笔的设置") # 设置窗口标题
self.resize(300,120) # 设置窗口大小
def paintEvent(self,event):
painter=QPainter(self) # 创建绘图对象
pen=QPen() # 创建画笔对象
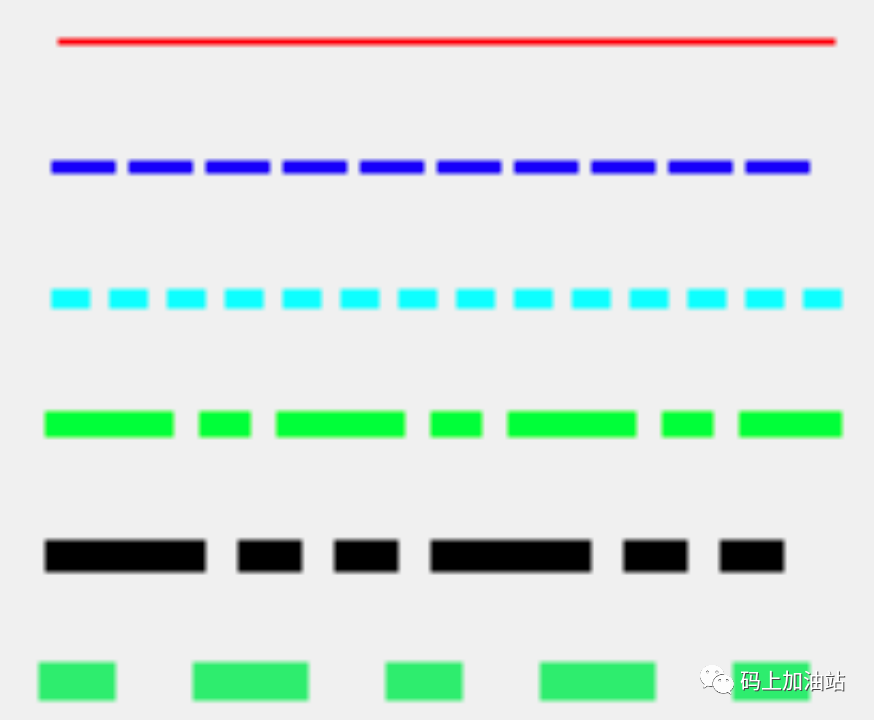
# 设置第1条直线的画笔
pen.setColor(Qt.red) # 设置画笔颜色为红色
pen.setStyle(Qt.SolidLine) # 设置画笔样式为正常直线
pen.setWidth(1) # 设置画笔宽度
painter.setPen(pen) # 设置画笔
painter.drawLine(80, 10, 200, 10) # 绘制直线
# 设置第2条直线的画笔
pen.setColor(Qt.blue) # 设置画笔颜色为蓝色
pen.setStyle(Qt.DashLine) # 设置画笔样式为由一些像素分割的短线
pen.setWidth(2) # 设置画笔宽度
painter.setPen(pen) # 设置画笔
painter.drawLine(80, 30, 200, 30) # 绘制直线
# 设置第3条直线的画笔
pen.setColor(Qt.cyan) # 设置画笔颜色为青色
pen.setStyle(Qt.DotLine) # 设置画笔样式为由一些像素分割的点
pen.setWidth(3) # 设置画笔宽度
painter.setPen(pen) # 设置画笔
painter.drawLine(80, 50, 200, 50) # 绘制直线
# 设置第4条直线的画笔
pen.setColor(Qt.green) # 设置画笔颜色为绿色
pen.setStyle(Qt.DashDotLine) # 设置画笔样式为交替出现的短线和点
pen.setWidth(4) # 设置画笔宽度
painter.setPen(pen) # 设置画笔
painter.drawLine(80, 70, 200, 70) # 绘制直线
# 设置第5条直线的画笔
pen.setColor(Qt.black) # 设置画笔颜色为黑色
pen.setStyle(Qt.DashDotDotLine) # 设置画笔样式为交替出现的短线和两个点
pen.setWidth(5) # 设置画笔宽度
painter.setPen(pen) # 设置画笔
painter.drawLine(80, 90, 200, 90) # 绘制直线
# 设置第6条直线的画笔
pen.setColor(QColor(48,235,100)) # 自定义画笔颜色
pen.setStyle(Qt.CustomDashLine) # 设置画笔样式为自定义样式
pen.setDashPattern([1,3,2,3]) # 设置自定义的画笔样式
pen.setWidth(6) # 设置画笔宽度
painter.setPen(pen) # 设置画笔
painter.drawLine(80, 110, 200, 110) # 绘制直线
if __name__=='__main__':
import sys
app=QApplication(sys.argv) # 创建窗口程序
demo=Demo() # 创建窗口类对象
demo.show() # 显示窗口
sys.exit(app.exec_())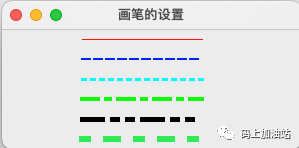
Example 3: font settings
from PyQt5.QtWidgets import *
from PyQt5.QtGui import QPainter,QFont
from PyQt5.QtCore import Qt
import random

class Demo(QWidget):
    def __init__(self,parent=None):
        super(Demo,self).__init__(parent)
        self.setWindowTitle("绘制验证码") # 设置窗口标题
        self.resize(150,60) # 设置窗口大小

    # 定义存储数字、字母的列表,用来从中生成验证码
    char = []
    for i in range(48, 58): # 添加0——9的数字
        char.append(chr(i))
    for i in range(65, 91): # 添加A——Z的大写字母
        char.append(chr(i))
    for i in range(97, 123): # 添加a——z的小写字母
        char.append(chr(i))

    # 生成随机数字或字母
    def rndChar(self):
        return self.char[random.randint(0, len((self.char)))]

    def paintEvent(self,event):
        painter=QPainter(self) # 创建绘图对象
        painter.drawRect(10,10, 100, 30)
        # 绘制干扰线(此处设置20条干扰线,可以随意设置)
        painter.setPen(Qt.red)
        for i in range(20):
            painter.drawLine(
                    random.randint(10, 110), random.randint(10, 40),
                    random.randint(10, 110), random.randint(10, 40)
            )
        painter.setPen(Qt.green)
        # 绘制噪点(此处设置500个噪点,可以随意设置)
        for i in range(500):
            painter.drawPoint(random.randint(10, 110), random.randint(10, 40))
        painter.setPen(Qt.black) # 设置画笔
        font=QFont() # 创建字体对象
        font.setFamily("楷体") # 设置字体
        font.setPointSize(15) # 设置文字大小
        font.setBold(True) # 设置粗体
        font.setUnderline(True) # 设置下划线
        painter.setFont(font)
        for i in range(4):
            painter.drawText(30 * i + 10, 30,str(self.rndChar())) # 绘制文本

if __name__=='__main__':
    import sys
    app=QApplication(sys.argv) # 创建窗口程序
    demo=Demo() # 创建窗口类对象
    demo.show() # 显示窗口
    sys.exit(app.exec_())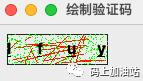
Example: Drawing a picture
from PyQt5.QtWidgets import *
from PyQt5.QtGui import QPainter,QPixmap

class Demo(QWidget):
    def __init__(self,parent=None):
        super(Demo,self).__init__(parent)
        self.setWindowTitle("绘制Logo图片") # 设置窗口标题
        self.resize(300,120) # 设置窗口大小

    def paintEvent(self,event):
        painter=QPainter(self) # 创建绘图对象
        # painter.drawPixmap(10, 10, QPixmap("./resource/logo.png")) # 默认大小
        painter.drawPixmap(10, 10, 290, 110, QPixmap("./resource/logo.png")) # 指定大小

if __name__=='__main__':
    import sys
    app=QApplication(sys.argv) # 创建窗口程序
    demo=Demo() # 创建窗口类对象
    demo.show() # 显示窗口
    sys.exit(app.exec_())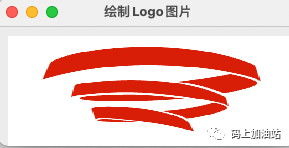
Finish
Get on the gas station
come on together
Long press to scan the code to follow