This chapter uses Blog Garden - News Crawling to explain the introductory use of scrapy, which is divided into three parts: upper, middle and lower.
1. Scrapy installation
When pip is installed, it is downloaded from a foreign server. There is a very common mirror in China, which can improve the download speed.
pip install -i https://pypi.douban.com/simple scrapy
In some windows environments, there will be an error when installing scrapy, and the installation error will be handled in the following way
https://www.lfd.uci.edu/~gohlke/pythonlibs/
This URL can directly download the package that will install the error. To install scrapy, you need to download the following 4. When downloading, you need to select the version of the corresponding interpreter
lxml twisted pywin32 scrapyGo to the download directory and install it in the following way. If packages such as lxml have their dependencies, they will also be downloaded and installed automatically through the mirror.


 The scrapy package is installed last because it depends on the previous 3 packages
2. Create a project using scrapy
Command line input:
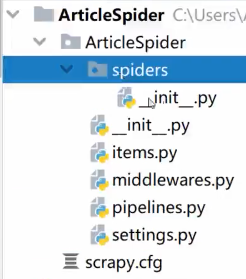
scrapy startproject ArticleSpider
scrapy startproject 项目名称

Don't rush to understand the role of each file first, it will be introduced later, the command line input:
scrapy genspider cnblogs news.cnblogs.com
scrapy genspider 爬虫名称 抓取的网址

Crawlers belong to projects, and there can be multiple crawlers under a project, which is similar to the relationship between a Django project and its app.
3. Debug the code
scrapy start
The crawler program started through the command line cannot be debugged
scrapy crawl 爬虫名with run log
scrapy crawl 爬虫名 --nolog without run log
English translation of crawl: crawl
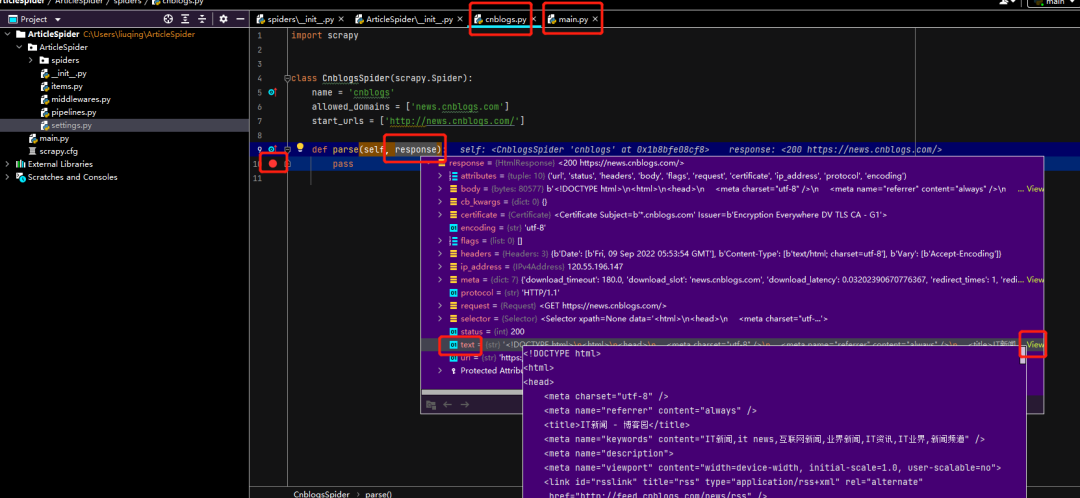
Create a new main.py in the project directory (name is taken by yourself) with the following content, and then you can right-click to debug the crawler
from scrapy.cmdline import execute
import sys
import os

sys.path.append(os.path.dirname(os.path.abspath(__file__)))
execute(["scrapy","crawl","cnblogs"])
Four. Focus: response
When running main.py and entering the parse method, start_urlthe URL inside has already been crawled.

The response object can use xpath, css selectors to extract elements
title_list = response.css('.link-title')
title_list = response.xpath('//a[contains(@class,"link-title")]')
Five. Key: parse() method
parse()The mission of the method is to parse the url in the start URL (start_url), and send these urls to scrapy to download; at the same time, parse the url of the next page and give it to scrapy to download
In this way, the url of each page and the url of the specific content in each page are extracted layer by layer and handed over to scrapy to download.
import scrapy
from scrapy import Request
from urllib import parse


class CnblogsSpider(scrapy.Spider):
    name = 'cnblogs'
    allowed_domains = ['news.cnblogs.com']
    start_urls = ['http://news.cnblogs.com/']

    def parse(self, response):
        """
        1.获取新闻列表页中的新闻url并交给scrapy进行下载后调用相应的解析方法
        2.获取下一页的url交给scrapy进行下载,然后交给parse()方法进行提取新闻url来下载
        """
        post_nodes = response.css("#news_list .news_block")
        for post_node in post_nodes:
            image_url = post_node.css("div.entry_summary img::attr(src)").extract_first("")
            post_url = post_node.css("div.content h2 a::attr(href)").extract_first("")  # 新闻页标题:具体详情的url
            yield Request(url=parse.urljoin(response.url,post_url),  # 这个请求会立马交给scrapy下载;
                          meta={"front_image_url":image_url},        # meta用于传参
                          callback=self.parse_detail)                # 下载好后回调真正提取数据的方法

        # 提取下一页并交给scrapy下载
        next_url = response.xpath('//div[@class="pager"]//a[contains(text(),"Next >")]/@href').extract_first("")
        yield Request(url=parse.urljoin(response.url,next_url),callback=self.parse)


    def parse_detail(self,response):  # response参数是scrapy自动传递进来的,已经下载好的页面
        pass
Next section: Introducing the parsing details page