
-
Overview of Database Storage Services
-
Database service installation and deployment
-
Database service basic management
-
Advanced management of database services
-
Database service backup and recovery
-
Database enterprise project combat
Overview of Database Storage Services
Today, database systems have become an important part of web applications on various dynamic websites.
Because very sensitive and confidential data may be stored in the database, it is especially important to protect the database.
To extract or store data from the database, you must go through the steps of connecting to the database, sending a legitimate query, getting the result, closing the connection, etc.
Currently, the most common query language that can accomplish this series of actions is the Structured Query Language (SQL).
Introduction to Database Service Concepts
Database (database DB) is a warehouse for storing data. It has the following characteristics in the actual application process:
-
A database organizes, stores and manages data according to data structures;
-
The database can manage and store data in a long-term and efficient manner;
-
The purpose of a database is to be able to store (write) and provide (read) data

Database service classification description
Databases are divided into three major types:
-
Relational Database:
The complex data structure is reduced to a simple binary relationship, that is, a two-dimensional table form (two-dimensional table); it will focus on the persistence of data storage, but the storage efficiency is low;
This type of database service is similar to the way of storing data in excel tables, and mostly uses SQL language for operation management;
Four-layer structure information of relational database:

Common relational database applications:

The ultimate pursuit of relational databases: the security of data storage, but the performance of data storage and reading will be lost to a certain extent.
-
Non-relational database:
A data structure without a specific model, referred to as NoSQL (Not Only SQL) in English, means "more than just SQL", and pays more attention to the efficiency of data reading;
Common non-relational database applications:

The ultimate pursuit of non-relational databases: the efficiency of data storage, but to a certain extent, the security of data storage will be sacrificed.
-
Enterprise new database:
It belongs to the database service developed and designed by Chinese people in recent years, which can meet the needs of many domestic high-concurrency website data storage and reading services;
Common new database applications:


Data information source reference: https://www.modb.pro/dbRank
Database service installation and deployment
Database service installation method
-
Database Service Installation Methods in Different System Environments-Linux
Deploy and install the Mariadb database service program:
[root@xiaoQ ~]# yum install -y mariadb-server mariadb
-- mariadb-server:服务端程序,主要用于提供数据库存储服务;
-- mariadb:客户端程序,主要用于管理应用数据库存储服务;

# 数据库服务安装后,会在系统中产生哪些重要数据信息
[root@xiaoQ ~]# rpm -ql mariadb-server
/etc/logrotate.d/mariadb
-- 此文件可以实现数据库服务日志切割功能
/etc/my.cnf.d/server.cnf
-- 此文件时数据库服务功能配置文件
/usr/bin/mysql_install_db
-- 此命令可以实现数据库服务初始化操作
/var/lib/mysql
-- 存放数据库中的所有数据信息,以文件方式进行存储保存
/var/log/mariadb
/var/log/mariadb/mariadb.log
-- 数据库服务日志文件,可以方便管理人员排查数据库服务异常问题
/var/run/mariadb
-- 此目录会存储数据库服务进程文件
Start and run the Mariadb database service program:
[root@xiaoQ ~]# systemctl start mariadb
[root@xiaoQ ~]# systemctl enable mariadb
-- 设置开机自动启动

# 检查数据库服务运行状态
[root@xiaoQ ~]# netstat -lntup|grep 3306
Login to manage Mariadb database service program
[root@xiaoQ ~]# mysql
Welcome to the MariaDB monitor.  Commands end with ; or \g.
Your MariaDB connection id is 2
Server version: 5.5.68-MariaDB MariaDB Server

Copyright (c) 2000, 2018, Oracle, MariaDB Corporation Ab and others.

Type 'help;' or '\h' for help. Type '\c' to clear the current input statement.

MariaDB [(none)]>
Database service exception troubleshooting method:
[root@xiaoQ ~]# grep -i error /var/log/mariadb/mariadb.log
Unable to log in to the database after starting the run:
[root@xiaoQ ~]# mysql
ERROR 1045 (28000): Access denied for user 'root'@'localhost' (using password: NO)
The above problems are generally caused by database initialization problems or database file corruption, as well as directory permission problems;
For DBA managers, the processing method can delete the initialized database directory and then re-initialize the database;
Analysis of the main reasons for such problems:
-
database initialization problem
-
directory permission issue
-
System database file corruption
-
User password is incorrect
-
The authorized host range is incorrect
Today I will share with you a complete set of database learning materials, [MySQL installation and deployment video + MySQL project actual combat video + MySQL learning document notes] , a package covering 99% of the core technology points.
MySQL installation and deployment video

MySQL study documentation notes
MySQL Tutorial Directory
-
MySQL Data Services Course Introduction
-
MySQL data service overview description
-
MySQL data service installation and deployment
-
MySQL data service password settings
-
MySQL data service user management
-
MySQL data service connection login
-
MySQL Data Services Character Encoding
-
MySQL data service basic operations - library related operations
-
MySQL data service basic operations - table related operations
-
MySQL data service statement classification
-
Get help with MySQL operation commands
-
MySQL data information operation management
-
MySQL data backup and recovery method
-
MySQL data backup and recovery practice
-
Incremental recovery of MySQL data backup
-
MySQL data backup and recovery case
-
Knowledge of MySQL data services
Database Services - MySQL Essay
[PDF document + video tutorial collection]
Free for the first 200 people only
It's time to fight fast!
Scan the QR code above and note [Database Service]
Sent to you as soon as possible! ! !
For network security personnel to deal with the inability to log in:
Method 01: Restore the virtual host snapshot to the system initialization state and reinstall it;
Method 02: Stop the database service and reinstall the original database service
[root@xiaoQ ~]# yum reinstall mariadb mariadb-server -y
MySQL database service installation and deployment methods:
The MySQL database can be installed and deployed in a variety of installation methods, but it is recommended to use the yum method for installation and deployment;
Installing MySQL database in yum mode is much simpler than rpm installation. The installation principle of yum mode is after executing the yum installation command;
It will automatically download the MySQL database rpm package of the corresponding name from the yum source address, and then install it on the system, and automatically solve the dependency problem between various software packages.
This is a great way to install software, not just for MySQL, but other software as well.
Installation environment basic optimization operation:
# 关闭selinux:
setenforce 0
getenforce
sed -i 's#SELINUX=enforcing#SELINUX=disabled#g' /etc/selinux/config

# 卸载mariadb依赖包
[root@xiaoQ ~]# rpm -qa|grep mariadb
mariadb-libs-5.5.68-1.el7.x86_64
-- 查找已经安装的mariadb的包
[root@xiaoQ ~]# yum remove mariadb-libs -y
-- 卸载系统已经安装的mariadb依赖包

# 下载mysql安装源
[root@oldboy ~]# wget https://dev.mysql.com/get/mysql80-community-release-el7-1.noarch.rpm
[root@oldboy ~]# rpm -ivh mysql80-community-release-el7-1.noarch.rpm

# 查看安装的mysql源
[root@oldboy ~]# rpm -ql mysql80-community-release
/etc/pki/rpm-gpg/RPM-GPG-KEY-mysql
/etc/yum.repos.d/mysql-community-source.repo
/etc/yum.repos.d/mysql-community.repo
Deploy and install the MySQL database service program:
[root@oldboy ~]# yum install mysql-community-server -y
Start and run the MySQL database service program:
[root@oldboy ~]# mysqld --initialize-insecure --user=mysql

# 检查数据库服务运行状态
[root@oldboy ~]# systemctl start mysqld
[root@oldboy ~]# netstat -lntup|grep 3306
tcp6       0      0 :::33060               :::*                    LISTEN      3267/mysqld
tcp6       0      0 :::3306                 :::*                    LISTEN      3267/mysqld
Log in to manage the MySQL database service program:
[root@oldboy lib]# mysql
Welcome to the MySQL monitor.  Commands end with ; or \g.
Your MySQL connection id is 8
Server version: 8.0.27 MySQL Community Server - GPL
Type 'help;' or '\h' for help. Type '\c' to clear the current input statement.
mysql>
MySQL database deployment reference link: https://www.cnblogs.com/oldboy666/p/15559963.html
-
How to install database services in different system environments-windows
Database service software program download:
MySQL software download address: https://dev.mysql.com/downloads/mysql/
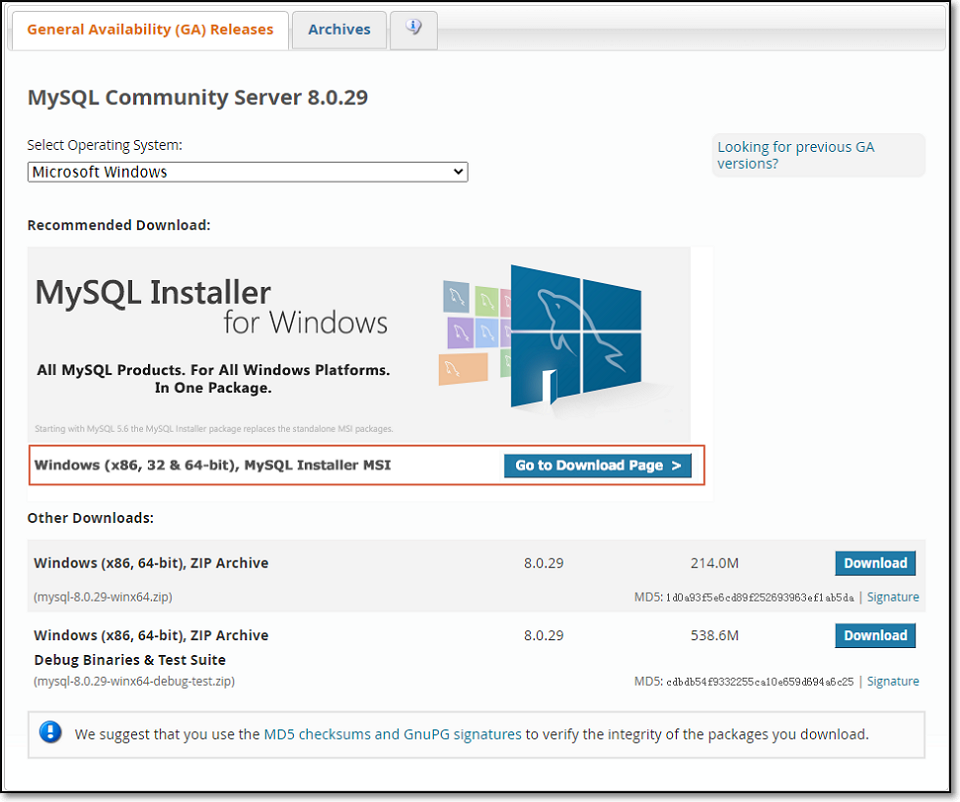
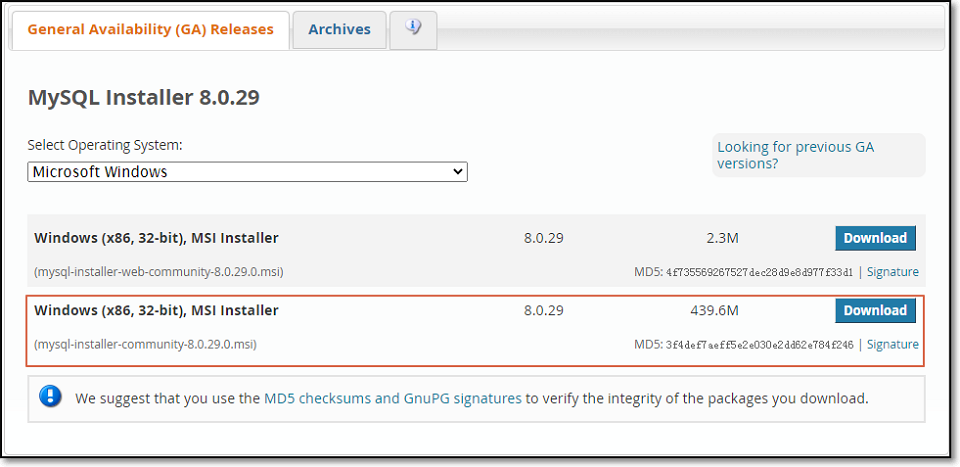
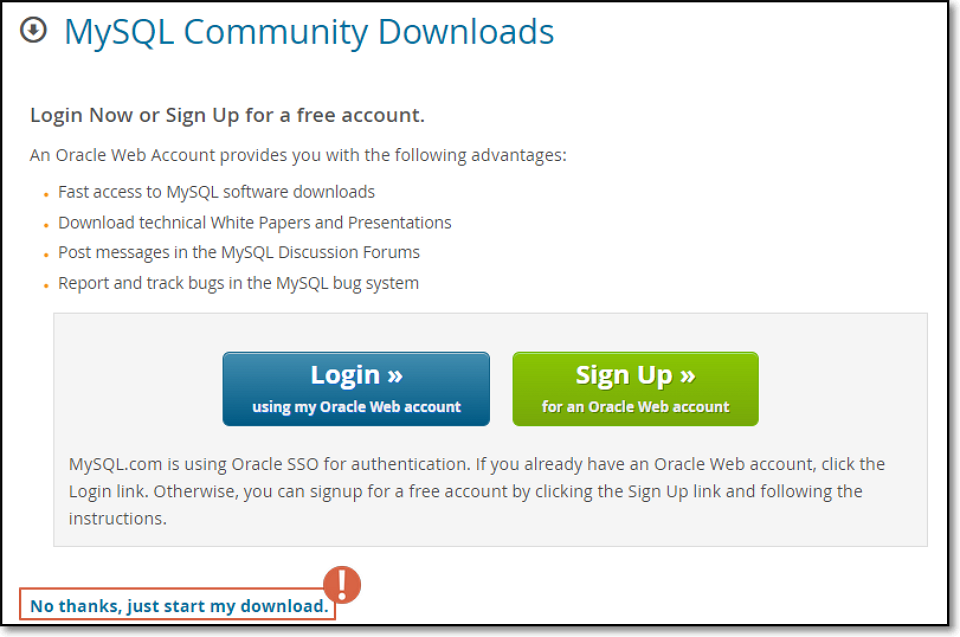
After the package is downloaded, it can be installed and deployed in a fool-proof manner.
Database service environment variable configuration:
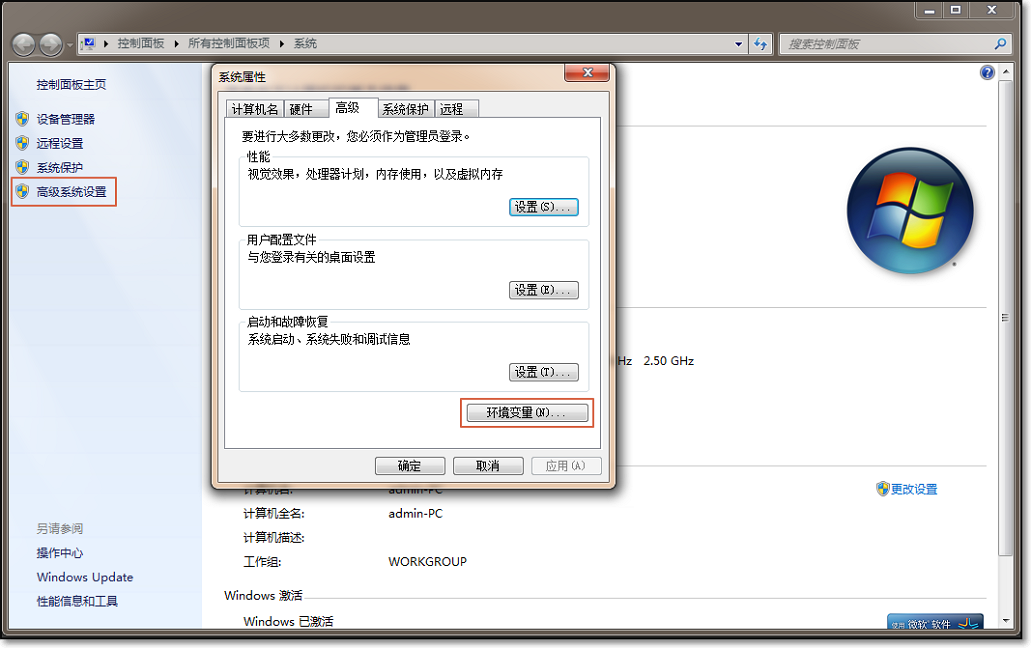

# 在PATH信息后添加以下信息:
;程序所在路径信息\bin
-- 设置数据库服务中bin目录路径信息
Database service password settings
Configure a login password for Mariadb and use the new password to log in to the database
# 设置root密码:
[root@oldboy ~]# mysqladmin password 'oldboy123'
-- 表示第一次登录设置密码信息

# 进行登录测试:
[root@oldboy ~]# mysql -uroot -p
Enter password:
MariaDB [(none)]> quit
Change the login password for Mariadb and use the new password to log in to the database
[root@oldboy ~]# mysqladmin -uroot -poldboy123 password 'oldboy'
-- 将原有oldboy123密码 改为oldboy

# 进行测试登录
[root@oldboy ~]# mysql -uroot -poldboy
Welcome to the MariaDB monitor.  Commands end with ; or \g.
MariaDB [(none)]>
Reset the login password for Mariadb and use the new password to log in to the database
Stop the database service and check if the database service is stopped:
[root@oldboy ~]# systemctl stop mariadb
[root@oldboy ~]# netstat -lntup|grep 3306
Restart the database service and set the startup mode to ignore the authorization table startup mode:
[root@oldboy ~]# /bin/sh /usr/bin/mysqld_safe --basedir=/usr --skip-grant-table --skip-network &
-- skip-grant-table 表示忽略授权表启动
--skip-network 忽略网络通讯方式启动

# 进行测试服务是否启动
[root@oldboy ~]# ps -ef|grep mysql
Log in to the database system in a password-free manner and reset the root user password information:
[root@oldboy ~]# mysql
MariaDB> UPDATE mysql.user SET password=PASSWORD("oldboy123") WHERE user='root' and host='localhost';
MariaDB> flush privileges;
--刷新到磁盘生效
MariaDB> quit
Restart the database server program:
# 杀死已经运行的数据库服务进程信息
[root@oldboy ~]# pkill mysqld
[root@oldboy ~]# ps -ef|grep mysql

# 重新启动数据库服务
[root@oldboy ~]# systemctl start mariadb
[root@oldboy ~]# netstat -lntup|grep 3306

# 重新登录进行测试
[root@oldboy ~]# mysql -uroot -poldboy123
Database service user management
01 Query database service user information
Go to the database environment and execute the following SQL statement to query:
MariaDB [(none)]> select user,host from mysql.user;

User information composition: user name@host name/host address range
主机范围就是允许哪些机器连接。连接的机器的iP地址,必须再允许的主机范围,否则不允许连接
主机名称或主机地址范围表示可以以什么样的方式,来使用数据库管理用户登录数据库系统;
常见的有两种方式:
-
第一种方式:以本地登录方式进行登录数据库系统;
-
第二种方式:以远程登录方式进行登录数据库系统;
查看当前登录系统的用户信息:
MariaDB [(none)]> select user();  -- whoami
+--------------------+
| user()                 |
+--------------------+
| root@localhost |
+--------------------+
1 row in set (0.00 sec)
02 删除数据库服务用户信息
进入到数据库环境中,执行以下SQL语句进行删除:
MariaDB [(none)]> drop user 'user'@'主机域'
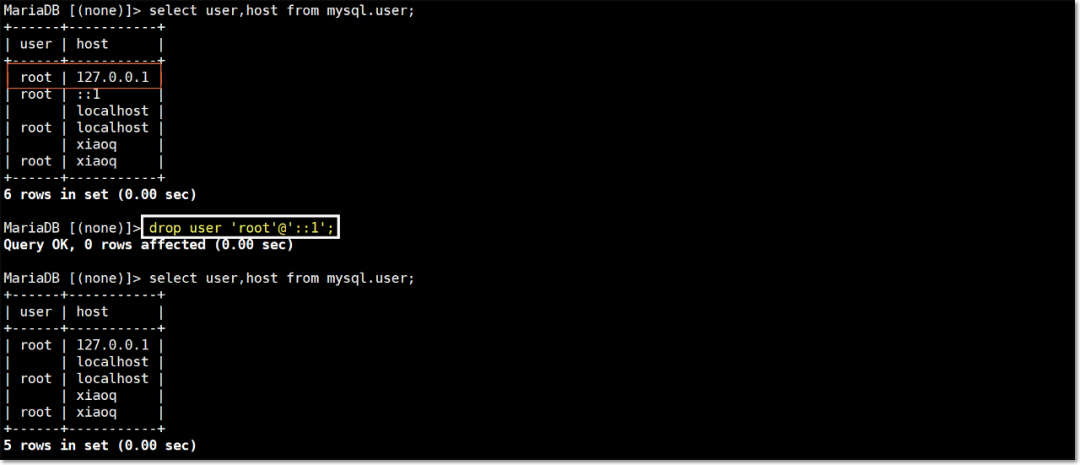
测试练习:删除以下用户信息
''@'localhost'
''@'xiaoq'
'root'@'xiaoq'
实现最终只保留两个管理员用户:
MariaDB> select user,host from mysql.user;
+------+-----------+
| user | host        |
+------+-----------+
| root | 127.0.0.1|
| root | localhost|
+------+-----------+
03 创建数据库服务用户信息
进入到数据库环境中,执行以下SQL语句进行创建:
MariaDB> create user blog@'192.168.56.%' identified by 'oldboy123';

使用create创建数据库服务用户信息,创建的用户默认是没有数据库的管理权限的。
在进行数据库服务对应管理用户创始时,建议一个数据库对应一个管理人员,以免多个管理员操作管理相同数据库产生冲突;
数据库服务——MySQL精讲
【PDF文档+视频教程合集】
免费领取,仅限前 200 名
拼手速的时间到了!
扫描上方二维码,备注【数据库服务】
第一时间发给你!!!
在进行用户信息创建时,具有多种用户主机域的设置方法:
方法一:设置数据服务管理用户只能本地登录数据库系统,主机域设置方法:
root@localhost
-- localhost:表示只能通过本地主机登录数据库系统
方法二:设置数据服务管理用户可以远程登录数据库系统,主机域设置方法:
[email protected]
-- 192.168.30.101:表示可以在192.168.30.101主机上远程登录管理数据库系统
在企业实际网站架构中,会有大量的集群服务器,大量的应用服务器都会连接后端的数据库服务,因此设置远程连接主机域方法有:
-
方法一:授权单个主机进行访问:
[email protected]
-
方法二:授权一个网段进行访问:
# 方式一:书写方法(企业常用)
[email protected]/24
-- 授权一个网段主机均可远程登录数据库服务,表示这个网段中192.168.30.1~192.168.30.254均可访问

# 方式二:书写方法(企业常用)
[email protected].%
-- 授权一个网段主机均可远程登录数据库服务,表示这个网段中192.168.30.1~192.168.30.254均可访问

# 方式三:书写方法
[email protected].%
-- 授权一个更大网段主机均可远程登录数据库服务,表示这个网段中192.168.0.1~192.168.255.254均可访问

# 方式四:书写方法
root@%
-- 授权任意主机都可以远程登录数据库服务
04 设置数据库服务用户授权
通过理解数据库内部结构,可以知晓,数据库是一个很大的仓库,里面包含多个库,每个库中有多个表,每个表中有多个行和列;
当然作为数据库服务管理用户,要管理的不仅仅是库和表,其实还有视图、触发器、存储过程等和数据库有关的信息;
因此,在某些时候创建完用户信息,还需要对创建的用户进行授权,就是让不同用户拥有管理库和表对象的权限。
进入到数据库环境中,执行以下SQL语句进行设置:
MariaDB[(none)]> grant  all    on     *       .      *       to     blog@'192.168.30.%';
授权   权限         库信息     表信息           用户       主机域
当用户授权操作完毕后,可以对授权的用户进行查看确认:
MariaDB [(none)]> show grants for blog@'192.168.30.%';

授权操作实践过程:
#  数据库用户权限设置实践
[root@oldboy ~]# mysql -uroot -poldboy123
MariaDB [(none)]> grant all on *.* to blog@'192.168.56.%';
-- 授权blog作为管理员,但是不具有创建用户权利
MariaDB [(none)]> flush privileges;
-- blog@'192.168.56.%' 权限,就相当于管理员,但是缺少一个创建用户权限

# 数据库用户权限设置查看
MariaDB [(none)]> show grants for blog@'192.168.56.%';
--再查看发现权限变化ALL PRIVILEGES,重新登录数据库可以对数据库操作。
数据库服务中可以授权的所有权限信息查看:
MariaDB [(none)]> show privileges;
输出展示的信息表示内容:

核心重要授权权限总结:
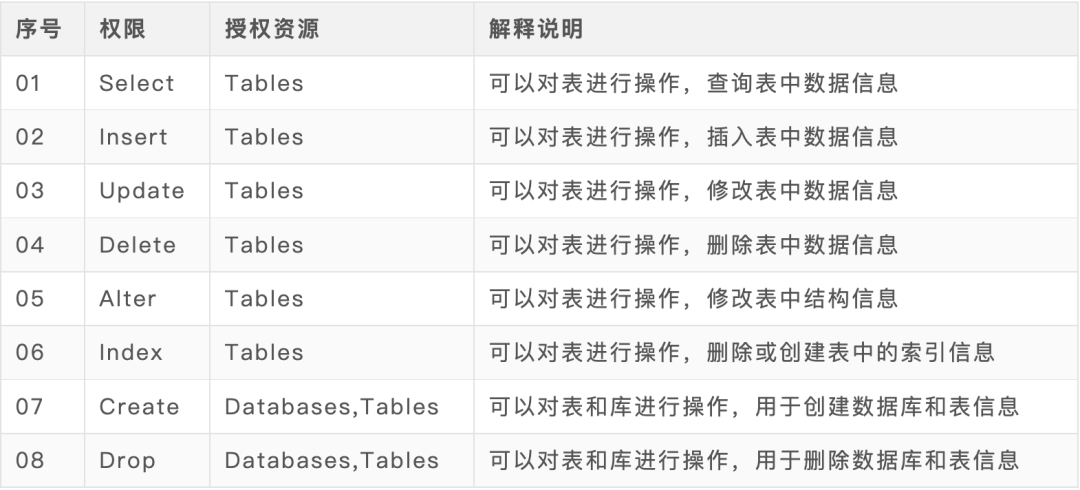
all privileges(all)包含查看的所有权限信息,但是唯独缺了Grant option,不能创建用户。
企业生产情况授权思路:
企业生产库表授权一定要更小,最小的授权最大的安全,给业务用户常规授权,包含对内容的增删改查;

# 生产常规授权实践
MariaDB [(none)]> create database oldboy;
-- 创建数据库操作
MariaDB [(none)]> create user bbs@'192.168.56.%' identified by '123';
-- 创建管理数据库用户
MariaDB [(none)]> grant insert,select,update,delete on oldboy.* to bbs@'192.168.56.%';
-- 进行管理用户授权

# 授权等价于root管理用户
MariaDB [(none)]> grant all on *.* to oldboy@'localhost' identified by 'oldboy123' with grant option;
MariaDB [(none)]> flush privileges;
数据库服务连接管理
当数据服务中用户创建设置完毕后,就可以实现利用指定用户身份连接登录管理数据服务,具体连接操作如下:
-
执行命令操作连接登录数据库服务:
# 本机连接数据库服务:
[root@oldboy ~]# mysql -ublog -poldboy123
[root@oldboy ~]# mysql -uroot -poldboy123
-- 以上连接方式等价于,以下长格式命令登录方式
[root@oldboy ~]# mysql -uroot -poldboy123 -hlocalhost -P3306 -S /var/lib/mysql/mysql.sock
--- 进行本地连接时,hlocalhost -P3306 -S /var/lib/mysql/mysql.sock可以省略

# 远程连接数据库服务:
[root@oldboy ~]# mysql -uroot -poldboy123 -h192.168.30.101 -P3306 -S /var/lib/mysql/mysql.sock
-
软件终端操作连接登录数据库服务:
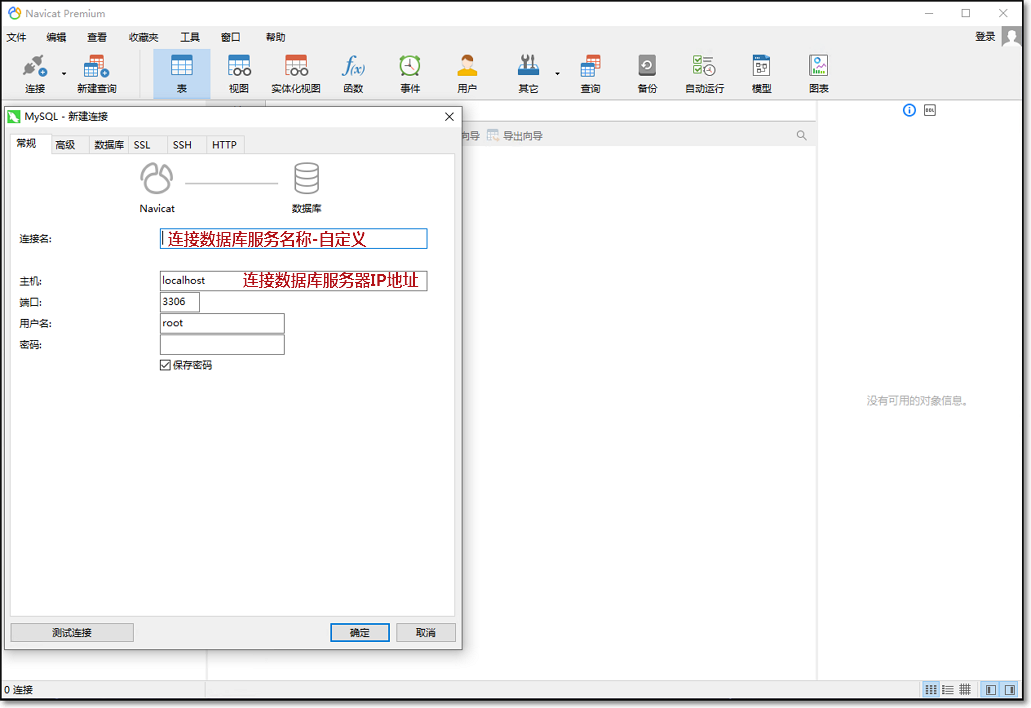
利用Navicat数据库客户端远程软件,实现远程连接管理数据库服务;
数据库远程连接客户端下载链接:
软件激活步骤参考:https://zhuanlan.zhihu.com/p/404086701
Navicat软件基础使用:
01 需要建立远程连接数据库服务;
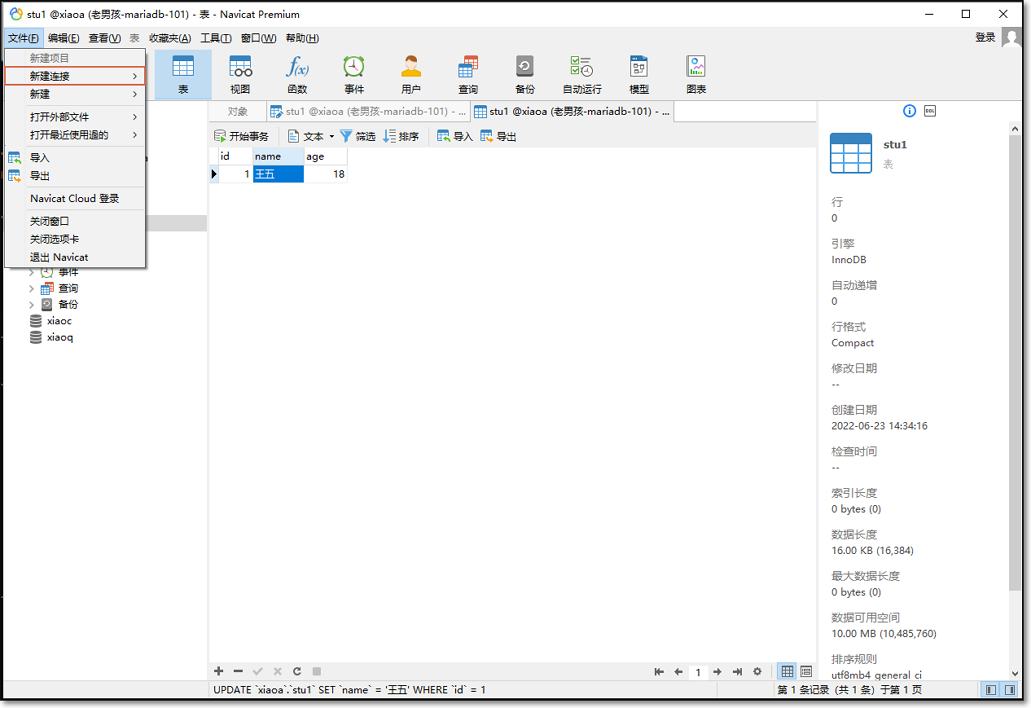
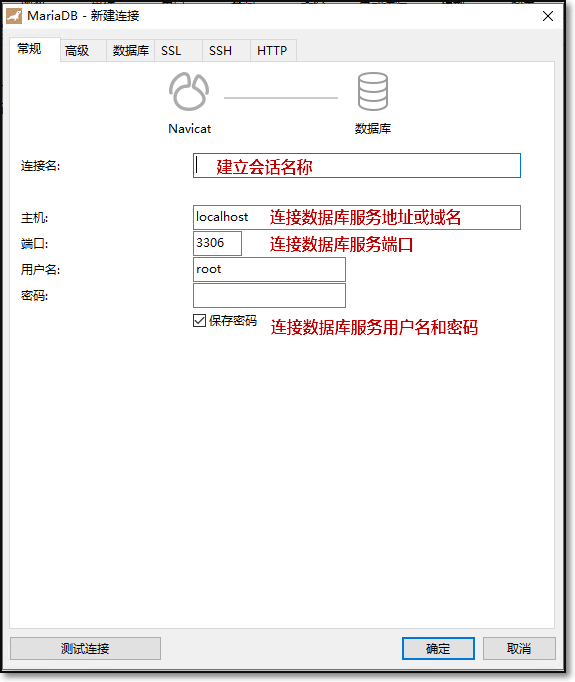
过加密技术成密文,哪怕信息被截获窃取了,也无法识别。
在连接数据库服务时,选择好指定的数据库服务类型,例如:mysql mariadb oracle等。
02 连接建立后进行基本操作管理;
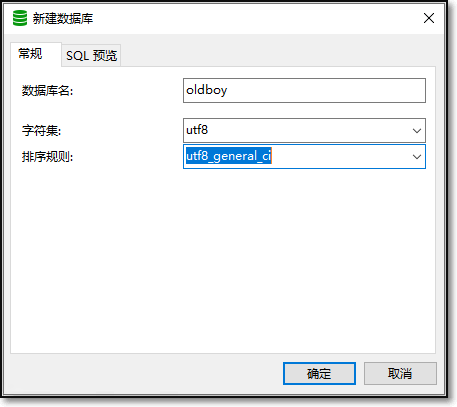
可以实现创建新的数据库;
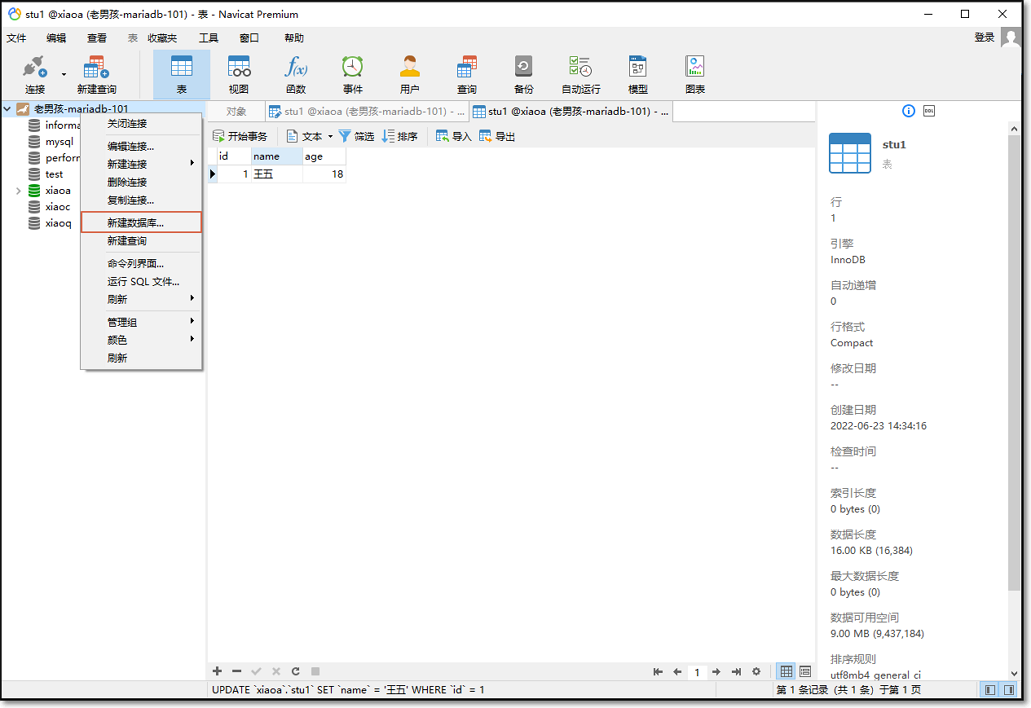
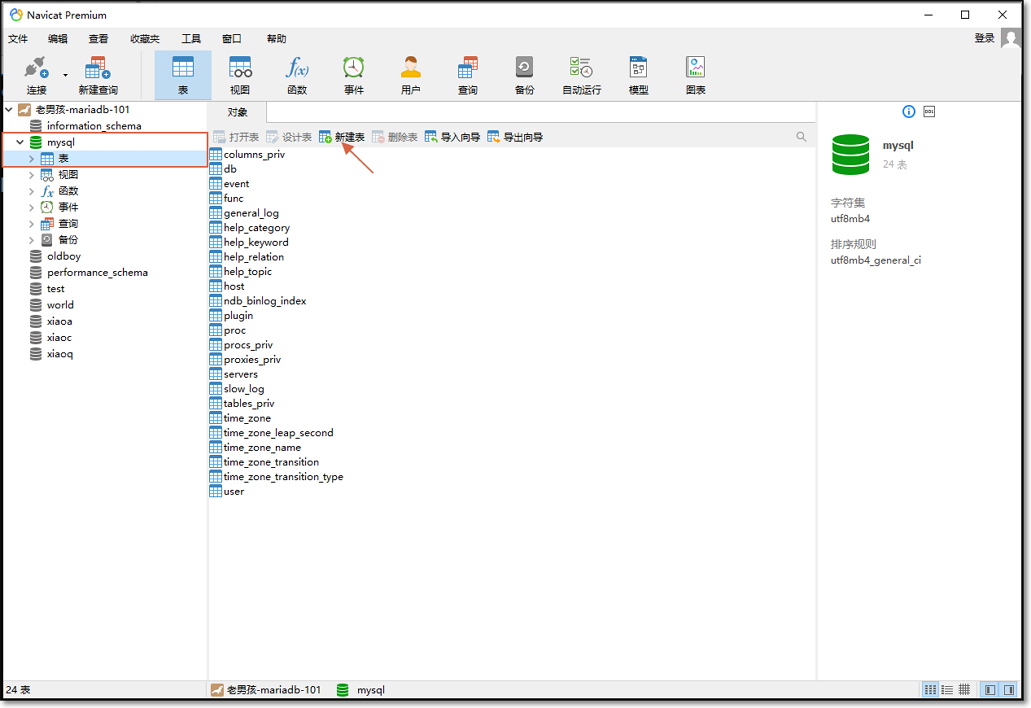
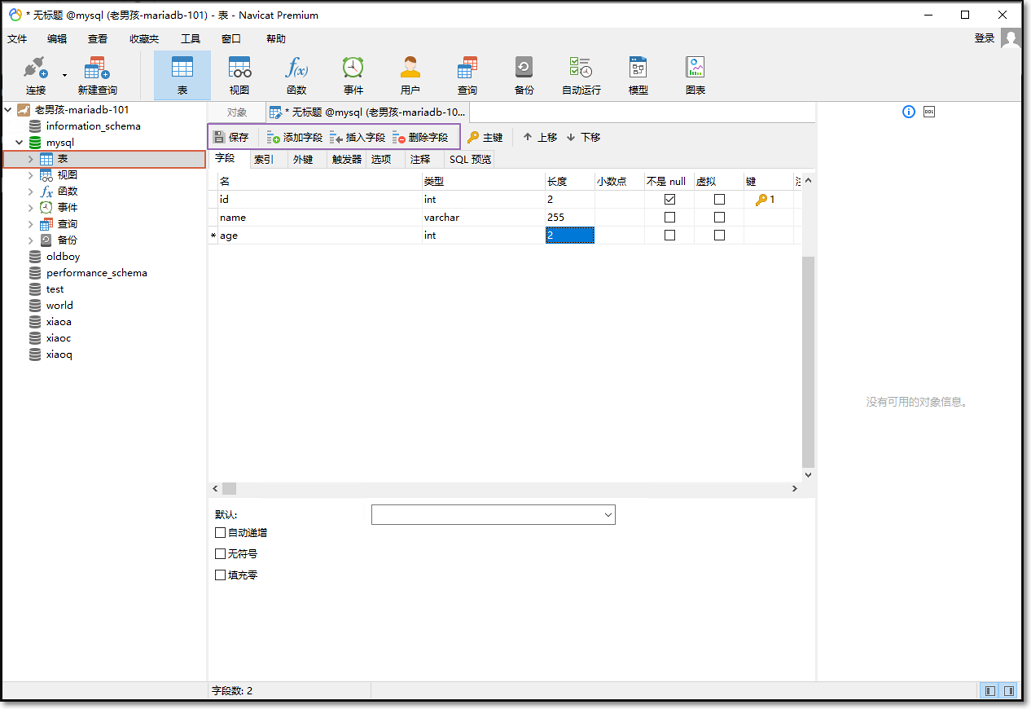
可以实现创建新的数据表;
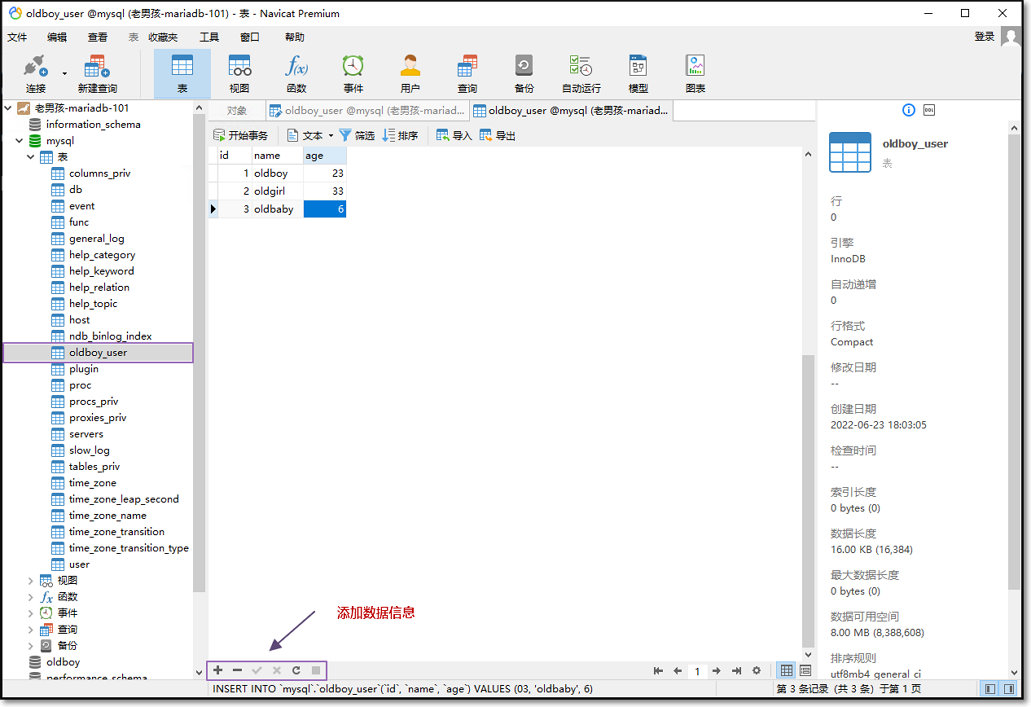
可以实现创建新的数据项;
数据库中文乱码修复
输入中文信息为什么会出现乱码:
系统字符编码概念解释:
计算机,不能直接存储⽂字,存储的是编码。计算机只能处理⼆进制的数据。
对于其它数据,⽐如:0-9、 a-z、 A-Z,这些字符,我们可以定义⼀套规则来表示。
假如:A-110表示, B-111表示等。
-
ASCII码:00000000 = 0-255
美国发布的,⽤1个字节(8位⼆进制)来表示⼀个字符,共可以表示2^8=256个字符。
美国的国家语⾔是英语,只要能表示0-9、 a-z、 A-Z、特殊符号。
-
ANSI编码:
每个国家为了显示本国的语⾔,都对ASCII码进⾏了扩展。
⽤2个字节(16位⼆进制)来表示⼀个汉字,共可以表示2^16= 65536个汉字。
中国的ANSI编码是GB2312编码(简体),对6763汉字进⾏编码,含600多特殊字符。另外还有GBK(简体)。
⽇本的ANSI编码是JIS编码,台湾的ANSI编码是BIG5编码(繁体)
-
GBK:
对GB2312进⾏了扩展,⽤来显示罕⻅的、古汉语的汉字。现在已经收录了2.1万左右。并提供了1890个汉字码 位。K的含义就是“扩展”。
-
Unicode编码(统⼀编码):2的32 A 1字节 4字节 2字节=8
⽤4个字节(32位⼆进制)来表示⼀个字符,想法不错,但效率太低。例如,字⺟A⽤ASCII表示的话⼀个字节就够, 可⽤Unicode编码的话,得⽤4个字节表示,造成了空间的极⼤浪费。
A的Unicode编码是:0000 0000 0000 00000000 0000 0100 0000
-
UTF-8(Unicode Transform Format)编码:
根据字符的不同,选择其编码的⻓度。⽐如:⼀个字符A⽤1个字节表示,⼀个汉字⽤2个字节表示。 毫⽆疑问,开发中,都⽤UTF-8编码吧,准没错。
中⽂能够使⽤的字符集两种:
第⼀种:UTF-8
UTF-8是国际通⽤字库,⾥⾯涵盖了所有地球上所有⼈类的语⾔⽂字,⽐如阿拉伯⽂、汉 语、⻦语……
第⼆种:GBK(对GB2312进⾏了扩展)。gb2312 是国标,是中国的字库,⾥⾯仅涵盖了汉字和⼀些常⽤外 ⽂,⽐如⽇⽂⽚假名,和常⻅的符号。 字库规模:UTF-8(字很全) > gb2312(只有汉字)
大部分情况下,作为中国网民用户在向网站服务端进行数据信息存储时,会经常使用到中文字符信息;
但是由于数据库服务系统默认的字符编码设置问题,会导致在识别存储的中文信息时,出现字符乱码问题;
因此,为了能更准确的识别数据库中的中文字符信息,需要对数据库服务配置文件中的字符编码设置进行调整。
配置修改数据库服务配置文件中的默认字符编码设置:
01 查看获取当前数据库默认字符编码信息:
# 查看获取数据库服务默认字符编码
MariaDB [(none)]> show variables like "%character%";

By default, the character encoding of the data stored in the database and the character encoding recognized by the database server is: latin1 encoding.
Simulate the display of Chinese characters in the database of stored Chinese data information:
# 创建新的数据库信息
MariaDB [(none)]> create database xiaoq;
Query OK, 1 row affected (0.00 sec)

# 常看新的数据库编码
MariaDB [(none)]> show create database xiaoq;
+----------+-------------------------------------------------------------------------------------------+
| Database  | Create Database                                                                                              |
+----------+-------------------------------------------------------------------------------------------+
| xiaoq        | CREATE DATABASE `xiaoq` /*!40100 DEFAULT CHARACTER SET latin1 */ |
+----------+-------------------------------------------------------------------------------------------+
1 row in set (0.00 sec)

# 创建新的数据库表信息
MariaDB [(none)]> use xiaoq;
Database changed
MariaDB [xiaoq]> create table a(name char(10));
Query OK, 0 rows affected (0.01 sec)

# 向数据库表中插入数据
MariaDB [xiaoq]> insert into a values("老男孩");
Query OK, 1 row affected, 1 warning (0.00 sec)

# 查看数据库中表的信息
MariaDB [xiaoq]> select * from a;
+--------+
| name |
+--------+
| ???     |
+--------+
1 row in set (0.00 sec)
02 Write and modify the character encoding of the database service configuration file:
# 将数据库服务配置文件进行备份
[root@xiaoQ ~]# cp /etc/my.cnf{,.ori}
-- my.cnf是数据库服务配置文件

# 编辑修改服务配置文件参数信息
[root@xiaoQ ~]# vim /etc/my.cnf
[mysqld]
character-set-server=utf8mb4
-- 设置服务端字符集编码为utf8mb4
03 Write and modify the character encoding of the database customer configuration file:
# 编辑修改客户配置文件参数信息
[root@xiaoQ ~]# vim /etc/my.cnf.d/client.cnf
-- client.cnf是客户端配置文件信息
[client]
default-character-set=utf8mb4

[client-mariadb]
default-character-set=utf8mb4
04 After the configuration is written, restart the database service to view:
# 重启数据库服务程序
[root@xiaoQ ~]# systemctl restart mariadb

# 进入数据库系统检查
[root@xiaoQ ~]# mysql -uroot -poldboy123
MariaDB [(none)]> show variables like "%character%";

Simulate the display of Chinese characters in the database of stored Chinese data information:
# 创建新的数据库信息
MariaDB [(none)]> drop database xiaoq;
MariaDB [(none)]> create database xiaoq;
Query OK, 1 row affected (0.00 sec)

# 常看新的数据库编码
MariaDB [(none)]> show create database xiaoq;
+----------+-------------------------------------------------------------------------------------------+
| Database  | Create Database                                                                                              |
+----------+-------------------------------------------------------------------------------------------+
| xiaoq        | CREATE DATABASE `xiaoq` /*!40100 DEFAULT CHARACTER SET utf8mb4 */ |
+----------+-------------------------------------------------------------------------------------------+
1 row in set (0.00 sec)

# 创建新的数据库表信息
MariaDB [(none)]> use xiaoq;
Database changed
MariaDB [xiaoq]> create table a(name char(10));
Query OK, 0 rows affected (0.01 sec)

# 向数据库表中插入数据
MariaDB [xiaoq]> insert into a values("老男孩");
Query OK, 1 row affected, 1 warning (0.00 sec)

# 查看数据库中表的信息
MariaDB [xiaoq]> select * from a;
+--------+
| name |
+--------+
| 老男孩  |
+--------+
1 row in set (0.00 sec)
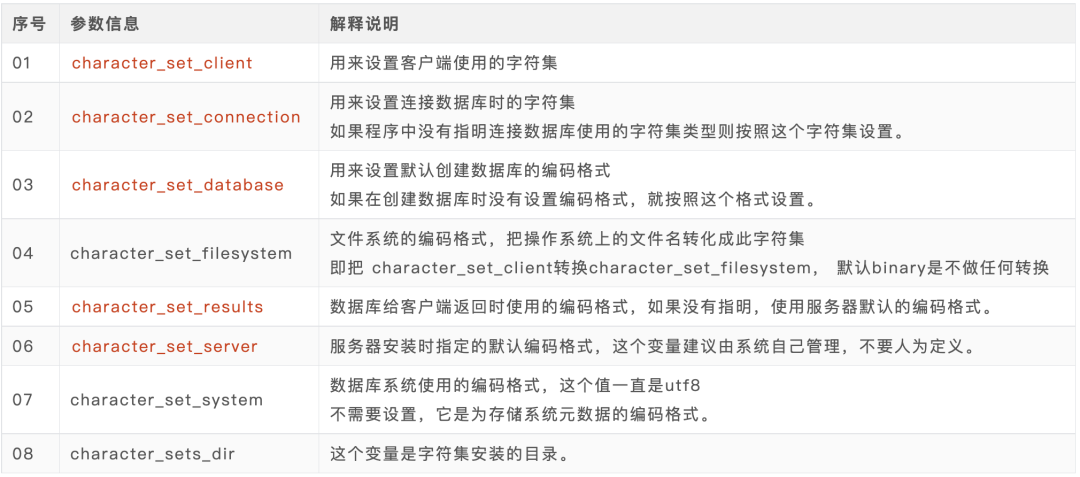
Description of character setting parameter information in the database:
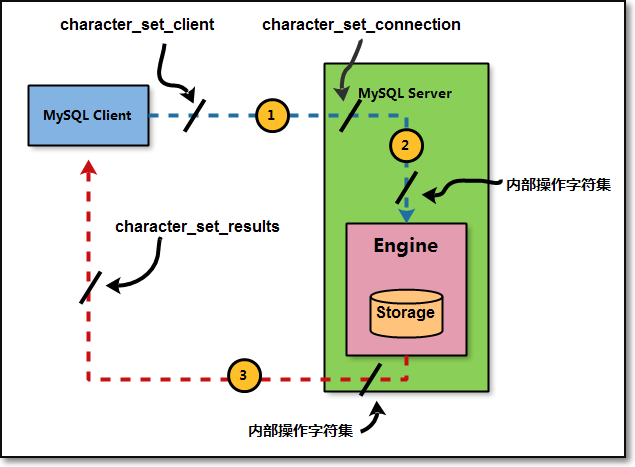
According to the client request database server character set conversion process, you can better understand the above character encoding configuration parameters:
01. When mysql Server receives the request, it converts the request data from character_set_client to character_set_connection;
02. Convert the request data from character_set_connection to the internal operation character set before performing internal operations;
-
Use the CHARACTER SET setting for each data field;
-
If the above value does not exist, use the character set setting value of the corresponding data table;
-
If the above value does not exist, use the character set of the corresponding database to set the value;
-
If the above value does not exist, use character_set_server to set the value;
03. Finally convert the operation result from the internal operation character set to character_set_results
Database Services - MySQL Essay
[PDF document + video tutorial collection]
Free for the first 200 people only
It's time to fight fast!
Scan the QR code above and note [Database Service]
Sent to you as soon as possible! ! !